- Overview
- How to Enable the Sales Notifications Module in Your Store?
- How to Create or Edit the Content of Your Sales Notifications?
- Sales Notifications > Styling Options
- How to Set Sales Notification’s Display Duration and Gap?
- How to Enable Sales Notifications for Selected Order Statuses?
- Sales Notifications > Sound Options
- Resetting Sales Notifications Plugin Settings
Overview #
Giving social proof helps businesses sail well in the competitive market. And Sales Notifications plugin by Booster is a great aid when it comes to online businesses. It lets you showcase proof of purchase to your customers in real-time.
Using this plugin with your eCommerce store, you can display a notification (with all possible details that do not breach your customers’ privacy) each time a product is sold.
What Does the Sales Notifications Plugin Do? #
- It adds a well-designed sales notification to your site.
- You may set one or multiple order statuses for which this notification should be displayed to your users.
- The plugin lets you display the purchased product’s title, its price, its link, and duration from the time it was sold. You can also display the buyer’s name, city, and country if you wish.
- WooCommerce store owners can enable sound with the sales notifications.
- You can show or hide the purchased product’s image with the notification.
- It allows you to set the background and text color for your sales notifications.
- You can add details like display position, devices, display effect, and hidden effect in Sales Notifications Plugin’s settings.
- You may define the duration for which this notification should be visible to your users.
- It lets you keep a gap (in seconds) between 2 notifications.
An Example Sales Notification #
On an Archive Page #
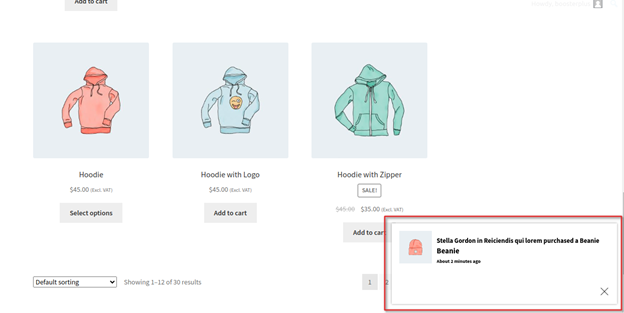
On a Single Page #

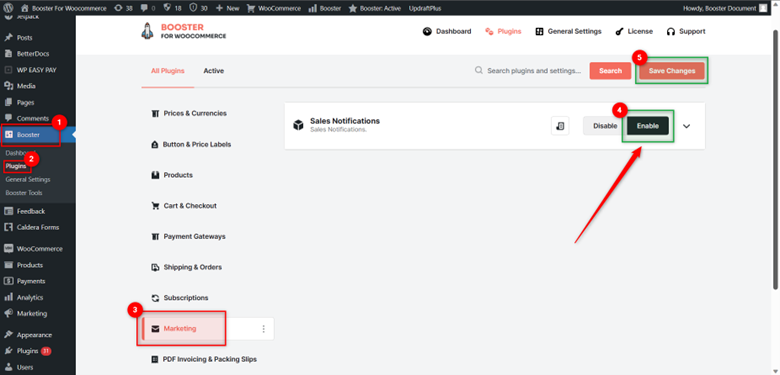
How to Enable the Sales Notifications Module in Your Store? #
Note: Download, install, and activate Booster for WooCommerce to get started with this Module in your store.
- Go to your WordPress site dashboard.
- Navigate to Booster > Plugins.
- Open the options available in the Marketing category (All Plugins tab).
- For the Sales Notifications plugin in this section, toggle the button towards Enable.
- Click the Save Changes button.
Now, you can start editing plugin settings to customize Sales Notifications as per your needs.
How to Create or Edit the Content of Your Sales Notifications? #
Sales Notification, created using this Booster for WooCommerce module, will appear in your store/site for all users as a notification. Learn how to set text, image, display position, and target devices for the same in the next few steps:
- Go to Booster > All Plugins > Marketing > Sales Notifications.
- Expand the Sales Notifications
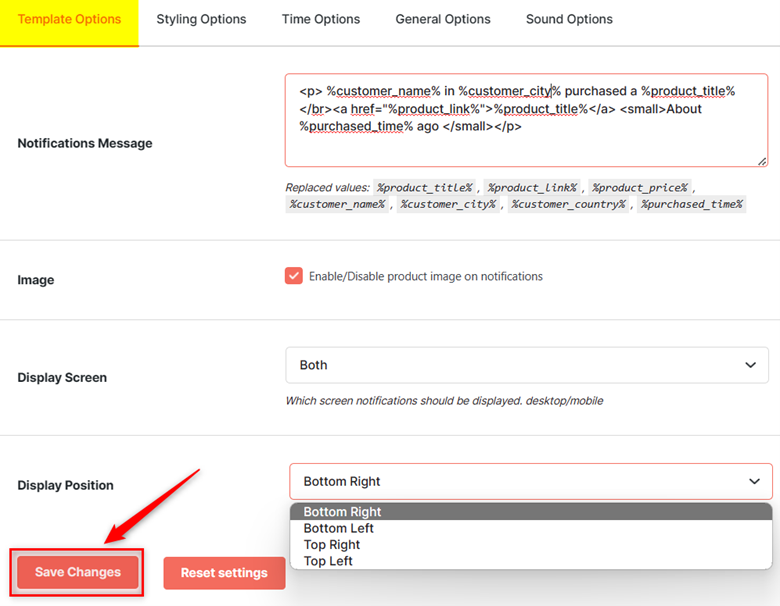
- Click the Template Options
- Add the message to be displayed in the Notifications Message text field. You can add the following variables in your message.
- %product_title%: The purchased product’s title/name.
- %product_link%: The purchased product’s link.
- %product_price%: The price of the purchased product.
- %customer_name%: The name of the buyer (of the product).
- %customer_city%: The city where your buyer (of the product) resides.
- %customer_country%: The country where your buyer (of the product) resides.
- %purchased_time%: The time passed after the product was purchased.
Example: <p> %customer_name% in %customer_city% purchased a %product_title% </br><a href=”%product_link%”>%product_title%</a> <small>About %purchased_time% ago </small></p>
Output text:
John in New York purchased a Pendent.
Pendant About 10 minutes ago
- If you want your site users to view the image of the purchased product with sales notifications, enable the checkbox for the Image
- Select Display Screen as Desktop, Mobile, or Both. If you select Desktop, your mobile users won’t view the sales notifications, and vice-versa.
- Set the notification’s display position by selecting an option from the Display Position
- Click Save Changes.
Sales Notifications > Styling Options #
To change the appearance of your sales notifications, you have various styling options provided by the Sales Notifications plugin.
- Go to Booster > All Plugins > Marketing > Sales Notifications.
- Expand the Sales Notifications
- Click the Styling Options
- Enter a percentile value in the Notification Width field to set a width for your notifications.
- Use the color selector to specify a Background Color for your sales notifications.
- Specify the Text Color for your sales notifications using the next color selector.
- Set a Display Effect for the entry of your sales notification on a user’s screen on your website. This dropdown has the following options: Fade in, Slide in left, Slide in right, Slide in up, and Slide in down.
- Set a Hidden Effect that decides how your sales notification will exit the user’s screen. Your options are: Fade Out, Slide Out left, Slide Out right, Slide Out up, and Slide Out down.
- Once you have modified all the styling options as per your requirement, click the Save Changes
 Styling Options” width=”779″ height=”699″ />
How to Set Sales Notification’s Display Duration and Gap? #
The Sales Notifications plugin lets you decide the duration for when your sales notification will appear on the user’s screen and the gap between 2 notifications being displayed to a user.
By setting a gap, you can improve your customer’s shopping experience and ensure that the person in question is not overwhelmed by sales notifications.
- Go to Booster > All Plugins > Marketing > Sales Notifications.
- Expand the Sales Notifications
- Click the Time Options
- Specify Duration (in Seconds) to set a display duration for your sales notification.
- Specify the Next Time Duration (in Seconds) so that 2 notifications are displayed on the user’s screen after some gap, as you have specified.
- Click Save Changes, and these settings will work for your WooCommerce store.

How to Enable Sales Notifications for Selected Order Statuses? #
While using the Sales Notifications plugin, you can decide the condition when your customers must see a notification on their screen. For example, if you only want to display a public notification where a product is sold, you can just enable notifications for the order status Completed.
Here’s how you can specify the order statuses for which the sales notifications should be displayed:
- Go to Booster > All Plugins > Marketing > Sales Notifications.
- Expand the Sales Notifications
- Click the General Options
- Select the preferred Order Status Include values in this tab. Your options are: Auto-draft, draft, failed, refunded, cancelled, pending payment, processing, on hold, completed, and refunded.
- Click the Save Changes button to apply these settings to your online store.

Sales Notifications > Sound Options #
Want your customers to hear a sound when the sales notification is displayed on their screen? Sure, it’s good for grabbing their attention. Follow these steps to enable a sound with each sales notification using the Sales Notifications plugin:
- Go to Booster > All Plugins > Marketing > Sales Notifications.
- Expand the Sales Notifications
- Click the Sound Options
- Select the checkbox for the Enable
- Select a notification tone from the options available in the Sound
- Click Save Changes.
 Sound Options” width=”779″ height=”446″ />
Resetting Sales Notifications Plugin Settings #
Want to use the default Sales Notifications plugin settings or wish to modify these settings from the very beginning? Try resetting everything. To do so, follow these steps:
- Go to Booster > All Plugins > Marketing > Sales Notifications.
- Expand the Sales Notifications
- For each of the tabs available for this module, click Reset Settings.


