Overview #
Generating PDF invoices for your customers helps your business gain some credibility. It is, in fact, mandatory in most of the countries.
The WooCommerce PDF Invoicing plugin allows you to generate PDF invoices and packing slips for orders on your WooCommerce site. You can use this plugin to create proforma invoices, custom documents, credit notes, invoices, packing slips, and PDF attachments for orders.
Additionally, it lets you style your invoices based on your requirements, add a header to your documents, enable a footer, pick a numbering style for your documents, define page settings, and even include a custom stamp for invoices.
From customizing the template for each of your PDF documents to adding custom CSS & design alongside enabling advanced settings and email options – there is nothing related to your WooCommerce PDF invoices or related documents that you cannot do using the Booster PDF invoicing plugin.
Enabling PDF Invoicing & Packing Slips #
To enable and use the PDF Invoicing & Packing Slips plugin, you should first download and install Booster for WooCommerce on your store. Once it’s done, do the following:
- Navigate to WordPress Dashboard > Booster and go to the category PDF Invoicing & Packing Slips. The PDF Invoicing Module Options page will be displayed.
- Select Enable for the PDF Invoicing plugin from this screen.
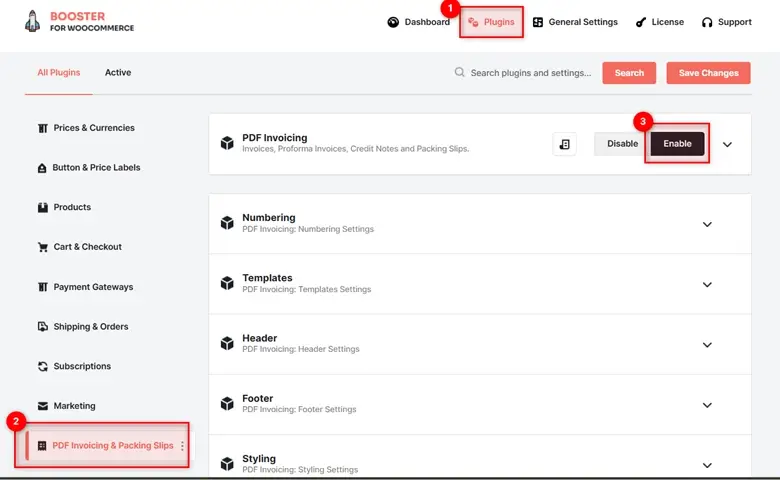
- Click Save Changes.
The WooCommerce PDF Invoicing & Packing Slips plugin will be enabled for your site.
PDF Invoicing > General Settings #
PDF Invoicing > Document Options #
The Document Options for PDF invoicing plugin lets you create 5 types of PDF files for your orders, which are:
- Invoice
- Proforma Invoice
- Packing Slip
- Credit Note
- Custom documents
You can enable the creation of these documents for the following order statuses (choose one or more options) in your WooCommerce store:
- Create on new order
- Create on order status pending payment
- Create on order status processing
- Create on order status on hold
- Create on order status completed
- Create on order status cancelled
- Create on order status refunded
- Create on order status failed
- Create on order status draft
- Create on order partially refunded
- Manually
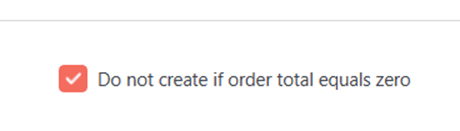
Do you not want to create an invoice, proforma invoice, packing slip, and/or credit note when there is no order for the selected order status(s)? Make sure to tick the Do not create if order total equals zero box for your preferred types of invoices/documents:
To amend Document Options, do the following:
- Go to your WordPress dashboard > Booster > Plugins > PDF Invoicing & Packing slips > PDF Invoicing > Document Options.
- Modify the given options as per your requirements.

- Save settings.
Remember, Standard document creation settings will create a proforma invoice and packing slip on a new order, but invoice creation is delayed until the order is complete. Credit notes will be created on order refunds.
You can also create invoices on custom order statuses if you have created a custom order status. Documents can be created on multiple statuses. In this case, a document is created only once – when the order is updated to any selected status.
PDF Invoicing > General Options #
If you want to add custom documents to your orders as per their order status, modify the General Options. It is a good idea to do so when you wish to attach a document other than the ones you can enable through document options (e.g., proforma invoice, invoice, credit notes, and packing slips)
To change General Options settings, do the following:
- Go to your WordPress dashboard > Booster > Plugins > PDF Invoicing & Packing slips > PDF Invoicing > General Options.
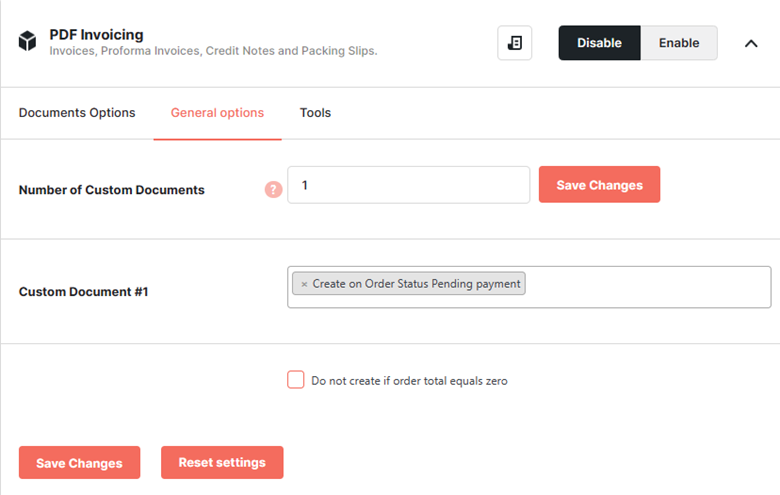
- Change the value for the Number of Custom Documents field, if required. And in case you change this value, make sure to click the Save Changes
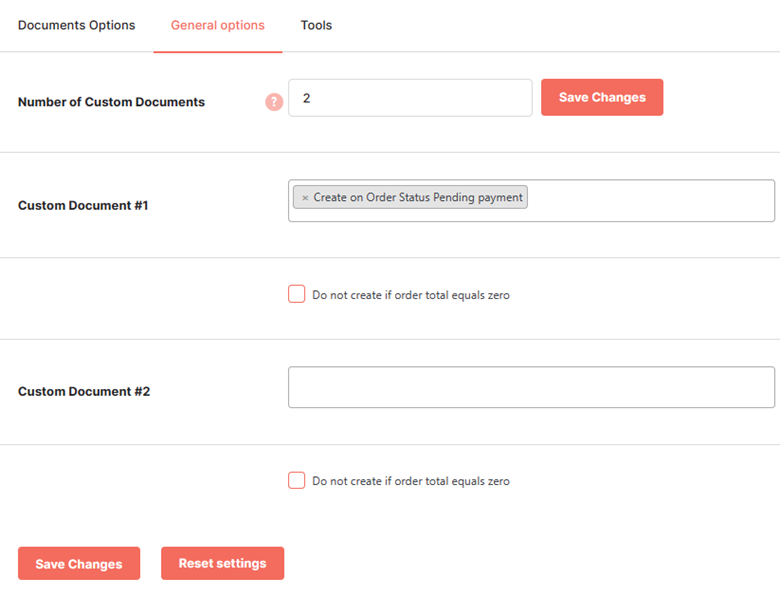
- Specify the order statuses for which your custom documents should load.
- Check the Do not create if order total equals zero if you do not want to create custom documents for empty orders.
- Hit the Save Changes button, present at the bottom of your screen.
PDF Invoicing > Other Options #
If you want to customize your PDF invoicing settings further, there are several sub-modules/sections that should be configured separately. These options are enlisted in the category PDF Invoicing & Packing Slips and can be found just below the PDF Invoicing plugin’s settings in your dashboard.
For more information on the above, refer to the following sections:
Numbering #
This option lets you generate invoice/document numbers as per your preference. From here, you can set the document number for:
- Invoice
- Proforma Invoice
- Packing Slip
- Credit Note
- All the customer documents (enabled through the Document Options)
For each type of document, you can configure the following settings:
- Specify if you wish to enable Sequential numbering for your document.
- Set a counter
- Determine a Counter Width, which is the minimum width of the document’s counter’s length. For example – If you set the width to 2, it will show the counter in 2 digits (e.g., 15). If you set it to 3, the counter’s value in the same case will be 015.
- Enable a Prefix and a Suffix for your document’s number.
- Use a template for the document number. In this template, you can use the following variable:
- %prefix%
- %counter%
- %suffix%
- Select the Bulk Invoice Number DESC Order checkbox if you want to generate the document numbers in descending order.
Save changes once you’ve configured it all.
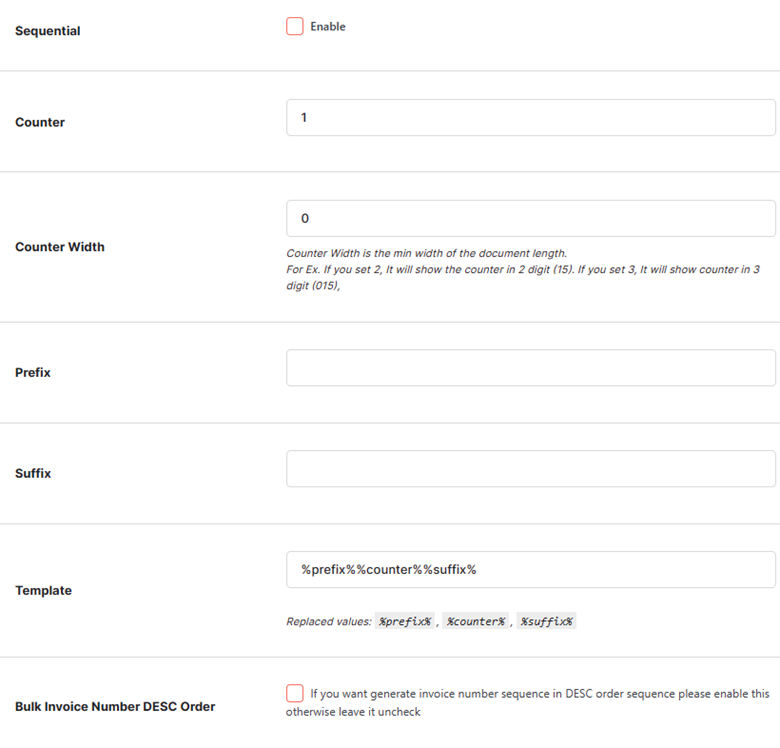
If sequential numbering is not enabled, then Order ID will be used for numbering documents.
To create invoices for existing orders, or to renumber invoices for any other reason, use the Renumerate Invoices tool, accessible through WooCommerce > Booster Tools > Renumerate Invoices.
Templates #
The Templates option lets you set a template format for the following documents:
- Invoice
- Proforma Invoice
- Packing Slip
- Credit Note
- All the customer documents (enabled through the Document Options)
You can create a template format using HTML, text, and shortcodes. Find the shortcodes that can be used with this Booster Plugin here.
To create/modify a PDF Invoicing document’s template:
- Go to your WordPress dashboard > Booster > Plugins > PDF Invoicing & Packing slips > PDF Invoicing > Templates.
- Think of the document type for which you want to modify the template, and go to the respective tab.
- Modify the HTML Template
- Save settings.
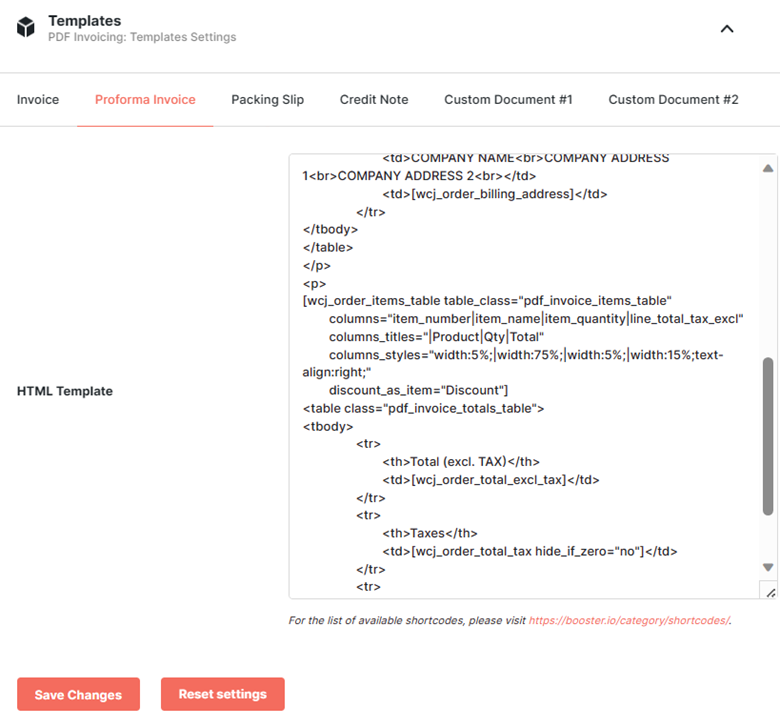
You can use the default templates as-is. However, an important thing to remember is that you must replace COMPANY NAME, COMPANY ADDRESS 1, and COMPANY ADDRESS 2 with the required values.
Wish to create different invoices for users from different billing countries? Just add the parameter billing_country to any shortcode. For example, to create two different invoices – one for customers from France and Belgium, and another for customers from the rest of the world – you can create a template similar to this:
wcj_text billing_country=”FR,BE”]Facture[/wcj_text] <br />
To add a page break to the invoice, just insert the shortcode.
To view a sample multilingual invoice template, click here.
Header #
The Header option lets you design and enable a header for the following documents:
- Invoice
- Proforma Invoice
- Packing Slip
- Credit Note
- All the customer documents (enabled through the Document Options)
To create/modify a PDF Invoicing document’s Header:
Go to your WordPress dashboard > Booster > Plugins > PDF Invoicing & Packing slips > PDF Invoicing > Header.
- Think of the document type for which you want to modify the header, and go to the respective tab.
- Select Enable for the Enable Header option.

- Now, you can add an Image (its URL), width (in millimeters), title, text, text color, line color, and margin for your header.
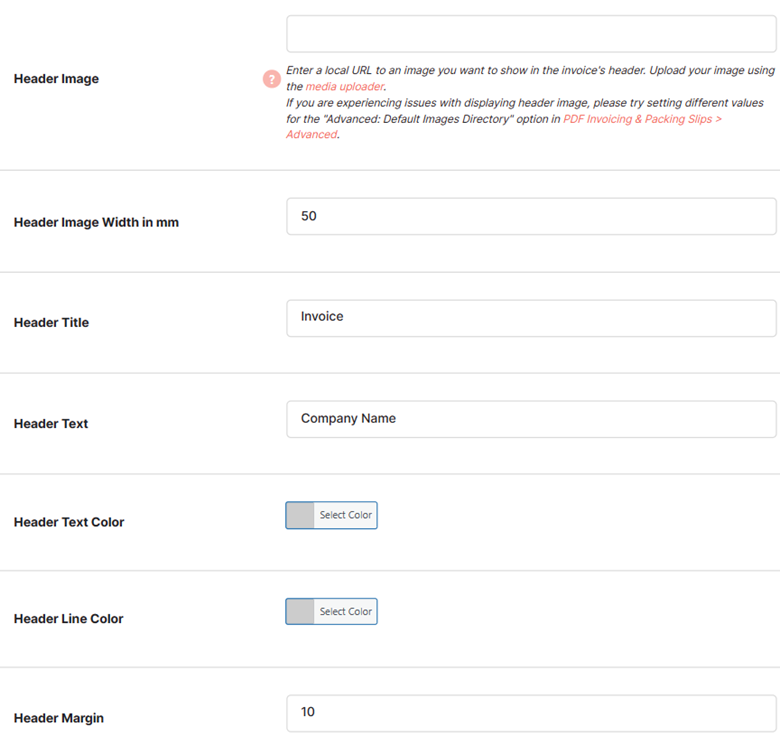
- Click Save Changes.
Footer #
The Footer option lets you create and enable a footer for the following documents:
- Invoice
- Proforma Invoice
- Packing Slip
- Credit Note
- All the customer documents (enabled through the Document Options)
To create/modify a PDF Invoicing document’s Footer:
- Go to your WordPress dashboard > Booster > Plugins > PDF Invoicing & Packing slips > PDF Invoicing > Footer.
- Think of the document type for which you want to modify the Footer, and go to the respective tab.
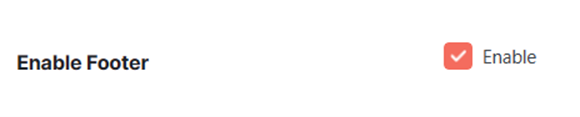
- Select Enable for the Enable Footer option.
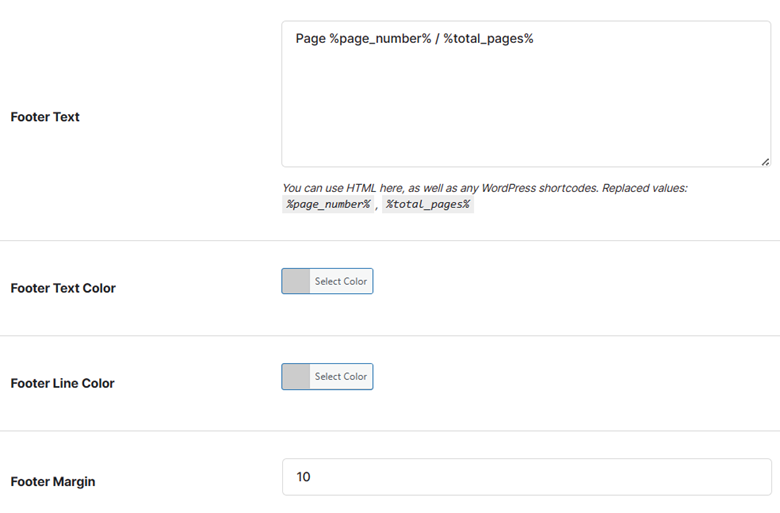
- Now, you can add a Footer Text, text color, line color, and margin for your Footer. In the Footer text, you can use static text alongside variables like %page_number% and %total_pages%.
- Click Save Changes.
Styling #
Want to style your PDF documents? That’s possible when you use the PDF Invoicing plugin. The Styling option lets you style the following documents:
- Invoice
- Proforma Invoice
- Packing Slip
- Credit Note
- All the customer documents (enabled through the Document Options)
To modify a PDF Invoicing document’s style:
- Go to your WordPress dashboard > Booster > Plugins > PDF Invoicing & Packing slips > PDF Invoicing > Styling.
- Think of the document type for which you want to modify the style, and go to the respective tab.
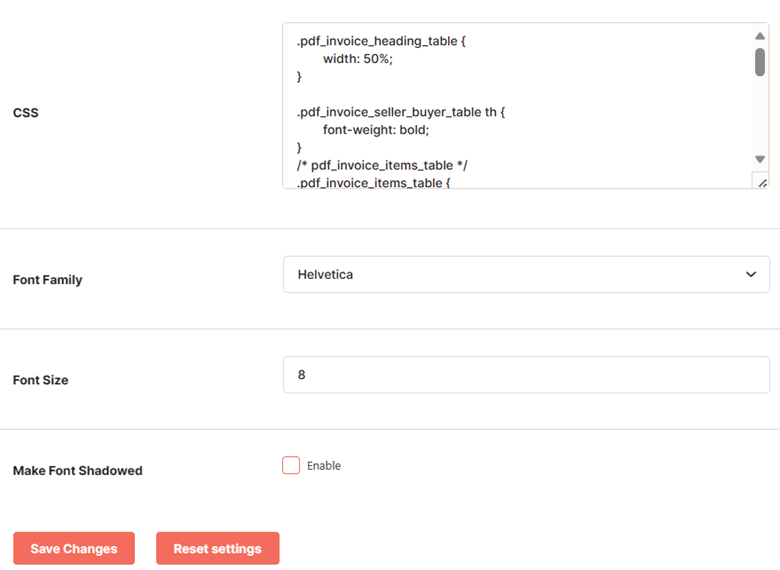
- Now, you can write your own Custom CSS for this document type.
- Specify the Font Family and the Font Size if you wish.
- Make Font Shadowed if required.
- Save Changes.
Page Settings #
The Page Settings option lets you define the page setup details for the following documents:
- Invoice
- Proforma Invoice
- Packing Slip
- Credit Note
- All the customer documents (enabled through the Document Options)
To modify a PDF Invoicing document’s default page settings:
- Go to your WordPress dashboard > Booster > Plugins > PDF Invoicing & Packing slips > PDF Invoicing > Page Settings.
- Think of the document type for which you want to modify page settings, and go to the respective tab.
- Now, you can specify the following:
- Page Orientation (Landscape or Portrait)
- Page Format (From A4 to A# and so on – Booster’s PDF Invoicing plugin supports hundreds of page formats)
- Margin (Left, Right, Top, and Bottom)
- Background Image
- Whether you want to parse the Background Image URL or not.
- Whether you want to use a Background image for multiple pages or not.
- Save Changes.
Email Options #
Email Options lets you attach PDF to emails (for one or multiple order statuses) and define payment gateways to include for the following documents:
- Invoice
- Proforma Invoice
- Packing Slip
- Credit Note
- All the customer documents (enabled through the Document Options)
To modify a PDF Invoicing document’s email options:
- Go to your WordPress dashboard > Booster > Plugins > PDF Invoicing & Packing slips > PDF Invoicing > Email Options.
- Think of the document type for which you want to modify email options, and go to the respective tab.
- Now, select the order statuses (one or multiple) for which you wish to attach your selected document to emails (that are sent to your customers):
- New order
- Cancelled order
- Failed order
- Order on-hold
- Processing order
- Completed order
- Refunded order
- Customer invoice / Order details
- Customer note
- Reset password
- New account
- New Renewal Order
- Subscription Switched
- Processing Renewal order
- Completed Renewal Order
- On-hold Renewal Order
- Subscription Switch Complete
- Customer Renewal Invoice
- Cancelled Subscription
- Expired Subscription
- Suspended Subscription
- New Receipt
- Failed subscription renewal SCA authentication
- Pre-order Payment Action Needed
- Payment authentication requested email
Note: Leave this field blank if you want to enable email attachments for all order statuses.
- Choose the payment gateways to include for this configuration. Booster currently supports the following gateways (and this list will only grow in the future 🙂)
- Credit /Debit card
- Direct bank transfer
- Check payments
- Cash on delivery
- PayPal
- Credit Card (Stripe)
- SEPA Direct Debit
- Giropay
- iDEAL
- Bancontact
- EPS
- Sofort
- Przelewy24 (P24)
- Boleto
- OXXO
- Alipay
- Multibanco
Note: Leave this field blank if you want to enable email attachments for payment gateways.
- Save Changes.
Paid Stamp #
The Paid Stamp option lets you enable a stamp (in the image format) for the “paid” invoices. Here’s how you can stamp your paid invoices and simplify your finance operations:
- Go to your WordPress dashboard > Booster > Plugins > PDF Invoicing & Packing slips > PDF Invoicing > Paid Stamp.
- Select Enable to the Paid Stamp option in the Invoices
- Add the URL from where the Custom Paid Stamp image should be fetched.
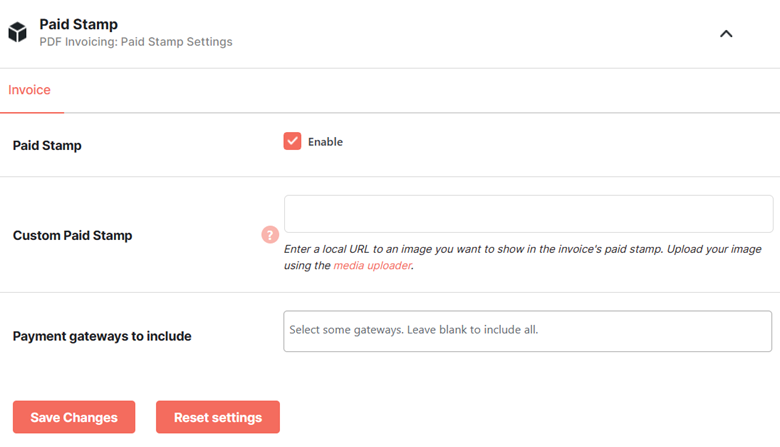
- Choose the payment gateways to enable the paid stamp for them. Booster currently supports the following gateways (and this list will only grow in the future 🙂)
- Credit /Debit card
- Direct bank transfer
- Check payments
- Cash on delivery
- PayPal
- Credit Card (Stripe)
- SEPA Direct Debit
- Giropay
- iDEAL
- Bancontact
- EPS
- Sofort
- Przelewy24 (P24)
- Boleto
- OXXO
- Alipay
- Multibanco
Note: Leave this field blank if you want to enable email attachments for payment gateways.
- Save Changes.
Display & Misc. #
Display & Misc. has various settings related to PDF invoicing for the following documents:
- Invoice
- Proforma Invoice
- Packing Slip
- Credit Note
- All the customer documents (enabled through the Document Options)
To modify a PDF Invoicing document’s Display & Misc. options:
- Go to your WordPress dashboard > Booster > Plugins > PDF Invoicing & Packing slips > PDF Invoicing > Display & Misc.
- Think of the document type for which you want to modify email options, and go to the respective tab.
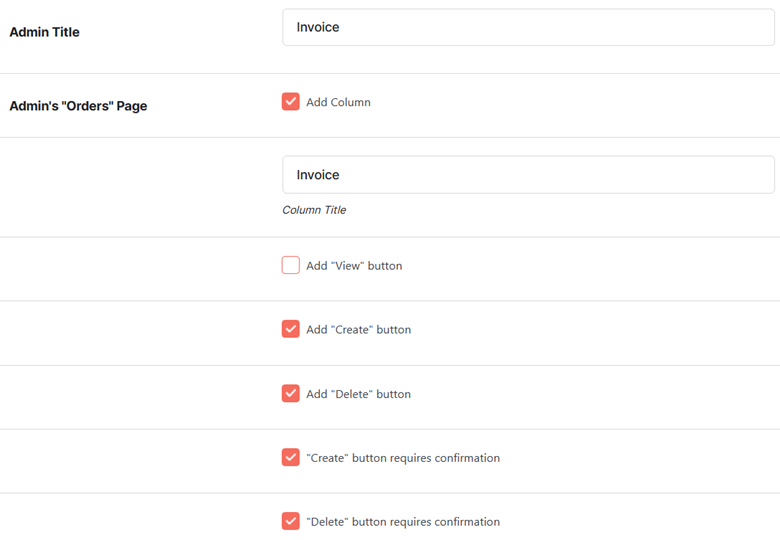
- Enter the Admin title of the document. It will be displayed to the site administrator (and other internal admin-level users, as selected by you)
- Configure the settings related to the Admin’s “Order” page in the next few fields. You can:
- Add a column;
- Specify its title;
- Add view, create, and delete buttons (visible to admins);
- Specify if create and/or delete options require confirmation.
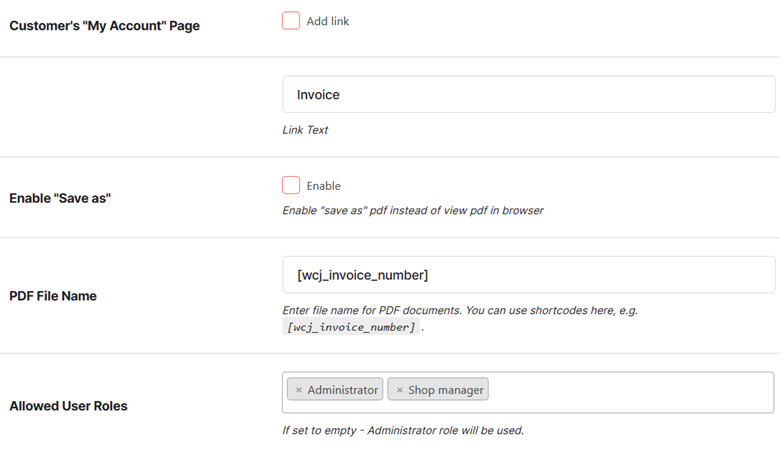
- If you want to add a link to the selected document on the Thank You Page for your customer, enable the Add Link option for it. You can also change the Link Text and set an HTML template for this. Make sure to use the variable %link% in this template.

- Enable the Add Link option for the Customer’s “My Account” Page, if required. You can also change the Link Text for it.
- Want to let your customers save the PDF invoice/document? Enable “Save as”
- Set a PDF File Name for this document type. You can use the shortcode here.
- Specify which shop users should be considered Admin for these settings. If you wish to give Administrative rights to the site admin only, leave this field empty.
- Save Changes.
Advanced #
Go to your WordPress dashboard > Booster > Plugins > PDF Invoicing & Packing slips > PDF Invoicing > Advanced to modify various advanced settings related to PDF invoicing.
Advanced Options #
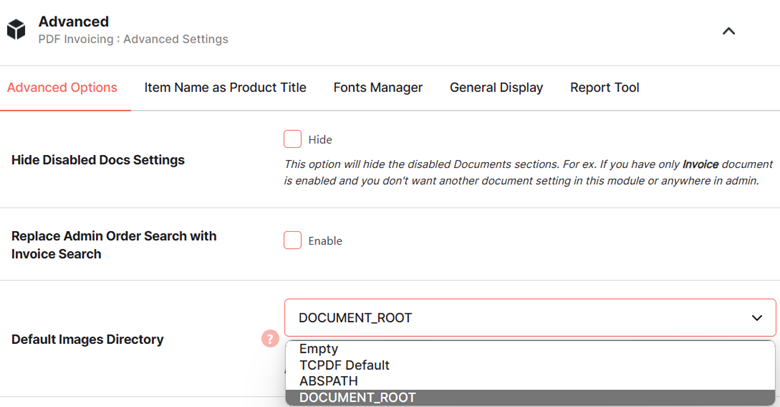
- If you have only customized and enabled settings for a few particular types of documents, you can hide the disabled document sections for other tabs, e.g., header, footer, templates, and so on. To do this, select Hide for the Hide Disabled Docs Settings. It will make your PDF Invoicing plugin’s dashboard neat and easy-to-use.
- Enable the Replace Admin Order Search with Invoice Search.
- Select your preferred Images Directory as your default.
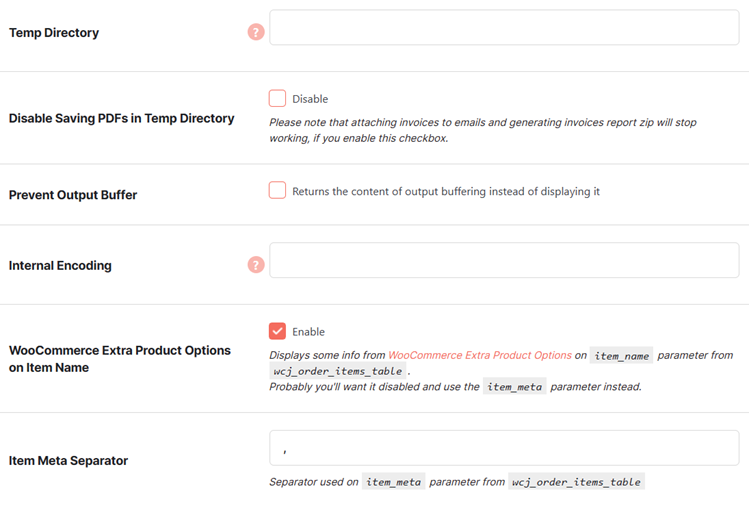
- Specify the Temp Directory path if you want.
- If you do not want to save PDFs created using this plugin, select Disable for the Disable Saving PDFs in Temp Directory
- Wish to prevent the output buffer and return the content instead of displaying it? Tickmark the Prevent Output Buffer
- Specify the value for Internal Encoding in the designated field.
- Enabling the WooCommerce Extra Product Options on Item Name displays some info from WooCommerce Extra Product Options on item_name parameter from wcj_order_items_table. If you want to use the item_meta parameter instead, disable this option.
- Add an item meta separator in the given field.
- Save Settings.
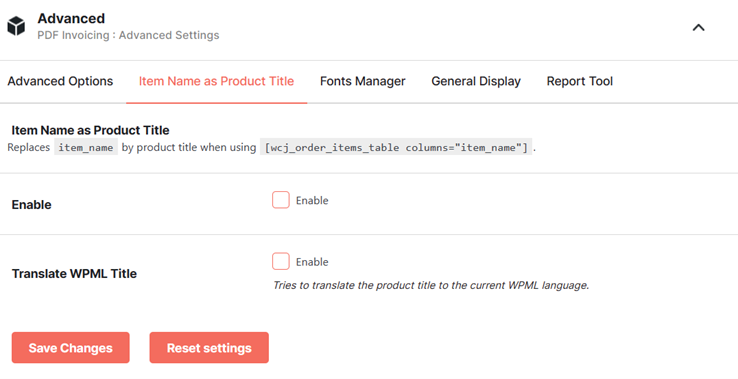
Item Name as Product Title #
This tab in the Advanced options lets you display the item name as the product title and enable translation for the WPML product titles. Enable the related settings as per your preference.
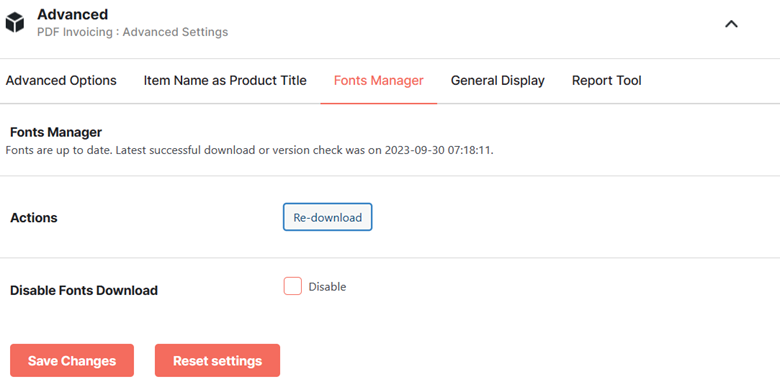
Fonts Manager #
Whether you want to re-download the fonts for your store’s PDF invoicing operations or wish to disable fonts downloading, the Fonts Manager tab in the Advanced options of the PDF invoicing plugin allows you to handle both.
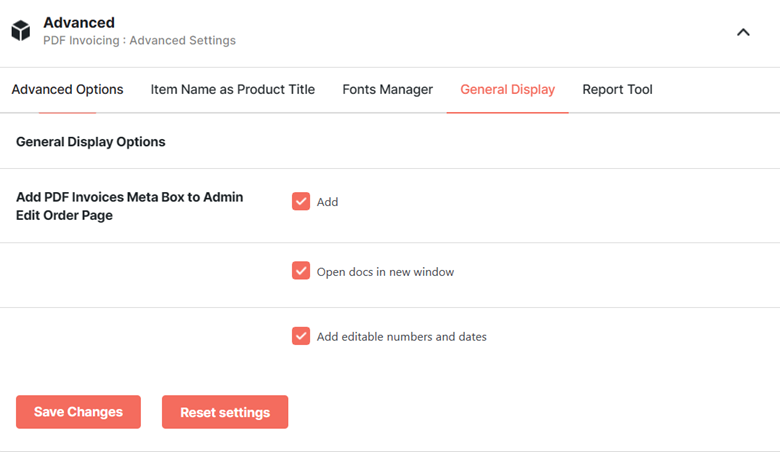
General Display #
This tab in the Advanced options of the PDF Invoicing plugin lets you add PDF Invoices Meta Box to Admin Edit Order Page for your invoicing setup. Select the checkboxes for the given options as you prefer.
Report Tool #
The Report Tool tab in your PDF invoicing plugin’s Advanced settings helps you take care related to PDF report generation. You can manage the following details from here:
- Reports Filename (you can use the variables like Replaced values: %site%, %invoice_type%, %year%, and %month% in the report file’s name.
- Report Columns to be displayed in the report.
- Tax Percent Precision and the CSV Separator to use.
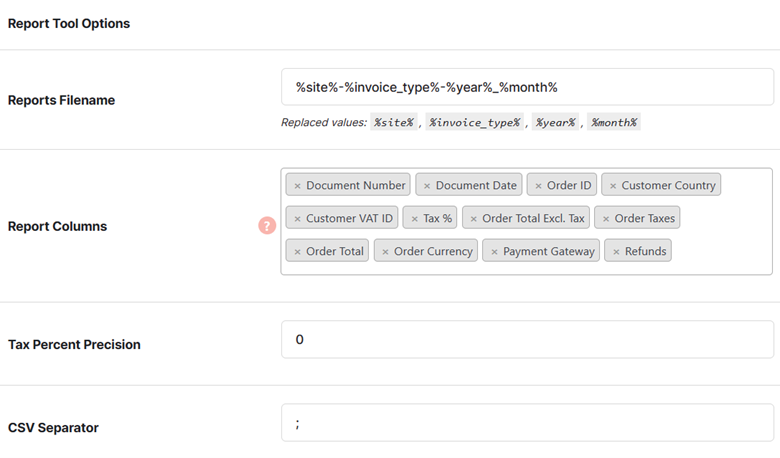
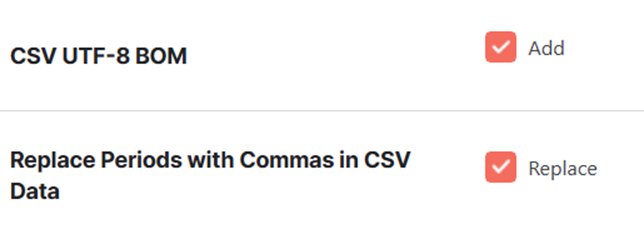
- Whether you wish to use CSV UTF-8 BOM encoding or not.
- Whether you wish to Replace Periods with Commas in CSV Data or not.
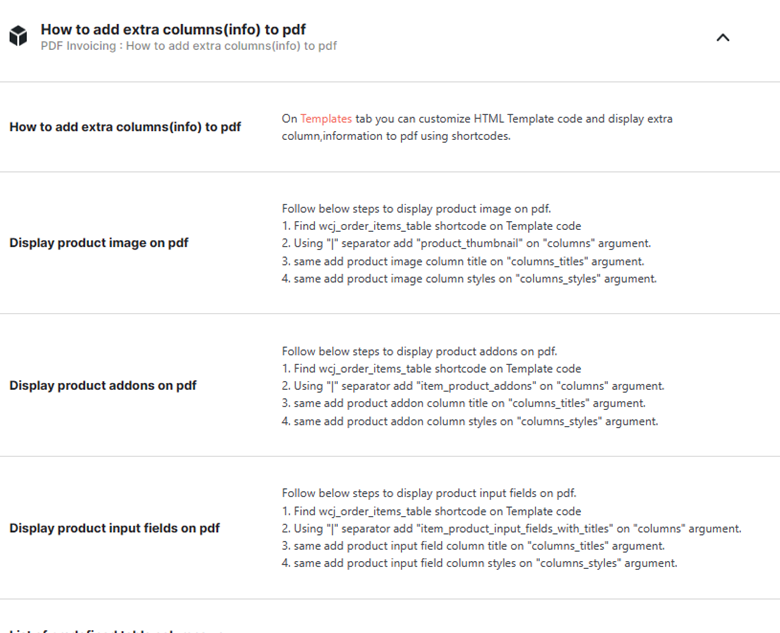
How to add extra columns(info) to pdf #
Want to display additional information in the PDFs created using Booster’s PDF Invoicing plugin? Go to the How to add extra columns (info) to PDF option, present at the bottom of the PDF Invoicing & Packing Slips category. This option is nothing but a guide to adding extra columns to your PDFs in WooCommerce.
From adding extra columns to your PDF to adding product image, addons, input fields, predefined table columns, checkout custom fields, WooCommerce order’s meta, and subscription order details – you can learn about doing everything here. It also comprises details on using Booster shortcodes.