Overview #
The Admin Orders List for WooCommerce plugin allows you to customize the WooCommerce admin order list, i.e., the list view of the WooCommerce Orders page, visible to the store admin (Dashboard > WooCommerce > Orders).You can also learn more about available features on the Admin Orders List page.
Additionally, it lets you:
- Add custom columns to the Admin orders page for WooCommerce
- Customize the status menu
- Change the order of columns
- Add billing country and currency code as custom columns
- Enable multiple status filtering
- Hide default statuses menu
- Adding presets (filtered views of the orders page) to the admin menu
- Change the order of columns on the Orders page, and so on.
How to Enable Admin Orders List for WooCommerce? #
To enable and use the Admin Orders List for WooCommerce plugin, download and install Booster for WooCommerce. Once it’s done, follow the below-mentioned steps:
- Navigate to Booster > Plugins > SHIPPING & ORDERS within your WordPress admin dashboard.
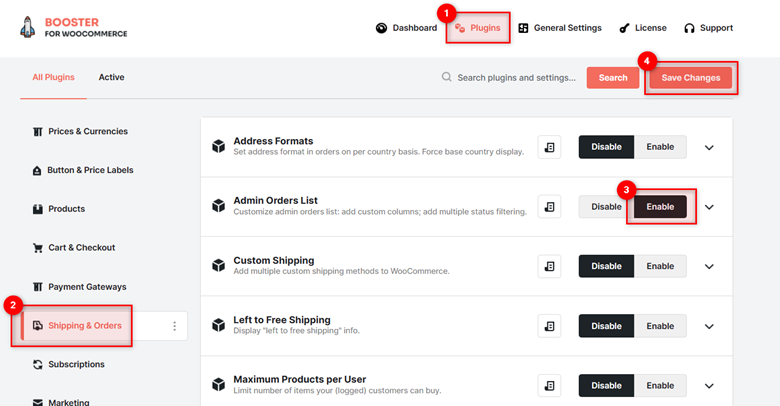
2. Select Enable for the Admin Orders List plugin in this category.
3. Scroll up to find the Save Changes button and click on it. The WooCommerce Admin Orders List plugin will be enabled for your site.
The plugin will be active, and you can begin customizing the Admin order page for WooCommerce.
Configuring Admin Orders List Settings #
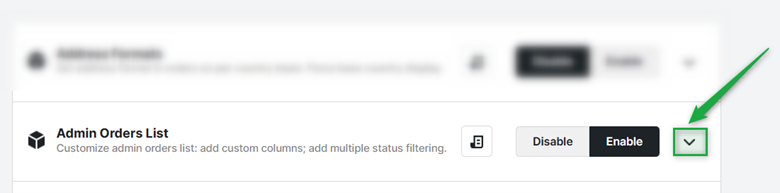
If you followed the above steps and enabled the Admin Orders List plugin for your WooCommerce store, it’s time to configure its settings. For this, use the expand button, and you’ll see all plugin-related options in front of you.
Custom Columns #
In the Custom Columns section, enter/select values for the Admin custom order fields for WooCommerce. Refer to the table below for field descriptions:
| Field | Description |
| Custom Columns | Select it to add customized columns to the Orders page |
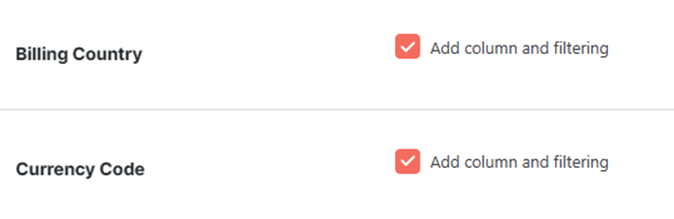
| Billing Country | Select it to add the column Billing Country on the Orders page and allow filtering based on the billing country |
| Currency Code | Select it to add the column Currency Code on the Orders page and allow filtering based on the Currency Code |
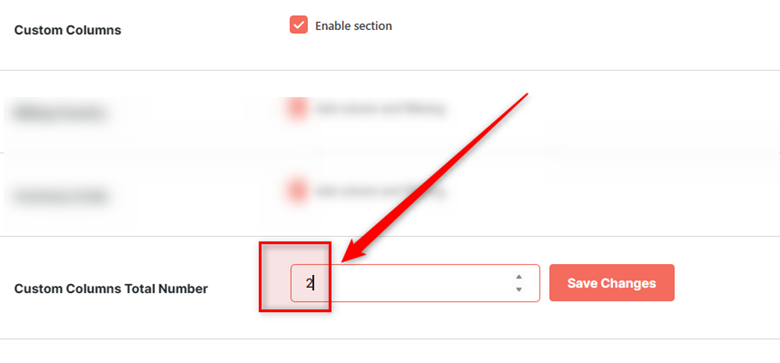
| Custom Columns Total Number | Total number of customized columns added to the Order page. After entering a value for this field, click the Save Changes button next to it. |
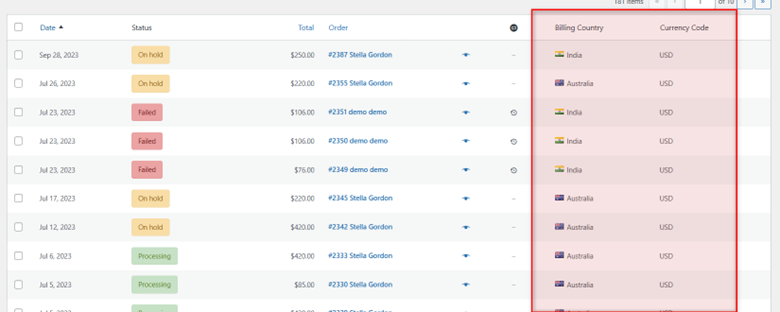
Let’s say you enabled the columns Billing Country and Currency Code for your shop’s admin page:
It will add these 2 columns on the WooCommerce > Orders page for your site’s admin(s).
Now, as you might want to add a few custom columns to this page, enable the Custom Columns option and set a total number for these columns. This gives you an easier alternative to writing Admin order list hooks for WooCommerce manually. Make sure to click the Save Changes button as you proceed.
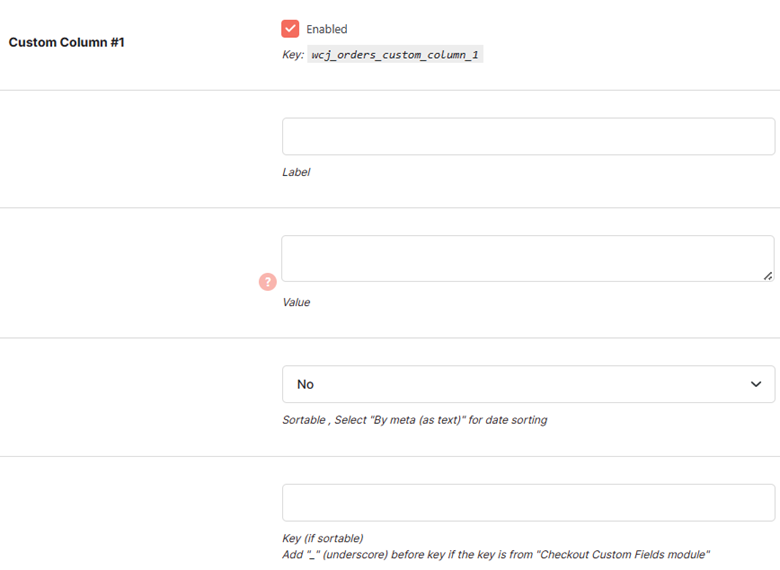
Now, as per the number entered in the Custom Columns Total Number field, you will have to provide the value of the following fields for each of the custom columns:
| Field | Description |
| Enabled | Select if you want to display this custom column on the Orders Page |
| Label | Name/title of the custom column |
| Value | Value of the custom column. You can use shortcodes and/or HTML here. |
| Sortable | Select a value for this dropdown menu from No, By meta (as text), and By meta (as numbers). It sets the basis for sorting your custom columns. |
| Key (if sortable) | Key of the customized column. Note: If the key is from the WooCommerce Checkout Custom Fields plugin, then add _ (underscore) before the key. |
Doing the above will add a custom column to the Orders page. This approach is especially useful if you’re working with Admin custom order fields for WooCommerce and want to display them without custom code.
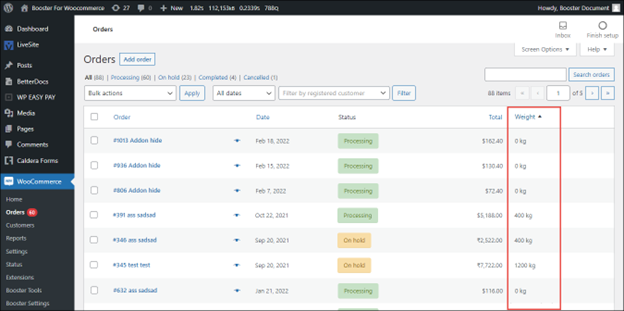
Example Output #
A sample Orders page with a sortable custom column Weight is shown in the below screenshot:
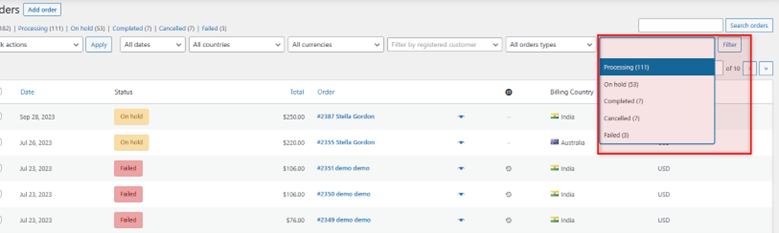
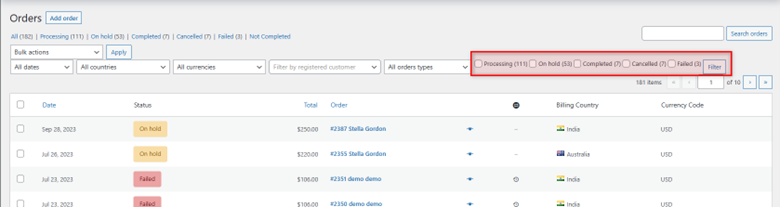
Multiple Status #
The Multiple Status section enabled store owners or WooCommerce developers to add a way to filter orders based on multiple statuses on the Orders page. This adds an extra layer of control to the Edit admin order page for WooCommerce experience. Go to this section, and do the following:
- Select Enable Section for the Multiple Status.
- Choose “Add as Multiple Select” or “Add as checkboxes” as your option for Multiple Status Filtering.

When Multiple Select Filtering is Enabled #
When Checkboxes are Enabled #
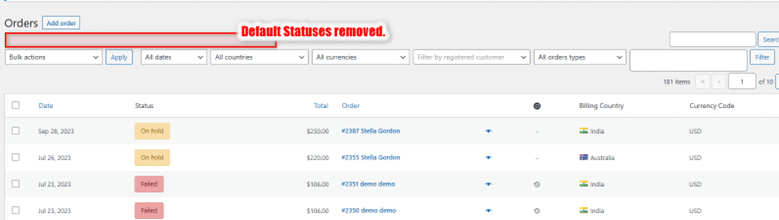
- If you wish to hide the statuses shown by default in WooCommerce, select Hide for the Hide Default Statuses Menu.
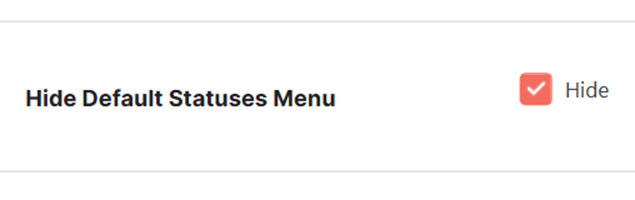
This action will hide the default order statuses filter from the Admin Orders page.
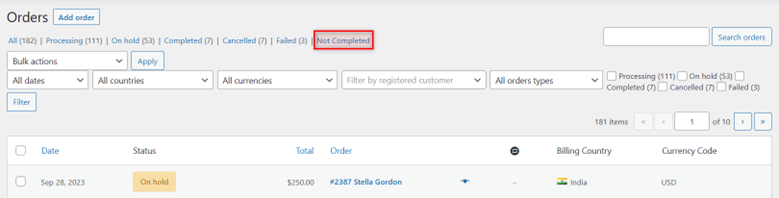
- Wish to add a “Not Complete” link/filter to the list of default order statuses? Select Add for the Add “Not Completed” Status Link to the default Statuses Menu Make sure you do not hide the default statuses in this case (using the previous option).
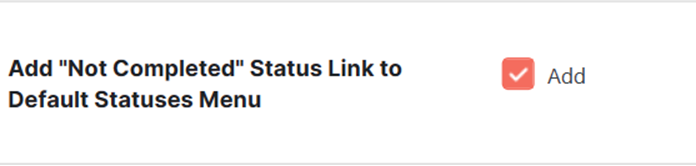
Once the Settings are saved, you will see “Not Completed” as an additional status option on the Orders page.
- Select Add Presets for the Add Presets to Admin Menu option and select the number of Total Presets. Hit the Save Changes button, present just next to the Total Presets field on your screen before you proceed to create presets.
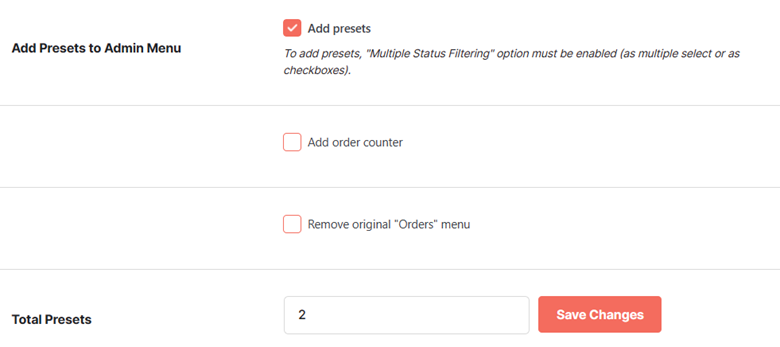
Note: A WooCommerce Orders Page Preset is a filtered view of the ordered page, which displays orders of a few types as per your selection while creating this preset. You can find the link to all your presets on the WooCommerce menu.
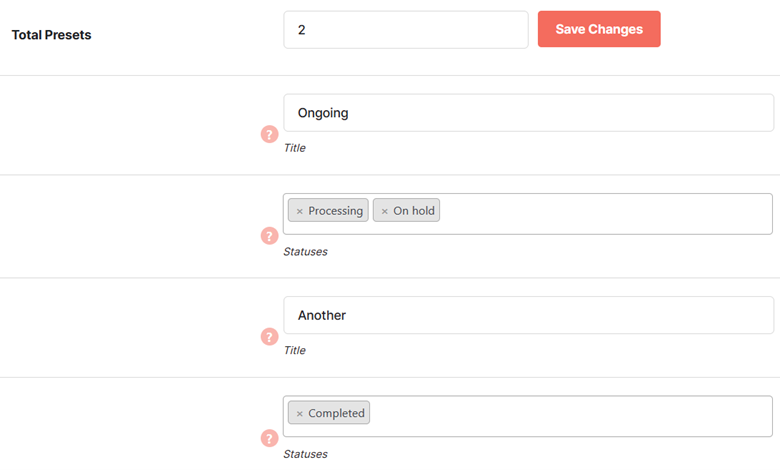
- Set a title and choose the order statuses for each of your presets.
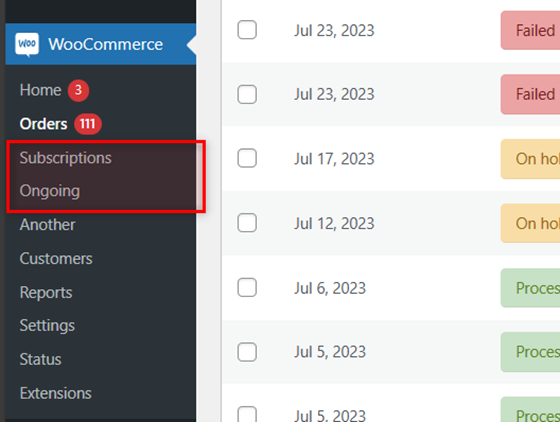
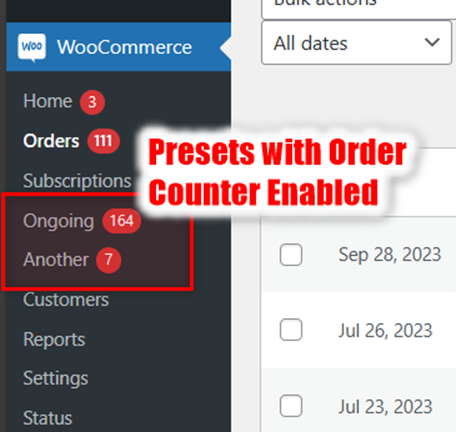
Upon saving these settings, you will find a few options (and the related pages) added to your WooCommerce menu.
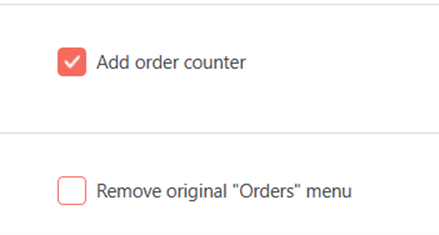
- Select the Add order counter option to show the count with these sub-menus/pages.
Output: Presets with Order Counter Enabled #
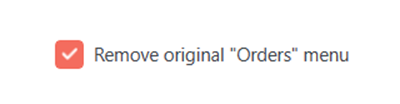
- Select the Remove original “Orders” menu checkbox if you just wish your administrator to view the customized presets in the menu instead of the Orders menu.
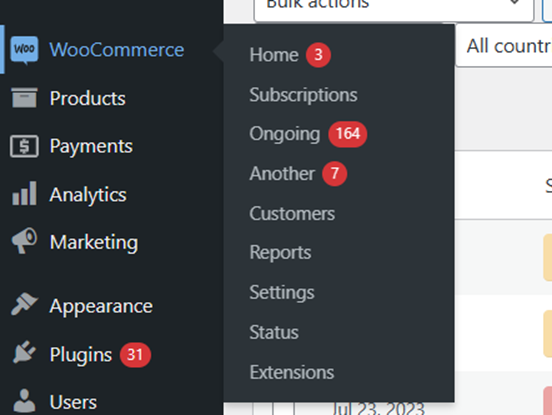
Output: Preset Enabled and Orders Menu Hidden #
You won’t see the Orders menu item in the WooCommerce menu anymore.
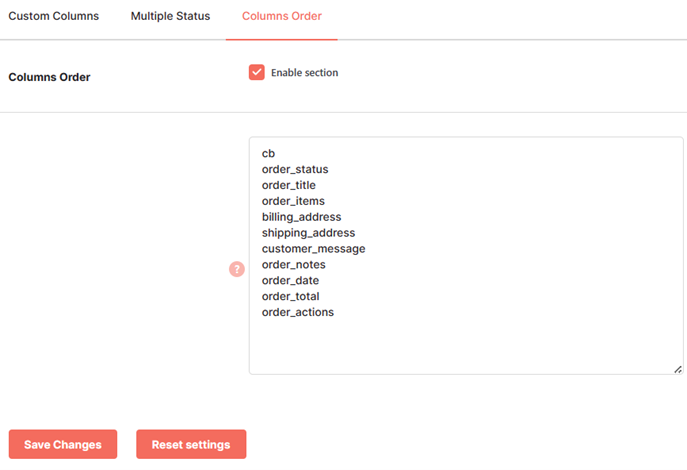
Columns Order #
- To enable the ordering of columns, check the box for the Columns Order
- Enter the column names in the order you want them to be displayed on the Orders This lets you control the visual layout of your Admin custom order fields for WooCommerce.Enter one column name per line.
- Click Save Changes.
How to Define a Custom Field’s Column Order on the Admin Orders Page? #
Let’s say you created a custom field using the Admin Orders List plugin’s Custom Columns Tab. Consider, the settings are similar to this field, shown in the screenshot:
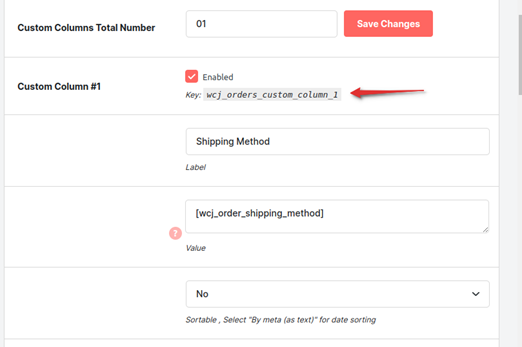
The field is enabled.
Now, by default, this field will appear in the last column on the Admin Orders page.
If you want to change its order and assign it with a custom order, do the following:
- Copy the key of your custom field.
- Go to the Columns Order tab in the Admin Orders List plugin settings.
- Enable this section.
- Insert this key in your preferred position in the list. This list decides the ordering of columns, shown on the Admin Orders page, including any Admin custom order fields for WooCommerce
- Save changes.
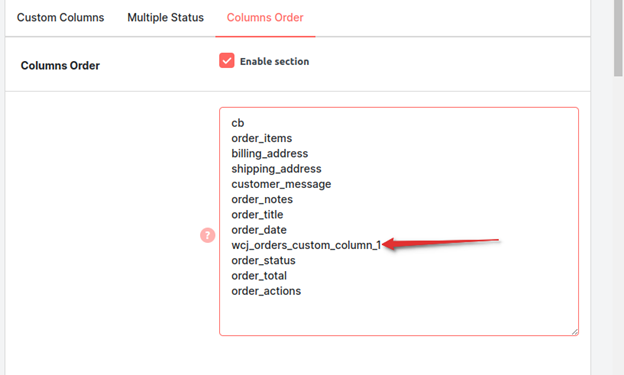
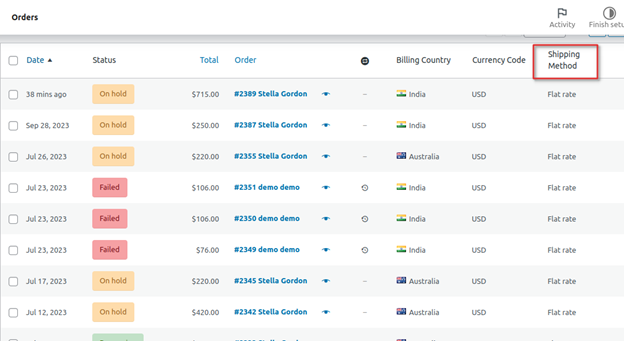
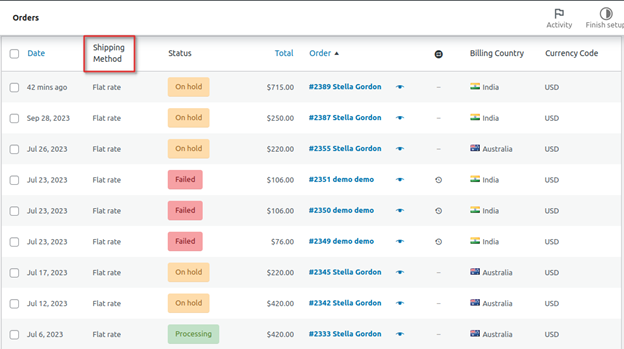
Can you see your custom column Shipping Method placed between the date and status columns, just as you wanted? Yup, it’s done 🙂
FAQs: #
Q1: Can custom fields be included in search results on the admin orders page?
A: Yes, once custom fields are added via the Booster Admin Orders List module, their values are stored in order meta and can be used for reference, including exports and filters.
Q2: Is there a character limit for fields like “Text” or “Textarea”?
A: No, these field types do not have character length restrictions in Booster.
Q3: Can I use HTML in the text-based field types?
A: Limited HTML such as anchor (<a>) tags can be added inside the value of text or textarea fields. However, HTML is not supported in field labels or admin headers.
Q4: Can I export the custom fields I’ve added to admin orders?
A: Yes, you can export them using the Booster CSV export tools or compatible WooCommerce export plugins, as long as the field key is included.
Q5: Will my custom admin fields appear in customer emails or account areas?
A: No, fields created through the Admin Orders List plugin are for internal admin use and won’t appear in customer-facing templates or emails by default.


