Overview #
WooCommerce Store owners can use the Custom Emails Plugin – Booster to create and set customized emails for various triggers. Using the plugin, you can create any number of custom e-mails as you want.
Just start by setting the email title in the plugin settings, and you will be able to view, edit, and use these emails just as your other emails in the WooCommerce > Settings > Emails.
Sending out customized emails to your customers during their shopping journey. For your customer, it improves the store experience and provides better buying guidance. It can increase your sales and retention rate while satisfying your customers.
How to Enable Custom Emails in Your WooCommerce Store? #
To get started with the custom emails feature, it is essential that the WooCommerce Store Owner installs and activates the Booster for WooCommerce Plugin in the store.
Once it is activated successfully, follow these steps:
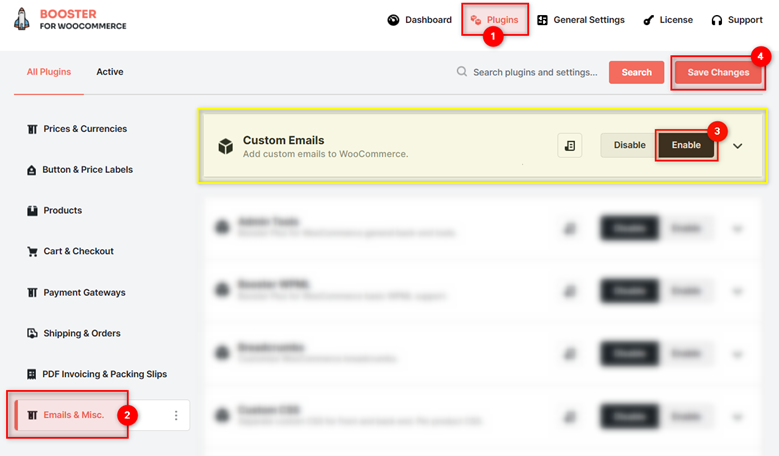
- After logging into your WordPress admin dashboard, go to Booster > Plugins
- Click on the EMAIL & MISC.
- Click Enable for the Custom Emails
- Click on the Save Changes button to enable the Custom Email plugin for your store.
How to Set the Number of Custom Emails to be Created? #
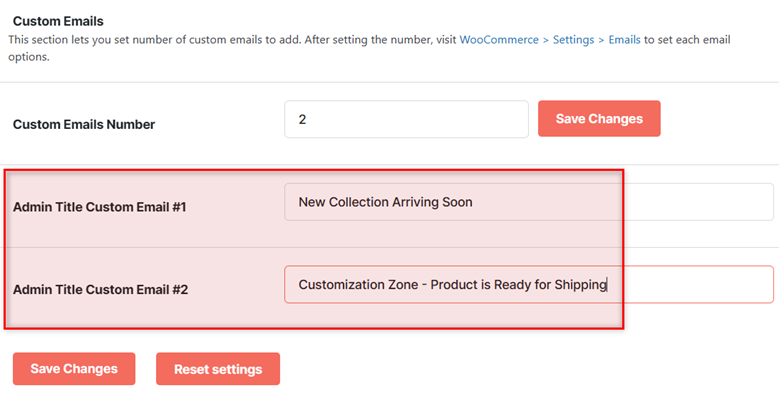
- Go to Booster > Plugins > EMAIL & MISC. > Custom Emails.
- Make sure that the plugin is enabled. If not, select Enable for the Custom Emails plugin.
- In the Custom Emails section of the plugin dashboard, there is an option named Custom Emails Number. Enter the total number of custom emails you want to create in the given input field.
- Click on the Save Changes button given next to this field.
- Click on the Save Changes button, present at the bottom of this page.

How to Create Custom Emails? #
You can start configuring your custom emails as soon as you enable the Custom Emails plugin and set the Custom Emails Number for your store.
- Go to the Custom Emails Here, you will see additional input fields with labels:
- Admin Title Custom Email #1
- Admin Title Custom Email #2
… - Admin Title Custom Email #n (where “n” equals to Custom Emails Number)
- Enter the titles of your custom emails one by one, replacing the default titles.
- Click on the Save Changes button at the bottom of this page.
- Now, go to WooCommerce > Settings > Emails At the bottom of the Emails list, you must see the Custom Emails appended.

- To customize any of these emails, follow the below-mentioned steps:
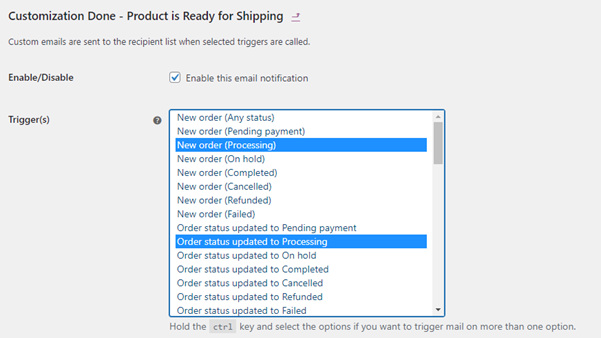
- Click on the Manage button, adjacent to the email to be customized.
- In the new page that goes opened by the previous action, select Enable this email notification option to start sending this email to your customers. To disable for now or later, just uncheck this field.
- In the Trigger(s) list, there is a large number of events that may occur for an eCommerce purchase. Select one or many (use the “Ctrl” key while selecting them) options as email trigger(s). Your email will only be sent out when any of these triggers work.
- Enter the email addresses, separated by comma, in the Recipient(s) Use %customer% to add the billing email address of the customer in this field. The email addresses in this field will be added as recipients for the custom email.
- Enter a dynamic subject line for your email in the Subject You can use {site_title}, {order_number}, and {order_date} like substitutable variables in the subject line.
Example: [{site_title}] Custom Subject – Order ({order_number}) – {order_date}
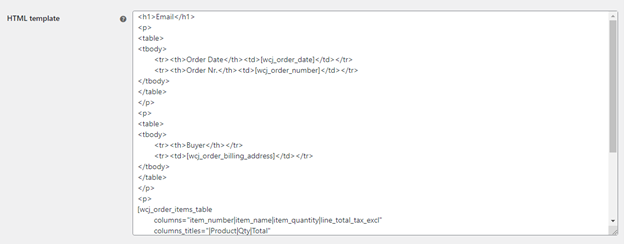
- Select the Email Type among Plain Text, HTML, or Multipart.
- Select the Wrap in WC Email Template option to enable controlling the main heading within the email notification. To use the custom heading, leave the next field blank, otherwise, enter the desired value in it.

- If you had selected the Email Type as HTML, add your email’s content in the HTML template You can use HTML tags as well as Booster Shortcodes in this field in this case.
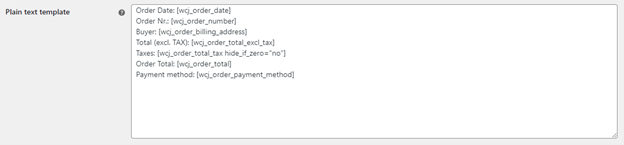
- If you’d selected Plain Text as your Email Type, enter your email content in the Plain Text Template Here, too, you can use Booster shortcodes.
- If you want to send multipart email to your customers, enter your email content for the both versions, i.e. Plain Text Template as well as HTML Template.
Editing Custom Email #
Once these details are specified for your custom email, you might also want to update the generic email information that also applies to your customized emails. So, you can do the following on the WooCommerce > Settings > Emails page:
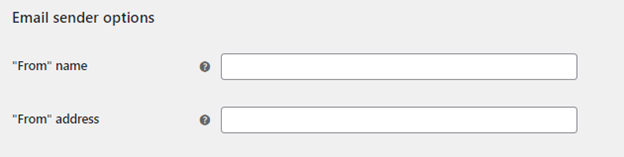
- Specify the “From” Name and “From” Address for the emails in the Email Sender Options.
- Specify or edit the Header Image, Footer Text, Base Color, Background Color, Body Background Color, and Body Text Color in the Email Template Section.
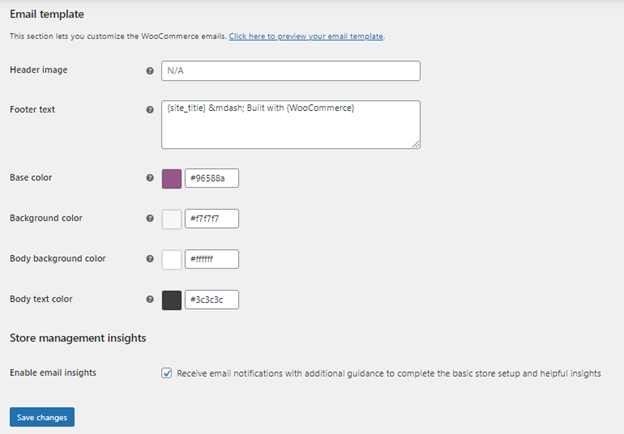
- Enable the Enable Email Insights option from the Store Management Insights section to enable receiving helpful insights from WooCommerce. These insights will be delivered to the admin’s email.


