- Overview
- Frontend View
- Scope of WooCommerce Multi Currency Switcher for Store-owners [Examples]
- Getting Started with the Multi currency Switcher Plugin for WooCommerce
- Configuring the Plugin
- General Options
- Compatibility
- Advanced
- Currencies Options
- Role Defaults
- Frontend Views: How to Display Multicurrency (Currency Switcher) in your WooCommerce Shop?
- Use Php code
- Use Widget for Displaying the Switcher Globally
Overview #
WooCommerce stores with delivery locations across multiple countries need to enable payment options in multiple currencies. The WooCommerce multi-currency plugin (currency switcher) of the Booster plugin lets store owners do that. You can set all significantly-used currencies of the world for your store with it.
The plugin allows administrators to set currency rates automatically (through the Currency Exchange Rate plugin) as well as manually. With this feature, one can set multicurrency payment options storewide, or on a per-product basis.
Besides the above, administrators can enable:
- Rounding the converted price (from store’s default to the customer’s preferred currency);
- Currency-switching for shipping cost (including table rate shipping);
- Currency-switching for coupons;
- Setting the currency by buyer’s country automatically.
Frontend View #
Scope of WooCommerce Multi Currency Switcher for Store-owners [Examples] #
- An e-commerce store with its stores in the USA and England can configure automatic or manual multicurrency product pricing for their shop.
- A store with its branches in 10 countries filling its product pricing manually can enable automatic conversion of pricing through this Booster feature.
- If a store is wishing to sell its products to its retailers in its main (default) currency only, the multicurrency model of the Booster plugin allows you to do so. Its user role-based switcher will let you set currency switcher visibility without any difficulty.
- For a store that charges a shipping fee and/or uses table shipping settings, it is possible to enable or disable multicurrency shipping rates using the multicurrency currency switching feature in the Booster for WooCommerce Plugin.
- If your online shop has coupons and you want to switch the coupon price with users’ currency settings, it is totally doable. You just need the WooCommerce Multicurrency Switcher!
Getting Started with the Multi currency Switcher Plugin for WooCommerce #
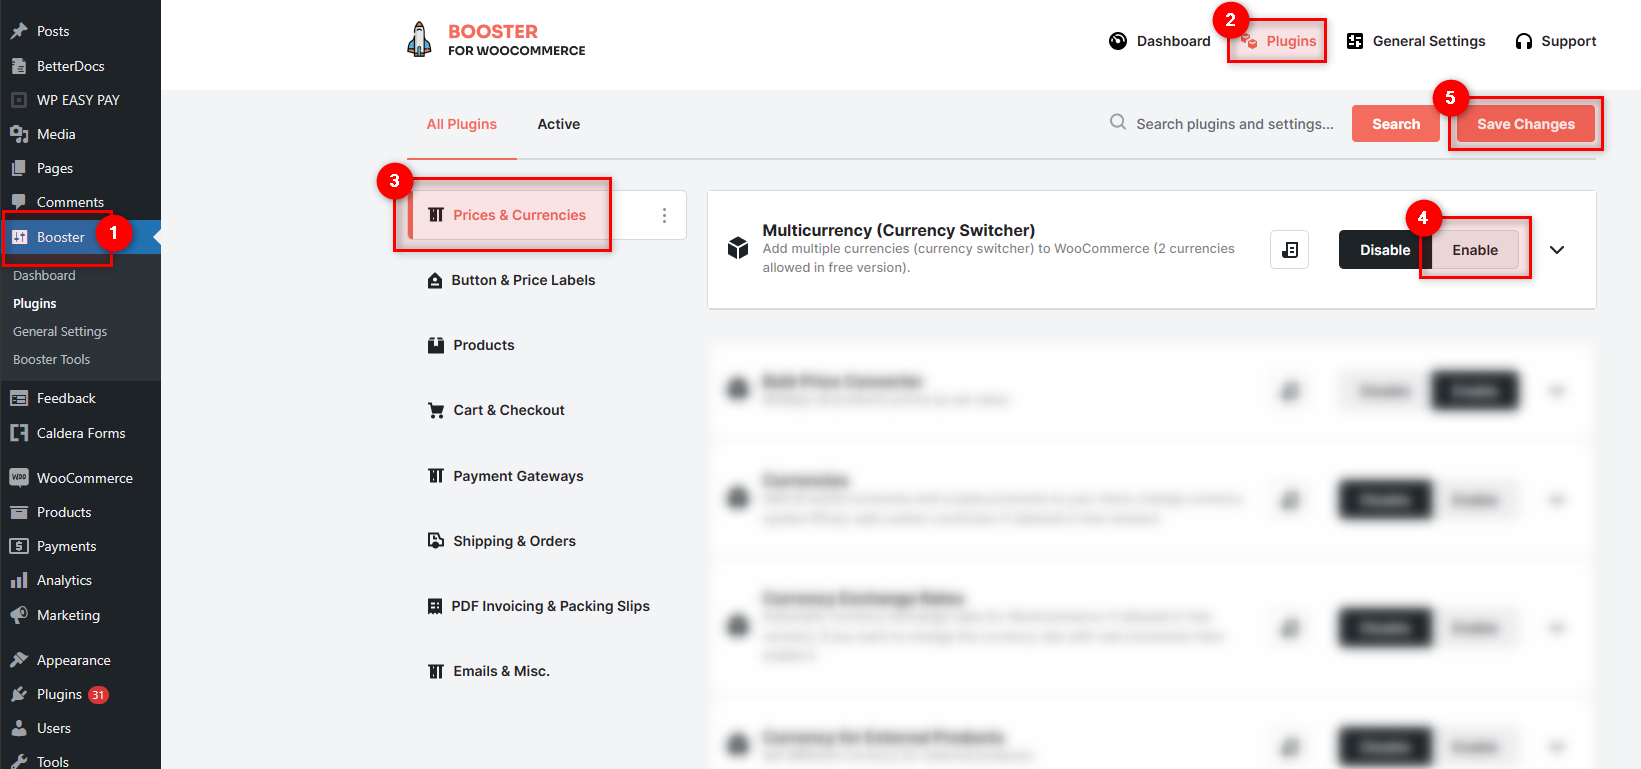
- After logging into your WordPress dashboard, go to Booster > Plugins and click on the Prices & Currencies category.
- Look for the Multicurrency (Currency Switcher) plugin among the once enlisted.
- Enable it and Save Changes button.
Note: If you want to enable automatic currency exchange rates for this plugin, you also need to configure the Currency Exchange Rates Plugin the same way.
Configuring the Plugin #
General Options #
- You can either enter currency-wise product prices manually or take automatic currency rate details through the Currency Exchange Rates Plugin. Select the option as per your preference for updating the exchange rates.

- Enable Multicurrency on per product basis if you want to enter prices for your products as per their selling region manually (instead of letting buyers switch between currencies automatically. With this:
- Enabling Variable products: list available/active variations only will let you do the same for product variants (variable products) too. However, if the per-product setting is not enabled, this setting will be ignored.
- You may also Add option to make empty price when you want to make certain products or product variants unavailable for certain locations.

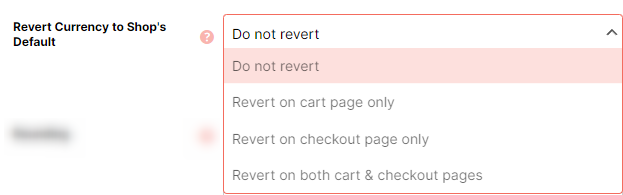
- If you want to show user-decided currency on the product pages, but store’s default currency on the cart and/or checkout pages, select your preference here.
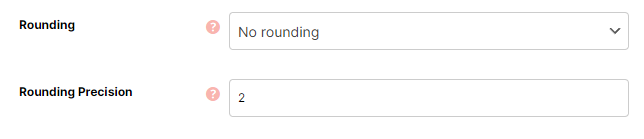
- Next, you may do rounding of the exchange rate and set the precision value. The multicurrency switcher allows rounding-off, rounding up, and rounding down.
- Set a Currency Switcher template. It is the way to decide the options that multicurrency switcher will show to your customers. This template accepts a string containing up to 3 variables.
- %currency_name% (e.g. US dollars, Indian Rupee)
- %currency_symbol% (e.g., $, ₹)
- %currency_code% (e.g., USD, INR)
Example Input: %currency_code% (%currency_symbol%)
The output will be – USD ($)
- Enable or Disable Shipping Values conversion for the shipping facility being given to the buyer.
Compatibility #
You may enable or disable currency conversion for various WooCommerce cart conditions, such as:
- Free shipping (native method)
- Fixed-price coupons
- For coupons with a certain minimum or maximum amount
- For smart coupons
- During price filtering by buyers
- For the imported products
- For WC product bundles
Besides the above, Multicurrency (Currency Switcher) can also be configured to work with the following plugins:
- WPC Product Bundles
- WooCommerce Tree Table Rate Shipping
- Flexible Shipping
- Pricing Deals
- Product Add-Ons
- WooCommerce Attribute Swatches by Iconic plugin
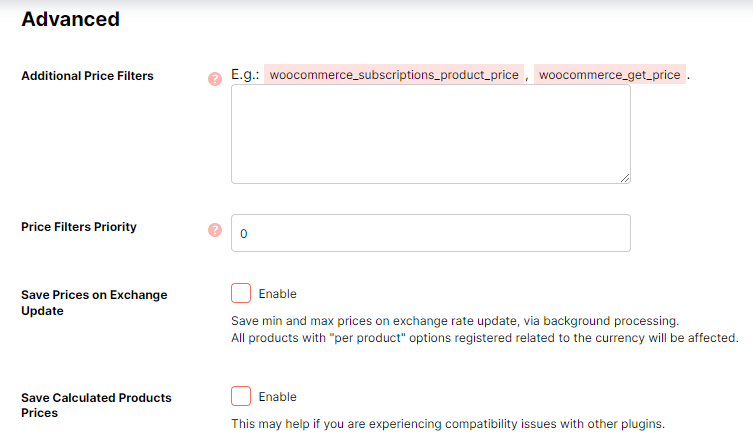
Advanced #
- If you have enabled compatibility settings for price filters in the Compatibility settings above, you can determine the price filters to enable currency switching for particular filters (and not all).
- In case you face any problem in displaying switcher or converted rates for your Price Filters, increase its priority. Greater the number in this input field, the higher the priority.
- Enable the Save Prices on Exchange Update option if you want the shop to save minimum and maximum exchange rates automatically. However, this setting will override your per product rates (in case you are using manual pricing).
- Enable the Save Calculated Products Prices option to manually calculate the product pricing for various currencies. The feature is especially useful when your store has a plugin clashing with Booster’s multicurrency settings and you need some time to solve the issue.
Note:
Price by user role plugin of Booster for WooCommerce Plugin runs before the Multicurrency (Currency Switcher) as per default settings. So, if you are not using the exchange rates and are setting product prices manually, the plugin’s Advanced Options (related to Price Filters Priority) might not work as you are expecting. To correct it, do the following:
- Set “Multicurrency (Currency Switcher) > Advanced: Price Filters Priority” to 999
- Set “Price by User Role > Advanced: Price Filters Priority” to 1000
- Save changes.
Currencies Options #
- Enable Set currency by Customer Country to automatically choose a currency for your buyer as per his address (country).
- In the Total Currencies field, provide the total count of currencies that your store has.
- Provide the currency name and exchange rate details for each currency if you’ve selected the manual method above.
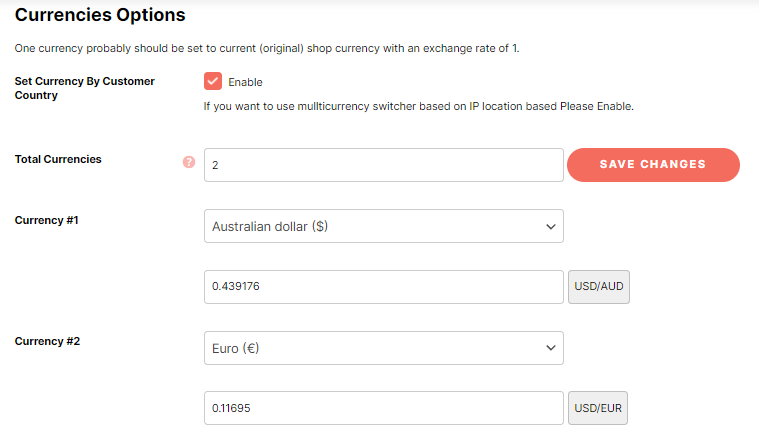
Note: Shop’s default currency will have the exchange rate as ‘1’.
Default Currency Options #
The multicurrency (Currency Switcher) plugin lets you select a default currency for your store through a dropdown menu and allows you to disable changing currency settings for your buyers.

Note: This option is useful when you are setting user currency by location (country) and do not want the user to change its currency, because you won’t be able to bill in another currency.
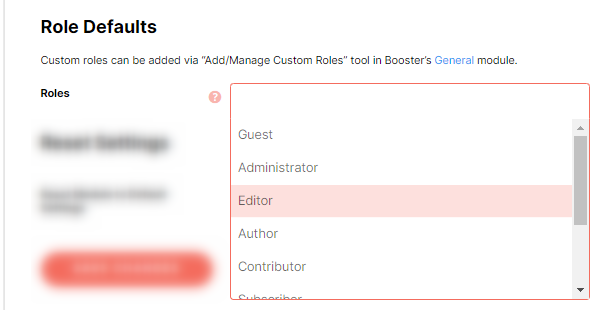
Role Defaults #
Using this setting, a store owner can set a default currency for a particular user role (or a set of user roles)
Frontend Views: How to Display Multicurrency (Currency Switcher) in your WooCommerce Shop? #
Use Shortcodes #
You can enable Multicurrency switcher for your product pages by entering the shortcode for displaying it. Shortcode that you may use are:
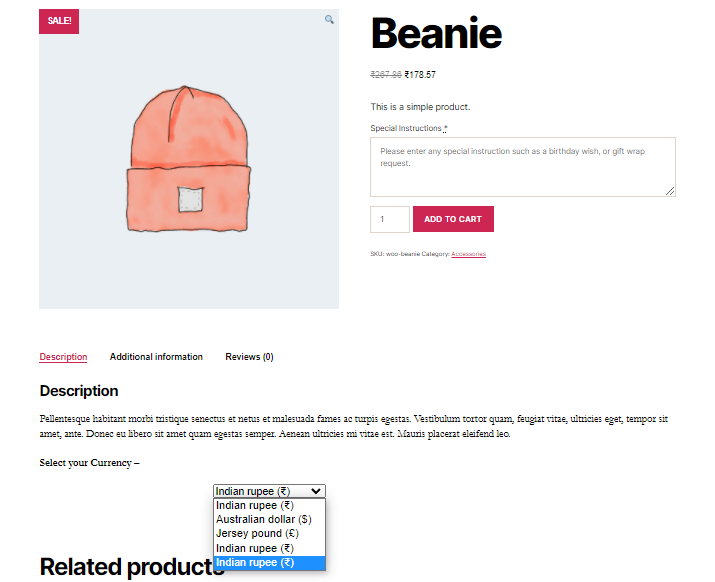
[wcj_currency_select_drop_down_list]
With this shortcode, you can display the multicurrency switcher in drop-drop list format. In the shop on your product pages, the multicurrency switcher will be rendered as shown below:
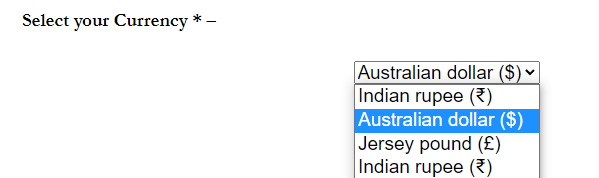
[wcj_currency_select_drop_down_list]
It is to display the multicurrency switcher as a radio button list. The frontend view for a radio list will be similar to the one depicted as under:

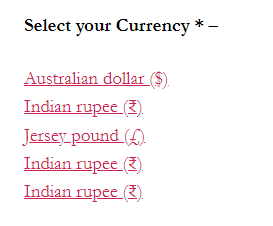
[wcj_currency_select_link_list]
It helps showcase all currencies as a list with links. Here’s how it will look on your site’s frontend:
[wcj_currency_select_drop_down_list visibility=”administrator,customer”]
It is used to set the visibility rights to your multicurrency switcher. The example shown here will make the switcher visible for administrators and customers only. For other user roles (e.g., authors), the same won’t be available.
Adding shortcodes for product pages #
- To add a shortcode for a product, open the respective product page in WordPress editor.
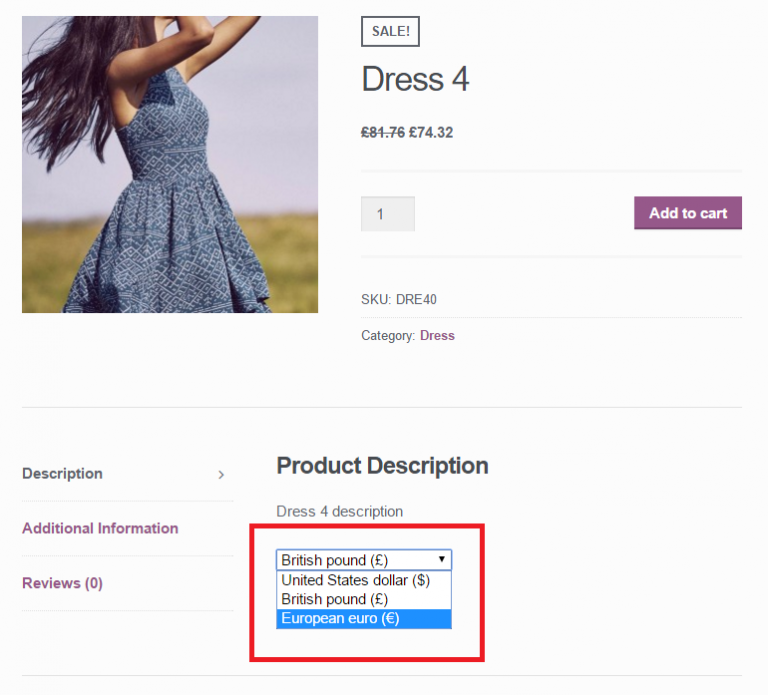
- Now, add the shortcode and other required details on the page, for example, in the description section, as shown below.
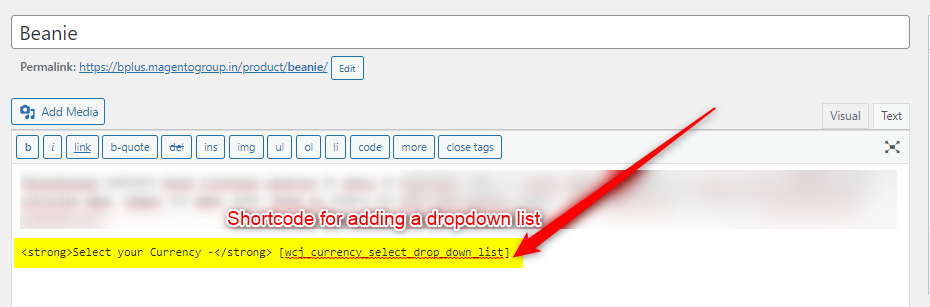
- Save changes.
On viewing the page in your WooCommerce shop, you will find the multicurrency switcher easily now. And when you will change the switcher’s value, the product price’s currency will also vary.
Use Php code #
The above-listed shortcodes can also be used in Php code. Here is one example:
echo do_shortcode( ‘‘ );
In a similar manner, you can also use the above-listed shortcodes in the echo statements and display switcher(s) on the frontend.
Use Widget for Displaying the Switcher Globally #
Using the shortcode and PHP code are good methods when you want to add the multicurrency switcher for a few products in your shop. However, to enable the switcher globally, this technique is not a good pick.
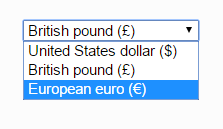
So, you must use the Booster – Multicurrency Switcher widget for your shop.
- Go to Appearance > Widgets.
- Add a widget named Booster – Multicurrency Switcher to your desired location (e.g., Footer 2 in our case).
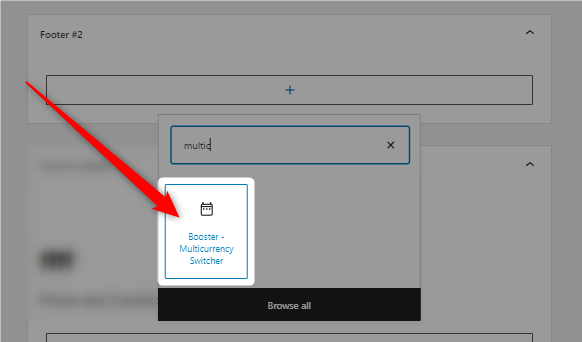
- Add a title, pick a switcher’s display type, select the form method (GET or POST), and fill in other details if you want.
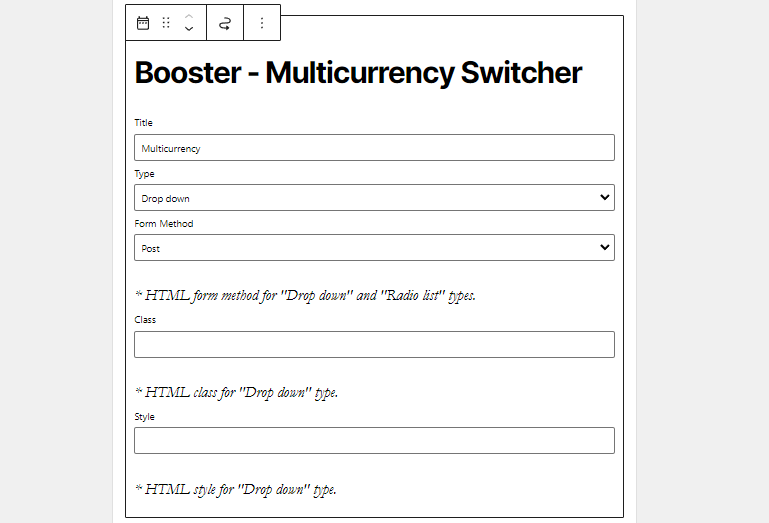
After adding the Booster – Multicurrency Switcher widget in any site location, you can reload your WooCommerce website and see if it is working. The multicurrency switcher will appear on the frontend, as shown below:

Enabling Multicurrency Currency Switcher through product/page URL #
To add the multicurrency currency switcher using a custom link for your product page or shop pages, you can add a postfix to your URL:
/?wcj-currency=<currency_code>`
E.g. – /?wcj-currency=<EUR>`
For example, if you have a buyer from India in your shop and he clicks a product, you may add ‘/?wcj-currency=<INR>’ to this URL and auto-select Indian currency for the person to enhance his shopping experience. With this, he won’t have to manually select a currency and reload the page, increasing your chances of a successful sale.


