- Overview
- Scope of the Checkout Custom Fields Module of Booster for WooCommerce
- Benefits of Enabling Checkout Custom Fields with Booster
- How to Enable Checkout Custom Fields for Your Shop?
- Prerequisites:
- Configuring Checkout Custom Fields Module:
- Configuring the Checkout Custom Fields Module
- Setting Visibility of Custom Fields for Emails
- Setting the Fields Template for your Emails
- Adding Custom Fields for other pages related to the checkout process
- Textarea Settings
- Setting number of customer Fields to Enable
- How to Add a Custom Field?
- Resetting Checkout Custom Fields details
- Advanced: Using Custom CSS with Checkout Custom Fields
- Adding Custom Fields to Booster Invoices
- Frontend Views
- Contact us
Overview #
The Checkout Custom Fields module allows WooCommerce Store owners to add custom checkout fields to their shop. Enabling it, you can take various types of inputs from buyers. So, it becomes very easy for stores to send the collected information through the checkout page and save it to the backend for varying usage.
Above all, if you want to display custom fields on “Thank you”, “View order”, or “Order Received” pages to take buyer input(s), the Checkout Custom Fields module will let you do that.
Collected data can be sent through email to store administrators and/or customers.
Stores can display custom-added fields in billing, shipping, account, order notes, and other sections as preferred. These fields will be added before or after the existing checkout fields in your WooCommerce site.
The accepted field data types are – Text field, number, text area, date picker week picker, radio button, time picker, radio buttons, checkboxes, password, country, state, email, and phone number. The total number of custom fields being added to your shop’s checkout page can be set from the backend and is not limited by any constraints.
For each of the custom checkout fields, you can:
- Show or Hide the field for your pages as needed;
- Determine a type;
- Make it compulsory or optional for the end-user;
- Add a label, a placeholder, and a description;
- Set the display priority when a page has multiple elements;
- Select the display section;
- Clear field value after form submission (or page reload);
- Add a Customer Meta Fields;
- Enter select list, radio buttons, or checkbox fields related details;
- Configure the date picker, week picker, and time picker settings;
- Include or exclude several categories and/or products;
- Set minimum and/or maximum cart amount when this field should work.
Scope of the Checkout Custom Fields Module of Booster for WooCommerce #
All kinds of WooCommerce stores can enable custom fields to make their online shop more advanced and to provide better services to their customers. A few usage examples of this module are:
- A bakery shop willing to take additional notes from customers ordering their cakes can enable a Textarea custom field and improve their cake delivery and customization services;
- A clothing shop that wants its customers to pick a product color while buying variable products can configure a Select list for this purpose. With this, buyers will be able to determine the particular product variant they actually want.
- Pizza shops or eateries selling food items with multiple add-ons available for their customers can use radio buttons on their websites. And by doing so, their customers can now easily select desired add-ons. No unnecessary calls for confirmation and no complaints.
- A retail shop with its online store can give special discounts to its loyal customers through a passcode. For this, the Password type custom field can be enabled as optional, and the buyers sharing the right information through the checkout form can be counted as eligible for this scheme.
- Have a grocery store and want your customers to select their preferred timeslot for the delivery? You can use the Timepicker custom field and make it happen without hassles.
- A business providing product customization services can add various custom fields and ask for a lot of extra information from its buyer to do amazing at their tasks.
Not just the above 6, WooCommerce Checkout Custom Fields can have hundreds of use cases. You, as a WooCommerce store, just need to determine its utility (or utilities) for your business and get started. Setting up and using this Booster plugin is super simple.
Benefits of Enabling Checkout Custom Fields with Booster #
- Advanced store functionality;
- Ability to take more information about the order from customers;
- Higher customer satisfaction level due to better service quality;
- Reduced customer care queries and upset buyers;
- Great details for your delivery, packaging, and product manufacturing teams;
- A smoother shopping experience for buyers;
- Efficient billing and shipping with more details;
- Accept extra information for business buyers while serving the B2B sector;
- Provide amazing add-on services with your products to help you gain an edge over rivals;
- Higher revenue for your e-commerce business.
How to Enable Checkout Custom Fields for Your Shop? #
Prerequisites: #
- A WooCommere store;
- Have the Booster for WooCommerce plugin installed on your WordPress website.
- The booster Plugin works with PHP v5.6+ and WordPress v4.4+. If you are using an older configuration than required, you will have to update your configuration before getting started with the plugin.
Configuring Checkout Custom Fields Module: #
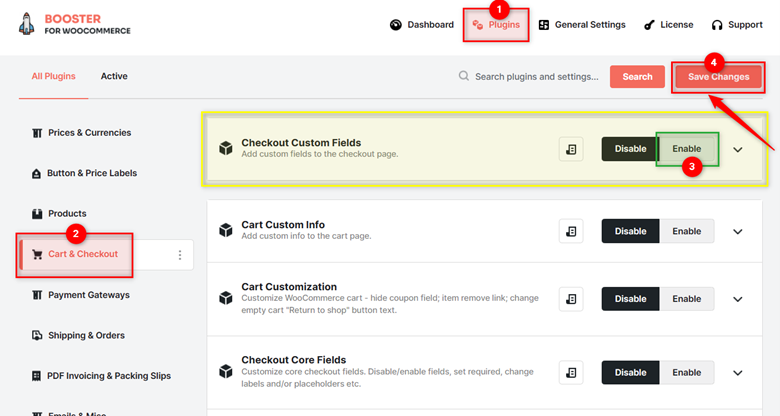
- In your administrator panel of the WordPress (WooCommerce) website, go to Booster > Plugins.
- Look for ‘Checkout Custom Fields’ among the plugins listed in this category in your dashboard.
- Select Enable for this plugin and save settings.
Configuring the Checkout Custom Fields Module #
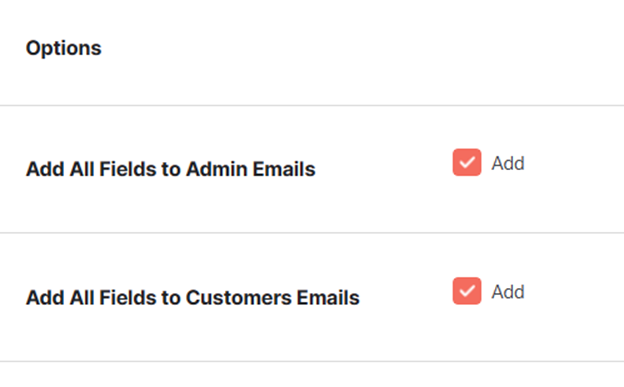
Setting Visibility of Custom Fields for Emails #
Data captured through custom fields can be integrated into WooCommerce emails for shop buyers as well as shop administrators. For this, you will have to go to the Options section in the Booster Elite Dashboard and click Add for the relevant option(s).
Enabling this field for administrators will help them consider all delivery and customization-related information while processing the order. On the other hand, customers can save this email for future reference, considering your store a more reliable eCommerce platform.
Setting the Fields Template for your Emails #
Emails fields Template of Checkout Custom Fields module in the Booster for WooCommerce plugin is the format of displaying your custom fields in the email. It accepts HTML-formatted text and renders this text in HTML format for your emails.
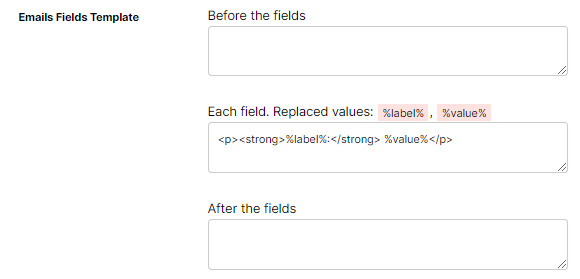
In the case of store emails, you may add the following information through the Checkout Custom Fields module:
- HTML to be added before the field, for example – section title, or an explainer line.
- HTML that contains fields data. It accepts two variable:
- %label% – Custom Field’s Label text
- %value% – The input for this custom field, as provided by the buyer
- HTML to be displayed after custom fields information.
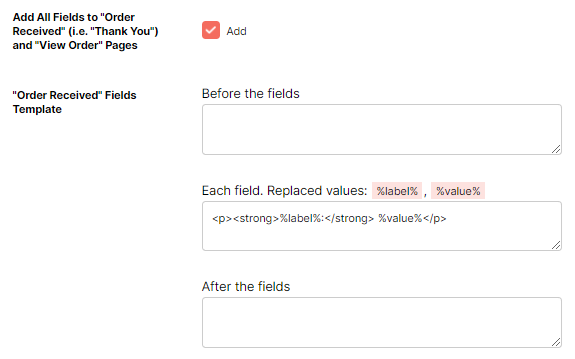
Adding Custom Fields for other pages related to the checkout process #
Do you want to take inputs from your buyers through various pages that are used during a checkout journey but are not the checkout page exactly?
In case you are confused, let us tell you which pages are we talking about. These are:
- “Order Received” Page
- “Thank you” Page
- “View Order” Page
To enable the custom fields for the above-listed pages, click Add for the Add All Fields to “Order Received” (i.e. “Thank You”) and “View Order” Pages option.
Note: Refer to the ‘Setting the Fields Template for your Emails’ section to learn how to edit the “Order Received” Fields Template.
Using this setting, store administrators can do various things, such as:
- Ask buyers if they are satisfied from the current ordering process;
- Take feedback from buyers on shopping experience;
- Let buyers input a passcode that unlocks digital goodies provided with the ordered item;
- Ask the buyer for order recipient’s contact information (if it is different from the one provided in the user profile).
Textarea Settings #
To clear the textarea field after the ordering or page reload processes, click the checkbox provided for Textarea Field Values option.
Because textarea field considers your buyer’s input as HTML information, it won’t consider the next-line (line break) while sending it to store administrators or buyers. However, if you want to retain line breaks (as used in the input), you should enable Textarea Line Breaks option.
Setting number of customer Fields to Enable #
The Checkout Custom Fields module lets you add any number of custom fields to your checkout pages. But you will first have to tell the Custom Fields Number, click Save Changes, and Save the overall settings. Only after this, your screen will show sufficient options to configure each of the custom fields.

How to Add a Custom Field? #
A custom field, added using the Checkout Custom Fields module, can be shown on various checkout pages while showing and hiding it for different conditions. Every custom field can be of one of the input (form field) types, including Text field, number, text area, date picker week picker, radio button, time picker, radio buttons, checkboxes, password, country, state, email, and phone number.
Once you have defined the total number of custom fields for your WooCommerce set up in Checkout Custom Fields configuration, you will see various sections, named as:
Custom Field #1, Custom Field #2, Custom Field #3, and so on.
Let us pick one such field and explain how to configure it. All steps for the same are explained below.
Showing or Hiding a Custom Field #
Click Enable to make your custom field visible to store buyers.

If you want to retain the custom field but do not want to show it to store buyers for the time being, you can uncheck this field to Disable or hide it.
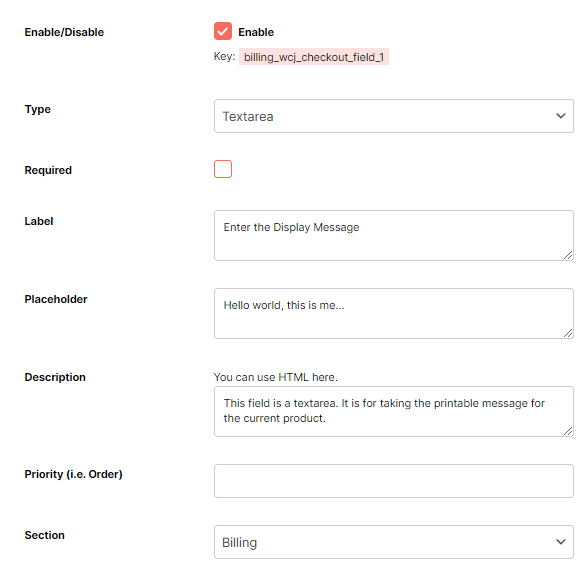
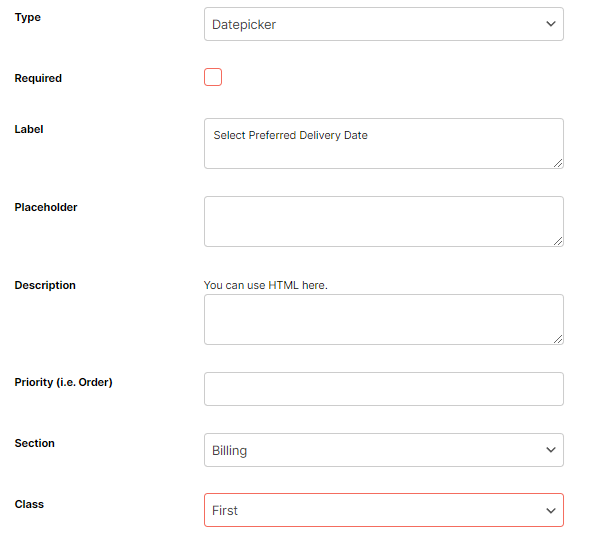
Configuring General Details #
General details about a text field are:
- Type (text, textarea, phone, etc.) – Select it from the dropdown list;
- Required – Check this field to make the custom field essential for proceeding towards final checkout. Skip checking the field to keep it an optional field for buyers;
- Label – Enter the text that is prefixed as field title to your custom field, helping buyers understand the purpose of the field;
- Placeholder – Provide the text to be displayed as field input template. It will guide buyers through example inputs or input instructions;
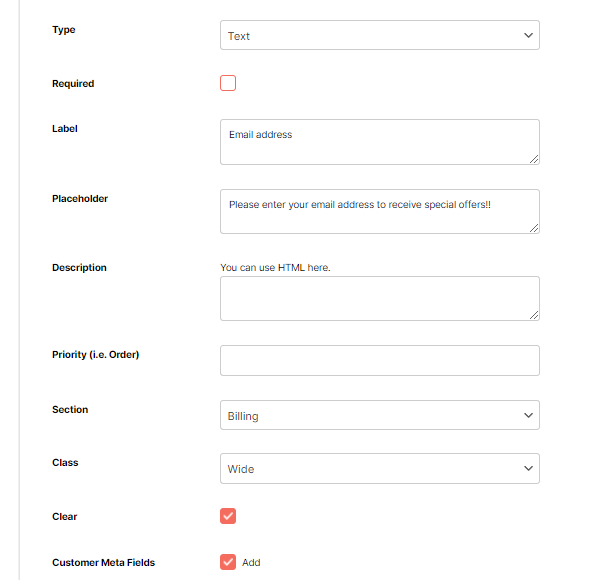
- Description – Enter 1-2 lines or a few words defining your custom field (optional);
- Priority – Enter a value (in numbers) if you want to change the sequence of your custom field on the checkout page. This value act as the sequence number for the field;
- Section – Select among Billing, Shipping, Order Notes, and Account options to define the display section for your custom field;
- Class – Select among the Wide, First, and Last options to assign an HTML class to this field;
- Enable or disable field clearing and customer meta-fields as suited for your store.
Adding Options (Select List, Radio Buttons, Checkboxes) if Applicable #
If your custom field is of a Type that may have multiple values (e.g., Select list, Radio buttons, or Checkboxes), you must fill required details here.
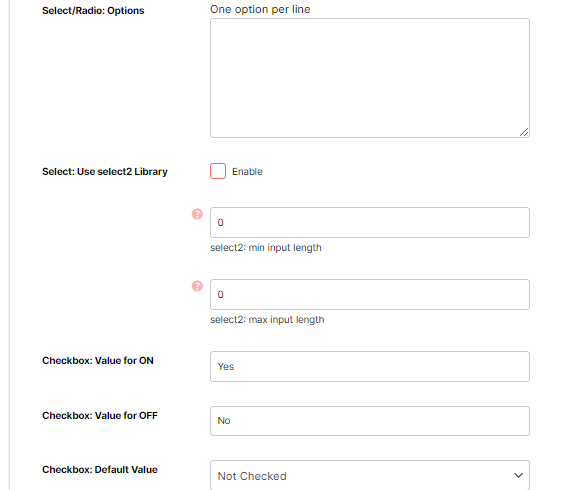
You can:
- Enlist options for your dropdown or radio button lists;
- Enable Select2 Library (an JQuery alternative of HTML Select lists);
- Set Checkbox ON, OFF, and default values;
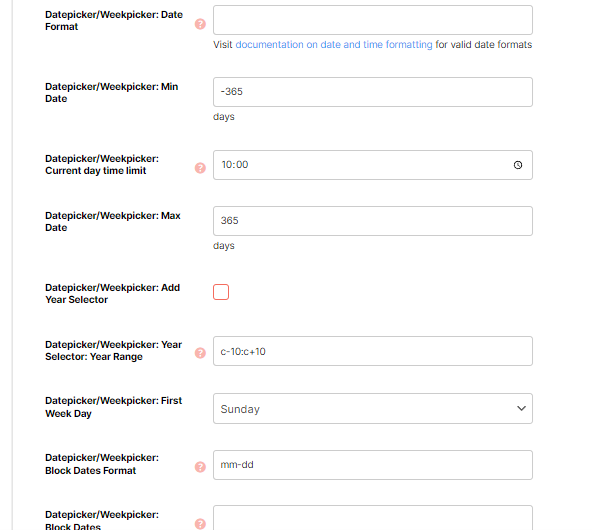
Datepicker/Weekpicker Settings #
This section lets you provide date and week related formats, limits, ranges, and restrictions. While adding information here, please consider adhering to this documentation on date and time formatting.
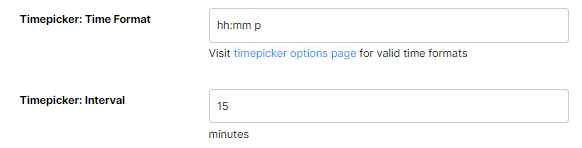
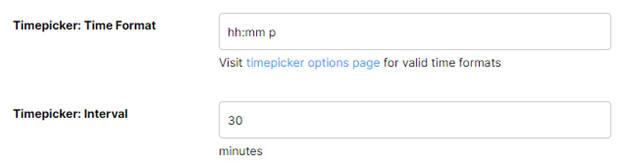
Timepicker Settings #
Set time format and interval details using these settings while taking a note of valid time formats here.
Setting Custom Field’s Visibility within the Shop #
Checkout Custom Fields module allows WooCommerce stores to set each custom field’s visibility as per their needs. This means, if you want to include or exclude several products or categories from this setting rather than enabling it storewide, you can do that. Similarly, one can set a minimum and/or maximum cart amount that will trigger that custom field to show.
For both the above case, you need to fill in the below-listed fields:

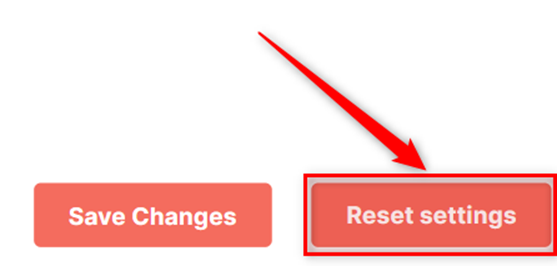
Resetting Checkout Custom Fields details #
If you want to reset the Checkout Custom Fields module’s settings to default, click Reset Settings, and it’ll be done. This option comes in handy when you are confused about the options you’ve selected and saved so far.
Advanced: Using Custom CSS with Checkout Custom Fields #
- Go to Booster > Plugins > EMAILS & MISC. > General
- Add your custom CSS for the custom fields here.
- Save settings.
Example:

Adding Custom Fields to Booster Invoices #
Use this shortcode:
[wcj_order_checkout_field]
Frontend Views #
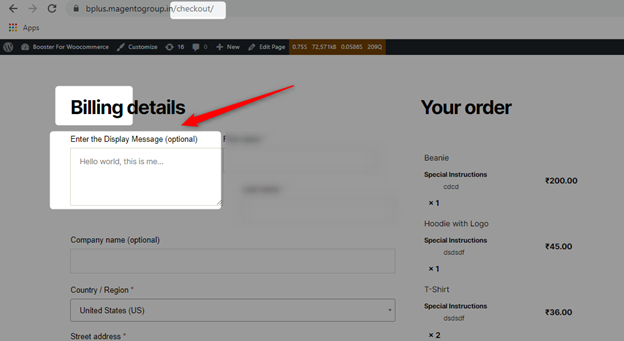
1) Adding a Textarea #
The Frontend View #
2) Adding a Datepicker #
The Frontend View #

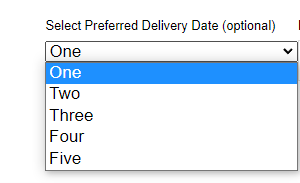
3) Adding a Select Dropdown #
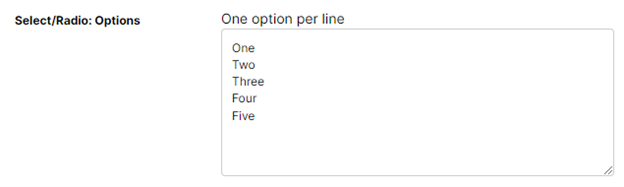
The Frontend View #
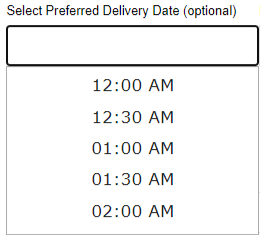
4) Adding a Timepicker with 30-minutes Interval #
Note: The default time interval value is 15 minutes.
The Frontend View #
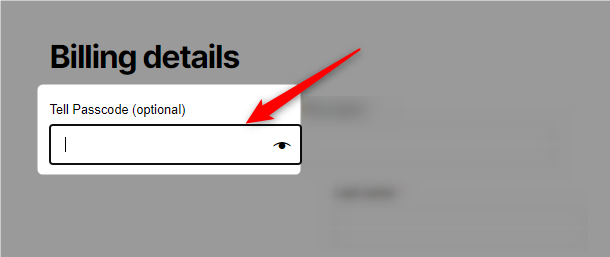
5) Adding a Password field #
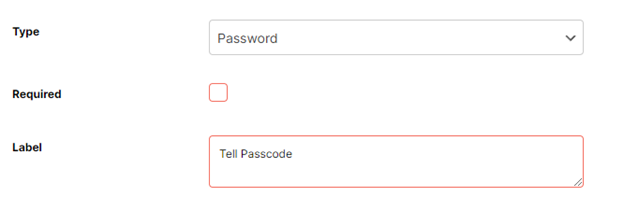
The Frontend View #
Contact us #
If you have concerns related to this module, please raise them in our support forum or log in to your Booster account to share the same with Booster Plus Premium Support. We are all ears 🙂


