Overview #
The Checkout Files Upload for WooCommerce plugin allows you to add file upload to WooCommerce checkout pages. Your customers can upload files while or after checkout using these options. Upload files during checkout for WooCommerce is a very useful functionality for the eCommerce store willing to offer customization services to their customers and improve user experience for shoppers.
You can specify the number of file uploads that you want to allow, the position of the file upload option on the checkout page, accepted file types, labels for upload and remove buttons, messages on wrong file type; required file; file successfully uploaded, and conditions based on which fields should be disabled, only if selected product or category or tag is in the cart.
This plugin also allows store owners to block potentially harmful files from being uploaded to their store, preventing WooCommerce fraud and cyber attacks on your store. To explore all related capabilities, check our Checkout Files Upload Feature page.
Example Output #
#1 – Checkout Page #
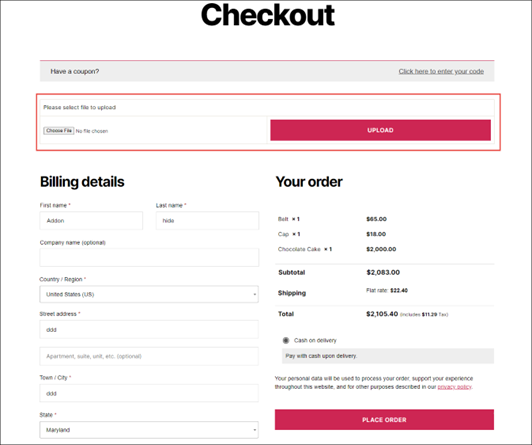
The customer gets an option to upload files on the checkout page (alongside a remove button for the same). The position of this upload option depends upon your Checkout Files Upload plugin settings (e.g., before checkout form, in this case).
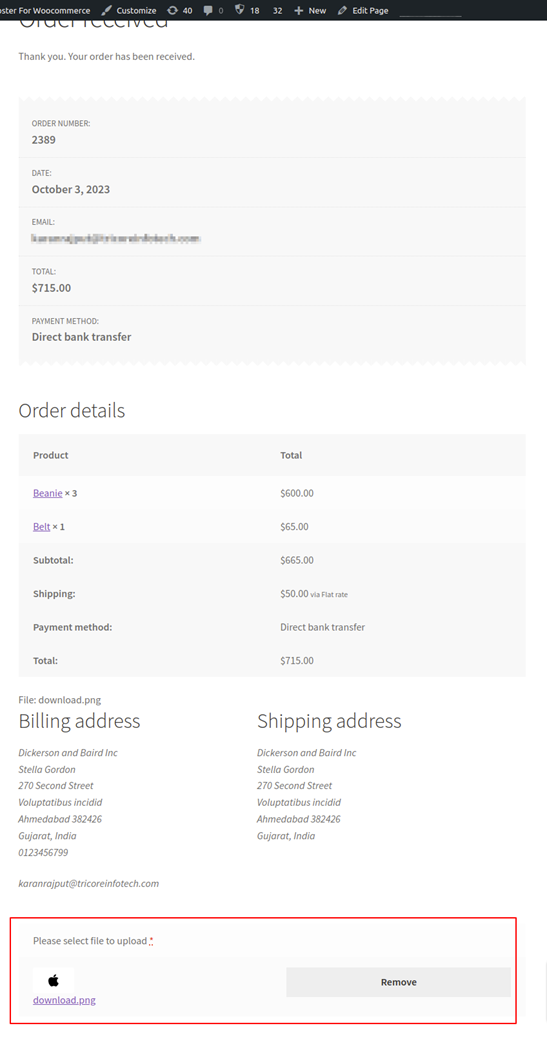
#2 – Thank you Page #
If the related option (Options > Add to Thank You Page) is selected, the Thank You page (order confirmation page) on your customer’s screen will have the uploaded file enlisted on it. The customer will also have an option to remove this uploaded file.
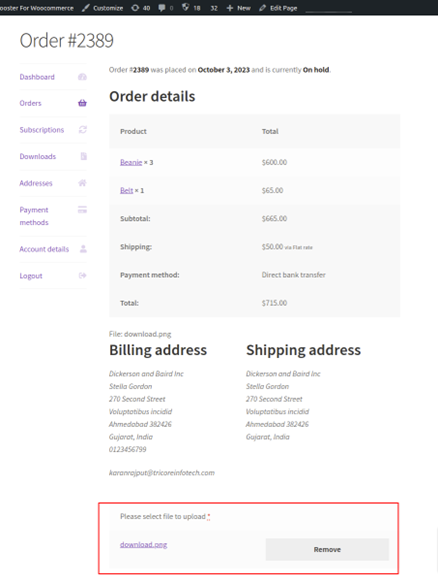
#3 – My Account Page #
If the related option (Options > Add to My Account Page) is selected, the My Account page (order details page) on your customer’s screen will have the uploaded file enlisted on it. The customer will also have an option to remove this uploaded file. This flexibility enhances the Checkout file upload for WooCommerce flow.
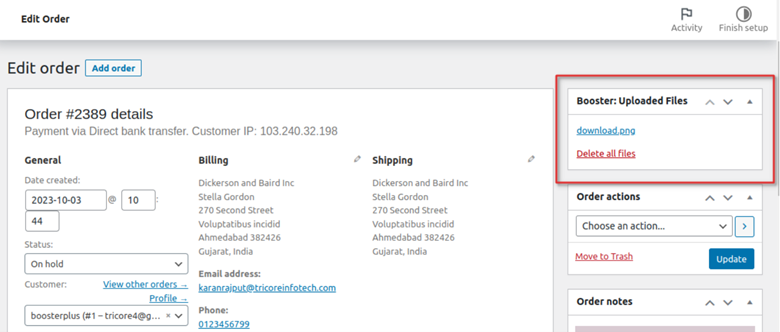
#4 – Admin Order Details Page #
The admin, upon viewing the customer’s order (which has file attachment(s)), will see an additional meta-box named Booster: Uploaded Files on the order details page. From here, the store administrator can download the attached files or delete all files. This simplifies managing File upload checkout for WooCommerce data.
How to Enable WooCommerce Checkout Files Upload for WooCommerce #
Please download and install Booster for WooCommerce and follow these steps:
- In your store’s admin dashboard, go to Booster > Cart & Checkout > Checkout Files Upload.
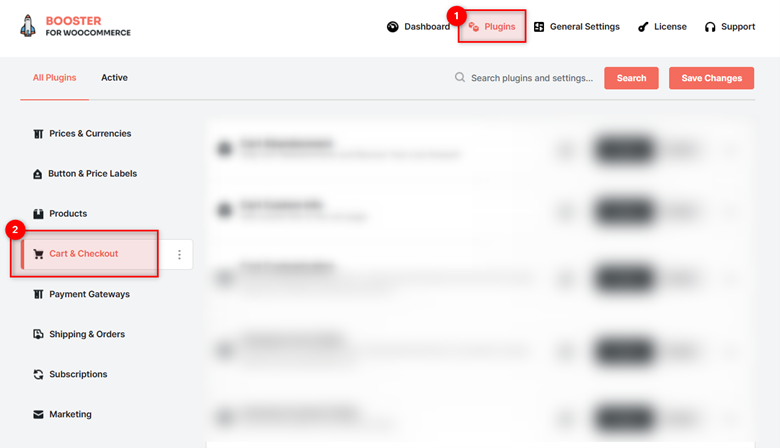
- In the Checkout Files Upload section, check the box for Enable Module field.

- Click on the Save Changes button.
Once enabled, Add file upload to checkout for WooCommerce options will be visible in the frontend.
How to Configure Checkout Files Upload Settings? #
- Log in to your store’s admin dashboard.
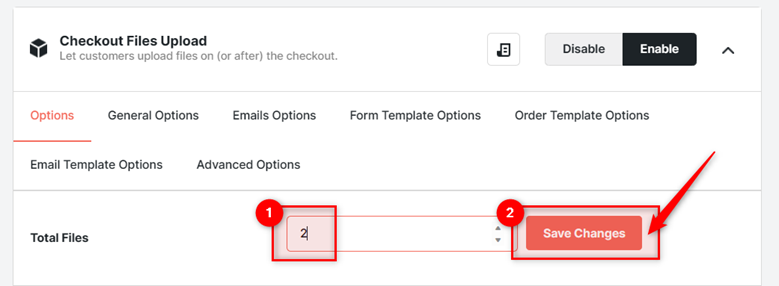
- Go to Booster > CART & CHECKOUT > Checkout Files Upload.
- Enter the number of file upload options that you want to add to your checkout page in the Total Files field and click the Save Changes button next to it.
Now, for the file upload(s), the Checkout Files Upload plugin has various other options. Use these options to customize your upload option settings.
Let’s say you are editing the main Options for the first file that your store customer can upload. Here’s what can be customized:
| Field | Description |
| File #1 | Select enable if you want to allow the user to upload this file |
| Required | Specify if you want to make this upload option mandatory |
| Position | Select a placement position of the file upload option on the checkout page |
| Add to Thank You page | Tick this box if you want to show this option on the Thank you page in your store |
| Add to My Account page | Tick this box if you want to show this option on the My Account page in your store |
| Label | Write the text to be displayed with the file upload option. To disable the label, leave this field empty. |
| Accepted file types | Add extensions/File formats that are accepted for upload |
| Label: Upload button | Add text for the file upload button |
| Label: Remove button | Add text for the file delete button |
| Notice: Wrong file type | Set a message to be displayed when a wrong file type is uploaded |
| Notice: File is required | Set a message to be displayed when uploading a file is mandatory, and the user does not upload a file uploaded |
| Notice: File was successfully uploaded | Set a message to be displayed when the file upload is successful |
| Notice: No file selected | Set a message to be displayed when the user clicks the upload button without selecting any file to upload |
| Notice: File was successfully removed | Set a message to be displayed when file deletion is successful |
| PRODUCTS to show this field | The file upload option will be displayed on the checkout page, only if at least one or more products specified in this field is selected by the customer. If this field is empty, then the file upload option will be displayed for all products. |
| CATEGORIES to show this field | The file upload option will be displayed on the checkout page only if at least one or more products from the categories specified here are selected by the customer. If this field is empty, then the file upload option will be displayed for all product categories. |
| TAGS to show this field | The file upload option will be displayed on the checkout page only if at least one or more products matching the tags specified in this field are selected by the customer. If this field is empty, then the file upload option will be displayed for all tags. |
| USER ROLES to show this field | If the customer is assigned any of the roles specified in this field, the file upload option should be displayed on the checkout page. If this field is empty, then the file upload option will be displayed for all user roles. |
| PRODUCTS to hide this field | The file upload option will be hidden on the checkout page if at least one or more products specified in this field is selected by the customer. If this field is empty, then the file upload option will be displayed for all products. |
| CATEGORIES to hide this field | The file upload option will be hidden on the checkout page if at least one or more products from the categories specified here are selected by the customer. If this field is empty, then the file upload option will be displayed for all product categories. |
| TAGS to hide this field | The file upload option will be hidden on the checkout page if at least one or more products matching the tags specified in this field are selected by the customer. If this field is empty, then the file upload option will be displayed for all tags. |
| USER ROLES to hide this field | If the customer is assigned any of the roles specified in this field, the file upload option should be hidden on the checkout page. If this field is empty, then the file upload option will be displayed for all user roles. |
This gives you flexible control over file upload checkout for WooCommerce visibility.
General Options #
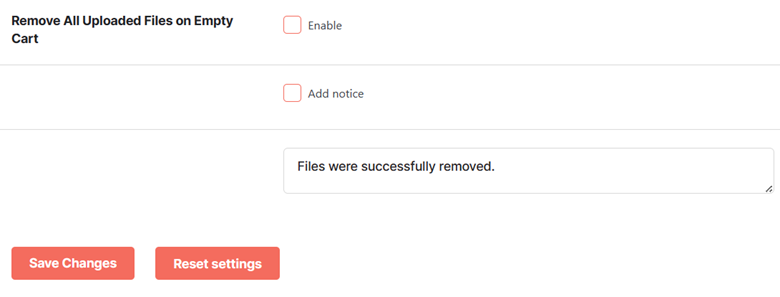
If you want to Remove all uploaded files on Empty Cart and/or add a notice for the same, tick the respective boxes accordingly. And, in case you have enabled the Add Notice option, you can customize the message to be displayed by entering a different notice in the text area given below.
Emails Options #
The emailing operations related to the file uploads are handled through the Email Options tab of the Checkout Files Upload.
Here’s what needs to be done with various fields available in this section.
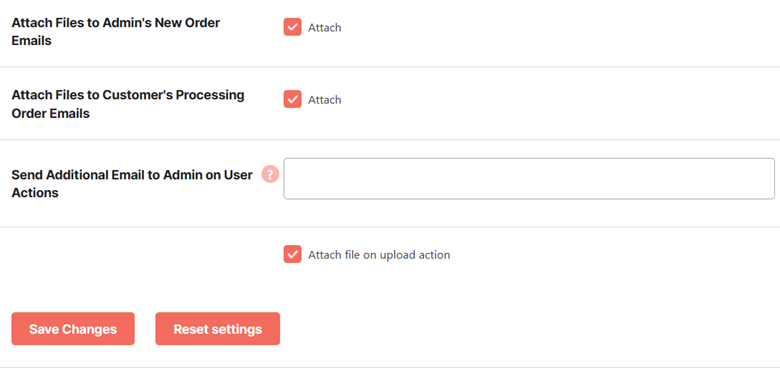
| Attach Files to Admin’s New Order Emails
|
Enable if you wish to allow uploaded files to be attached to the administrator’s new order emails |
| Attach Files to Customer’s Processing Order Emails | Enable if you wish to allow uploaded files to be attached to the customer’s order processing emails |
| Send Additional Email to Admin on User Actions | Enter the email address of the administrator to which emails will be sent on user actions |
| Attach file on upload action | Enable if you wish to allow uploaded files to be attached to additional emails sent to the admin. |
This supports smoother communication around File upload for WooCommerce during checkout .
Form Template Options #
The checkout files upload section, displayed on the checkout page of your customer, is an HTML form. Now, if you wish to modify its design or elements using HTML, that’s totally possible.
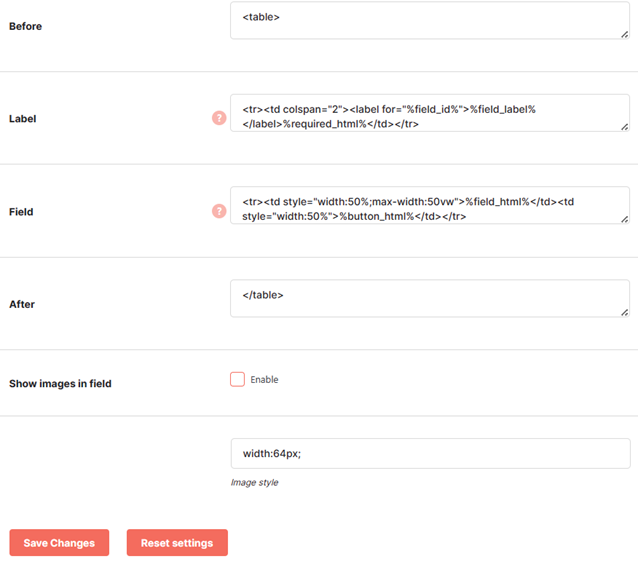
Head to the Form Template Options tab in your plugin dashboard and modify the HTML content for the following parts of this section:
- Before the checkout files upload section
- For the section label
- For the section’s file uploads field.
- After the checkout files upload section
You can enable displaying images in this section by selecting enable for the Show images in field settings and adding the relevant HTML content in the fields above. Edit an image width if required.This enhances the Upload file for WooCommerce on checkout interface visually.
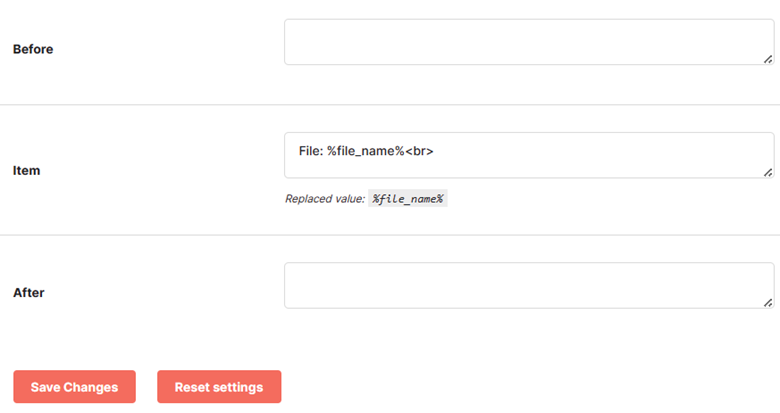
Order Template Options #
Edit the order page template for the checkout files upload part if needed. You can modify the before, after, and item field content from the Order Template Options.

Email Template Options #
Edit the email template for the checkout files upload part if you wish. You can modify the before, after, and item field content from the Email Template Options.
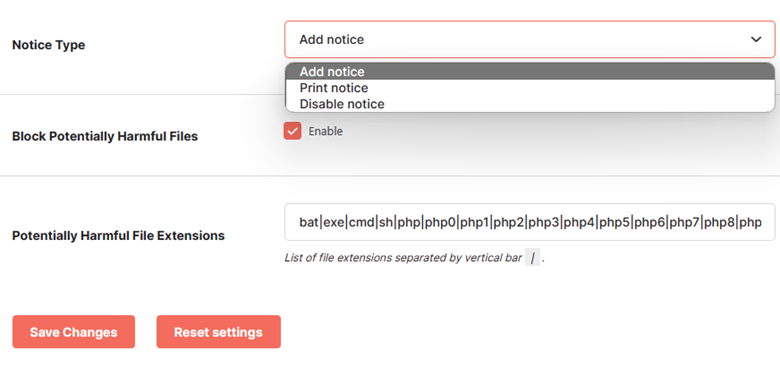
Advanced Options #
The Advanced Options for the Checkout Files Upload for WooCommerce plugin lets you trigger a notice when the user attaches a potentially harmful file.
- Enter the file extensions that you consider harmful in the Potentially Harmful File Extensions Separate the extensions using vertical bars (e.g., bat|exe|cmd)
- Select Enable for the option Block Potentially Harmful Files if you wish to block the harmful files uploaded by a customer.
- Select the Notice Type according to your preference. Your options are: Add notice, print notice, or disable notice.
- Click on the Save Changes
FAQs #
-
- Can I limit the file size or allowed file types?
Yes, you can define minimum and maximum file size, and allow only specific file types like JPG, PNG, or PDF.
-
- Does the plugin support uploading multiple files at checkout?
Yes, you can set how many files a customer can upload for each field, and configure rules per product or category.
-
- Where can file upload buttons appear on the site?
You can place the upload field on product pages, cart, checkout, Thank You, and My Account pages.


