Overview #
The Subscription Customization plugin lets WooCommerce store owners manage subscriptions and present them in a better way. For example, you can improve your Subscription cancellation process by enabling your buyers to tell about why they are not interested in the subscription anymore.
Besides the above, the plugin also lets you do more useful subscription-related tasks. You can:
- Add one or multiple products to your existing subscription.
- Convert a normal product into a subscription-based product.
- Let your subscribers change the next payment date for the subscription.
- Specify the email templates (for admin and subscribers) related to payment change date.
- Add sender name and email for subscription emails.
Working in collaboration with your general WooCommerce > Subscription settings, the Subscription Customization Plugin – Booster will let you leverage multiple benefits, including:
- Analyzing the reason for subscription cancellation (and acting upon the same);
- Helping you satisfy your (current and future) buyers as you can improve your store’s products/processes as per the inputs received;
- Adding the functionality to enable product-wise subscriptions in your store. It will act as an extra stream of revenue for your e-commerce business.
How to Activate the Subscription Customization Plugin – Booster? #
Prerequisite 1: The subscription Customization plugin is a part of Booster for WooCommerce Mega Plugin, a bundle of 110+ WooCommerce-specific plugins. So, to enable this plugin on your store, you must install Booster on your store and activate it using a valid key.
Prerequisite 2: This plugin essentially needs the WooCommerce Subscriptions Plugin to be active on your WooCommerce store in order to function well. Assuming that you have the subscription functionality enabled in your store, your online might already have it.
Once the above 2 plugins are activated, follow these steps:
- Go to Booster > Subscription > Subscription Customization.
- Select Enable for the Subscription Customization

- Click on the Save Changes
The plugin is now activated.
Guide to Using the Subscription Customization Plugin #
Note: Please install and enable the subscription customization plugin & the WooCommerce Subscriptions plugin before following any of these mini-guides. To do so, you may scroll up and get help from the ‘How to Activate the Subscription Customization Plugin – Booster?’ section.
Subscription Cancellation #
- Go to WooCommerce > Booster > Settings > Subscriptions > Subscription Management.
- Scroll down to the Subscription Cancellation
- Now, do the following:
- If you want to ask your subscriber why s/he is cancelling the subscription, select the Ask the Reason on Cancellation
- Enter the Title and Subtitle for your Subscription Cancellation
- If you have enabled the option to ask reasons, specify the options for Reason(s) in the given input text area – one reason per line.
- To let the subscriber specify his/her own reason for subscription cancellation, click on the Enable Other Reason
- If the ‘other reason’ option is enabled, specify the main label and its description in the given text fields.
- Save settings by clicking the Save Changes

Existing Subscription #
All the existing subscriptions (with their price and other details) can be viewed from the WooCommerce > Subscriptions page. To add one, few or all products to these subscriptions, you can use the Subscription Customization Plugin – Booster. Here’s how:
- After enabling this plugin, go to the Booster > Subscriptions > Subscription Customization plugin dashboard.
- Scroll down to the Add Products to an Existing Subscription

- Tickmark the Enable option, present on the top of this section.
- If you want to add a few specific products to an existing subscription, select the checkbox for the Enable Per Product Doing so will add a meta-box on all product pages (see them in Editor).
- Now, you can select the value for Enable as Yes or No for each product separately.
- After changing these settings for any product, make sure to click on the Update

- To add all store products to an existing subscription, select the checkbox for the Enable All Product
- If the Enable Per Product option is selected, enter a Title to be shown on the Product Pages (in Editor).
- Click on the Save Changes
Subscription Addon #
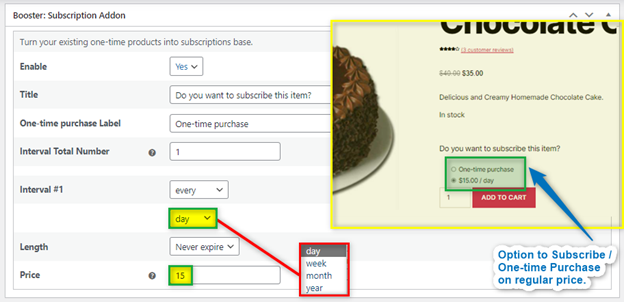
Using the Booster – Subscription Customization Plugin, you can create subscription-based products. It implies that you can sell your normal products on subscription in WooCommerce. This subscription could be on daily, monthly, weekly, yearly basis. And with our plugin, you can even enable it for every 2nd, 3rd, 4th, 5th, or 6th (day, month, week, year).
Use the Subscription Addon feature to do so.
- Go to WooCommerce > Booster > Settings > Subscriptions.
- Click on the Subscription Customization.
- Scroll down to the Subscription Addon
- Select Enable for this option.
- Click on the Save Changes button, present at the bottom of the page.

- Following the above steps will enable a meta-box named Booster: Subscription Addon to each of your product’s edit page.
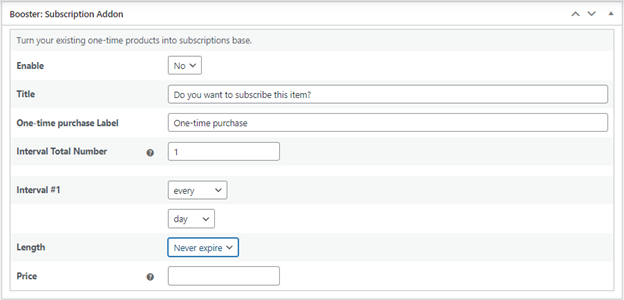
- To make a product subscription based, do the following:
- Open the product page in Edit
- Edit the Title to be shown on the product page for the subscription option.
- Enter the one-time purchase label. It will be displayed for the one-time purchase or life-time subscription of the product.
- Now, you can enable one or multiple intervals for your product subscription. For example, a daily subscription and a monthly subscription can be enabled for it. Specify the number of types of subscriptions (with different pricing) to enable in the Interval Total Number
- For each interval:
- Select occurrence (every 2nd, 3rd, 4th, 5th, 6th) by day, week, month, year.
- Specify the Length of this offer. It can be everywhere between 1 day to 90 days. For longer offers, you can set its value to Never Expire.
- Set a price for the subscription.
- Repeat the same steps for each interval.
- Click on the Update button for your product page to save & apply these changes.
Input and Output Example
Enabling a subscription ($15/day) for a product in the WooCommerce Store
Subscription Editing #
- Go to Booster > Subscriptions > Subscription Customization page
- Scroll down to the Subscription Editing: Change Next Payment Date
- Select Enable option, present on the top of this section.
- Set a label for this option. Buyer/subscriber will see the same label on the change next payment date
- Besides the above, you can set Email Subject and Email Content for the Admin and Customer recipients, separately. Use the variables like %customer_name%, %order_id%, and %next_payment_date%, as per your preference in these templates.
- Click on the Save Changes

Now, buyers will be able to change the payment date of the subscription from the My Account > My Subscription page.

General Options #
As subscribers receive emails from your WooCommerce store, these emails should have a trusted source/sender. To configure sender details:
- Go to Booster > Subscriptions > Subscription Customization page and scroll down to the General Options.
- Enter the From Name that represents the email sender.
- Enter the From Email that tells about the email address of the sender.
- Click on the Save Changes

How to Clear Booster-enabled Subscription Customization Plugin Settings? #
To clear/reset/format the plugin settings:
- Go to Booster > Subscriptions > Subscription Customization
- Scroll down to the bottom of the page and in the Reset Settings section, click on the Reset Settings
- Confirm the same when a browser alert/popup appears on your screen.


