Overview #
Got a WooCommerce shop for your clothing, bakery, retail, or fashion products shop online? You must customize your product description pages to (optionally) offer the customized services or additional items. For some stores, e.g. pizza shops, this functionality is a necessity rather than being an extra facility.
Offering the facility to select add-ons for your products or the whole store is a good idea. This one step can boost your sales, revenue, service quality, and buyer satisfaction rate. Use Product Addons from Booster’s bundle of 120+ plugins to get started with it in a few minutes.
This plugin lets eCommerce businesses use a global setting with one or multiple product add-ons, at the same time, allowing them to enable per-product addons. You may (or may not) associate prices with each addon option.
Wondering what this plugin is capable of and where can you use it? Read ahead and understand.
Note: Scroll down a bit to find how-to guides for various product addons functionalities.
A Quick List of Features of the Product Addons Plugin (Booster):
- Enable or disable one or more storewide addons;
- Enable or disable one or more addons for any product in the store;
- Show addons as checkbox list, select dropdown, radio buttons, or text input field;
- Specify label text and tooltip text for each option in each of your addons;
- Specify the price for each addon option (each addon label);
- Set a default value for your addon;
- Make the product addon compulsory or optional;
- Exclude products from global (storewide addon) settings;
- Define addon quantity;
- Enable AJAX on product pages to display price’s changing value as per buyer’s selection;
- Show or hide addon details from admin (order page);
- Decrease addon quantity per order for better inventory management;
- Create custom templates to display addons on the product, order details, and cart pages.
You can also add item_product_addons into columns parameter of to show the selected product addon in pdf.
Scenarios Where You Can Enable Storewide Product Addons for WooCommerce
- Offer customized carry bags to customers as addon while sending out groceries;
- Give your restaurant customers an option to ask for a menu as an add-on to any product;
- Enable the ‘store pickup’ addon, to let the buyers pick their orders themselves (optionally);
- Gift stores can enable the addon to ‘hide receipt’ for their customers;
Scenarios Where You Can Enable Per-Product Product Addons for WooCommerce
- Enable ‘1-year’, ‘2-year extended’, or ‘3-year long’ warranty for electrical appliances;
- Offer ‘cheese’, ‘tomato’, ‘capsicum’, ‘onion’, and ‘extra cheese’ addons for pizzas;
- Let buyers pick from ‘Mango’, ‘Peach’, ‘Melon’ or ‘Cherry’ addons for ‘Fruit Shakes’;
- Ask for what to print on a customizable t-shirt using text field addon.
How to Install Product Addons for your WooCommerce store? #
Please note that the Product Addons plugin is a part of the Booster for WooCommerce plugin. You can enable it on your store once the plugin is installed and activated.
The below-mentioned instructions are written keeping in mind that you already have Booster installed on your online shop. If you have not done so yet, use this link.
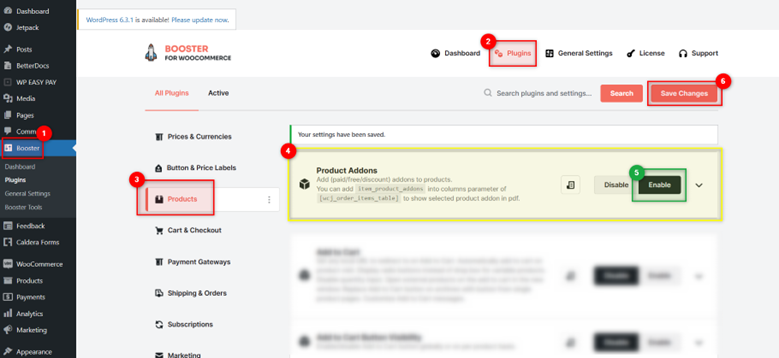
- Login to your WooCommerce-powered WordPress website using valid credentials.
- Go to Booster > Products > Product Addons.
- Select the Enable checkbox for the Product Addons plugin.
- Click on the Save Changes button.
Per Product Addons #
The Product Addons plugin lets you set storewide as well as per-product addons for your WooCommerce store. This setting will work for all kinds of products in your store, for example, simple products, variable products, grouped products (product bundles), etc.
Follow these steps to enable per-product product addons (Product Addons with Different Settings for each Product):
1. Activate the Product Addons plugin (see the instructions for this above).
2. Scroll down to the Per Product Options and enable the checkbox for the option Enable per Product Addons.
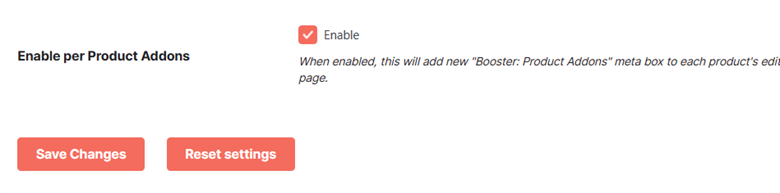
3. Click on the Save Changes button.
Now, you will be able to edit or create Product Addons for each product or product bundle from the Product Page (in Page Editor).
To create add-on(s) for any of your products, follow the steps mentioned below:
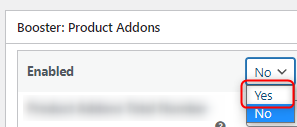
1. Scroll down to the Booster: Product Addons metabox.
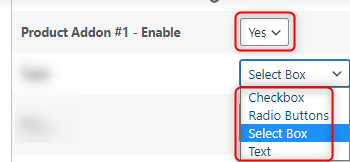
2. Set the value of Enabled to ‘yes’.
3. Set the number of addons to be created in the Product Addons Total Number field.

4. Update your product page to save these settings and fetch extra options enabled on changing the value for the Product Addons Total Number field.
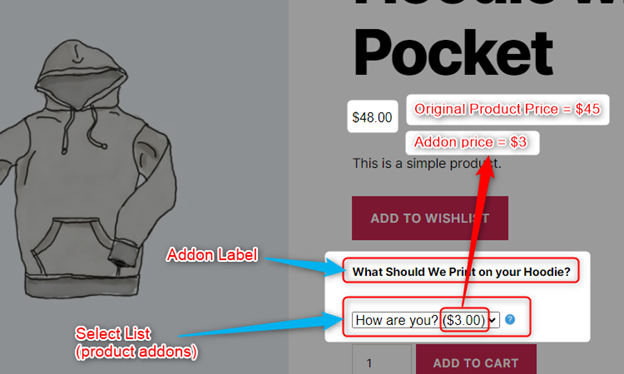
5. Select a display type for your respective product addon. Its value decides how the addon options will be displayed to your customers and how many options they can select from the available options.
For example – The select box will let your buyer from the dropdown list while the checkbox will allow the selection of one, many, or all options. In the Text field, the buyer can enter the text input for the product addon. And for the radio list, your buyer will be able to pick one option out of multiple options present on the same screen.
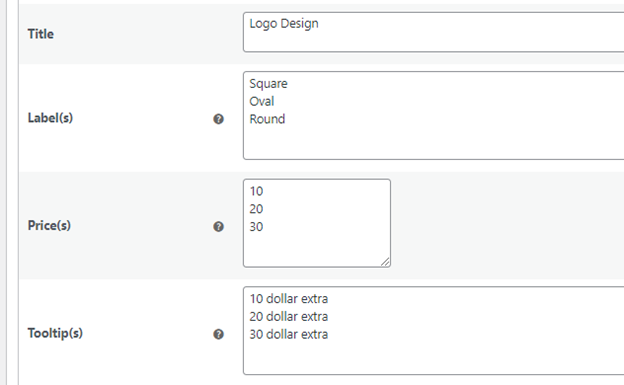
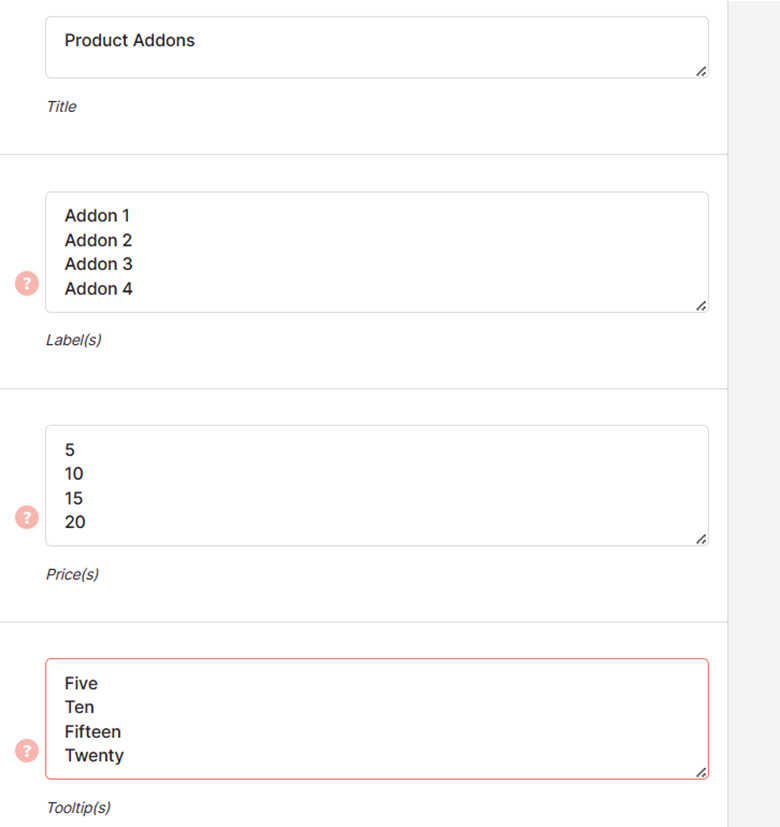
6. Set a title for your product addon in the Title field.
7. Specify the values for Label(s), Price(s), and Tooltip(s) for your addon options in the same sequence. Enter one value per line.
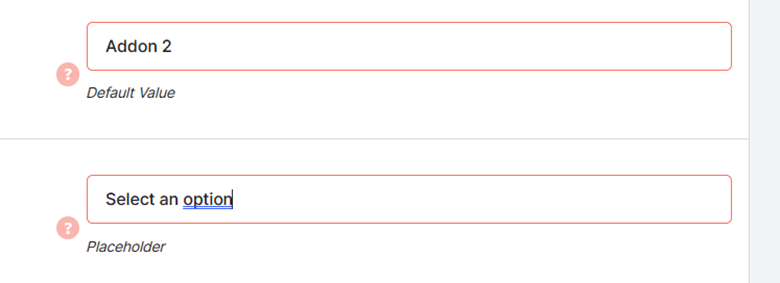
8. Enter the Default Value for the addon. This value will be selected when the buyer makes no choice or leaves the addon value unchanged while proceeding to the checkout.
9. Enter the placeholder value for your addon. This value will be displayed until the buyer enters or selects a value. However, it won’t be sent with the order on checkout.
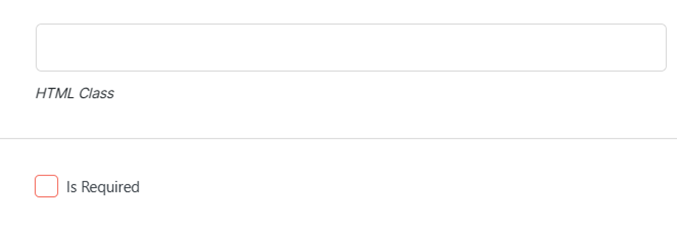
10. Specify the HTML Class for your product addon if required.

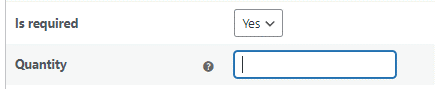
11. Select yes for the Is Required option to make your addon compulsory with the selected product. If you want to keep it optional, set the value to No for this field.
12. Specify the Quantity for the addon per product purchase.
13. Click on the Update button to save these settings for your product.
All Product Addons #
Enabling product addons storewide implies that the add-ons created through this method will work for the whole store. These add-ons will show up for all your products unless you have set some exceptions.
To enable global product addons storewide and configure them in your store:
1. Enable the Product Addons plugin (see the instructions above).
2. Go to the All Product Options section and select the checkbox for the Enable All Products Addons option.

3. In the Product Addons Total Number field, you must set the number of add-ons that you would like to create for your store. Remember, these add-ons will be applicable storewide.

4. Click on the Save Changes button to see more options related to these settings as per your selection.
5. Now, you will see multiple options per addon. However, here, we will enter details for just one product add-on to give you the demo.
6. Check the Enable checkbox for the product addon, if you want to apply this to the store. Later on, if you want to disable any addon temporarily for all your products, you can edit this setting and uncheck the Enable option.
7. Select a type for displaying your product addon, where your options are:
Checkbox: Lets buyers choose multiple add-ons;
Radio Buttons: Lets buyers select any one option from all the available options;
Select Box: Lets buyers select any one option from the dropdown list;
Text: Lets buyers enter input text to explain their preference.

8. Enter the Title, explaining the purpose/use of your addons list to the buyers. For example – “Tell us your Pizza Topping Preference.”
9. Specify labels for each addon option to the buyers. Add one option per line in the textarea provided.
10. Specify the price for each label in the same sequence as above. Add one price (in digits) per line in the textarea provided.
11. Specify tooltip value (the text to show when buyer hovers on the label) for each label in the same sequence as above. Add one option per line in the textarea provided.
12. Specify (or better, copy-paste the label) the label for the addon’s default value in the Default Value field. Leave this field blank if there is no default value.
13. Specify the value for the Placeholder (until the buyer selects an option) field.
14. Enter the value for the HTML class for your addon (optional)
15. Select the Is Required checkbox to make it essential for buyers to select an option from addons for purchasing the product.
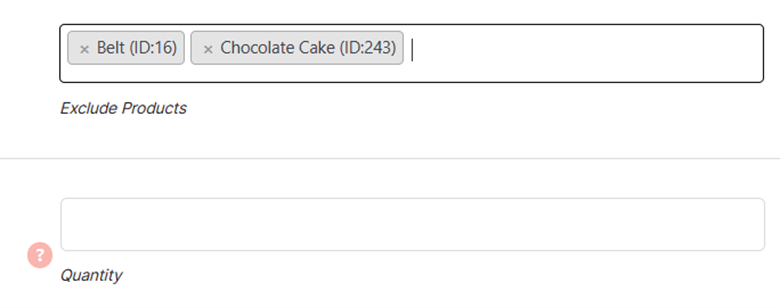
16. Select the products to exclude from the Global Product Addon setting. For example, if you select a product named ‘Belt’, product addons will appear for all product pages except for the product ‘Belt’ in your store.
17. Specify the addon quantity to be added per product when a buyer selects one.
18. Click on the Save Changes button.
Options – Product Addons #
1. Enable the AJAX on Single Product Page option to update the product prices with the change in the selected add-on option. If not selected, the product value won’t change dynamically and will be reflected on the cart page directly.

Frontend Preview: An AJAX-updated Price Value for Select Box Addons
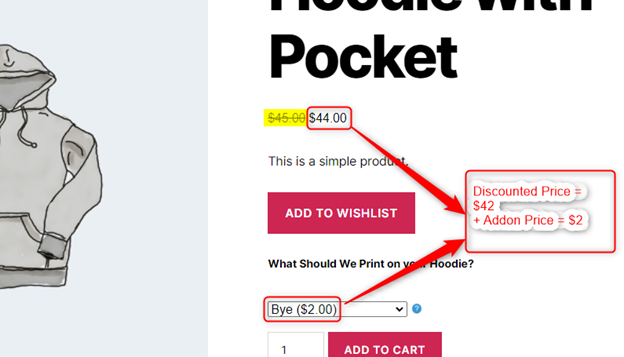
2. To skip the AJAX updates for regular prices (in the presence of discounted prices), enable the ignore strikethrough option.

Frontend Preview: Ignore Strikethrough Enabled
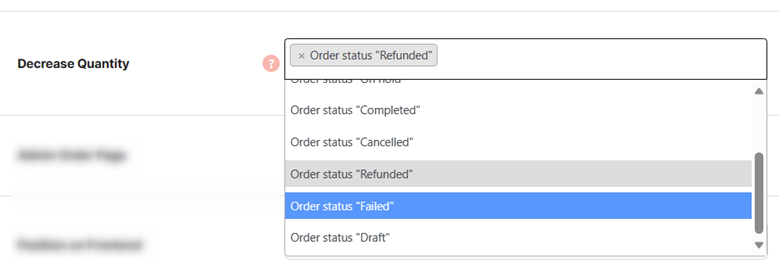
3. Select none, one, or various order status values for the Decrease Quantity field to keep a track of addons quantity left in the store. It will help out your inventory team.
Note: On selecting multiple values for the Decrease Quantity field, the decrement will happen only once per order and for the first order status update only.
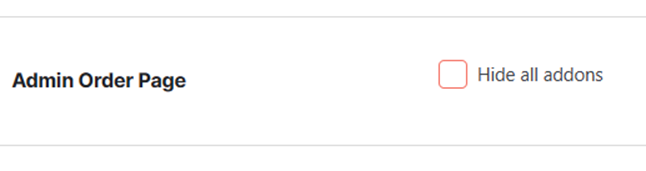
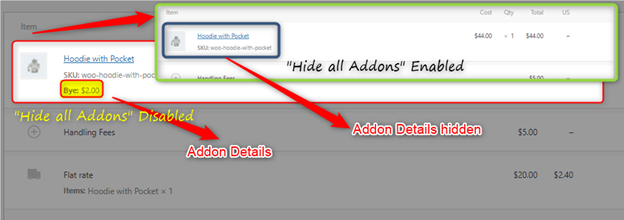
4. Enable the Hide all Addons option to hide addon selection details for the administrator.
Frontend Preview: “Hide All Addons” – Enabled Vs Disabled
5. Select the Position and Position Priority (optional) to display your product addon as per your preference on the product page. You may add it before or after the cart.
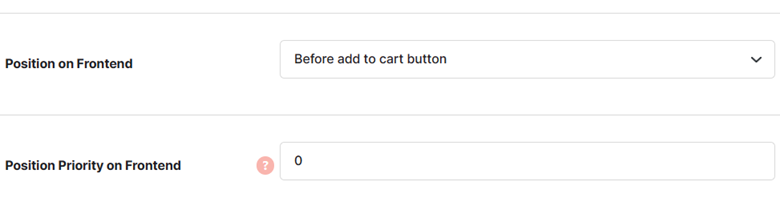
Note: Setting Position Priority is useful when there are other elements in the same location as the product addon. You can increase its value from 0 to give it a higher priority.
Advanced Settings – Product Addons #
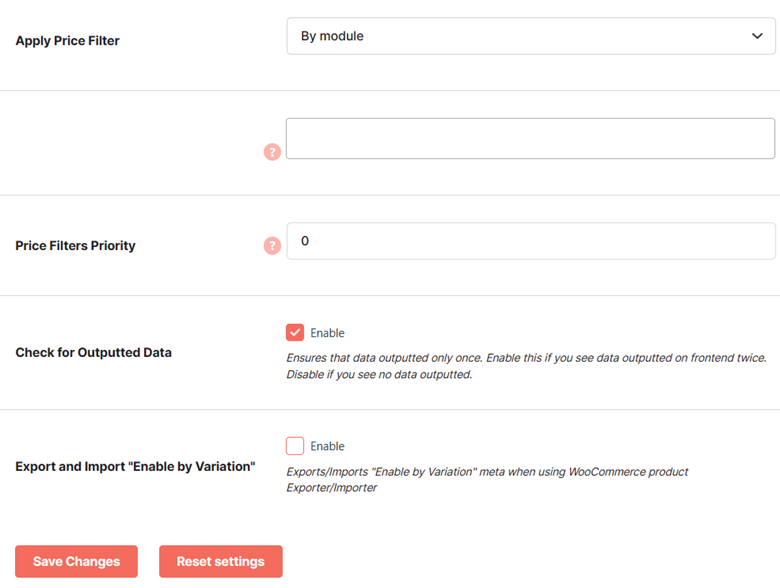
In the Advanced section of the Product Addons plugin settings:
- You have the option to apply a price filter. This selection will make the addons work for price filters in your store.
- If you have selected its value as By Module, specify the name of the module in the next field.
- Set a Price Filter Priority in case of compatibility issues.
- To make sure that the output is displayed just once, select the Check for Outputted Data
- In case you want to export/import the “Enable by Variation” meta, enable Export and Import “Enable by Variation”. *This feature works with WooCommerce product Exporter/Importer functionality only.*
Frontend Templates #
For the product addons plugin, store owners can set various Frontend Templates for different pages. This plugin gives you full control over how the addons will look in your store. You can set frontend templates for the product page, the order details page, and the cart page.
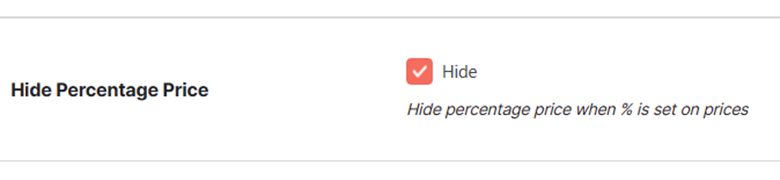
To begin with, customizing the frontend templates, decide whether or not you want to Hide Percentage Price. Select this field’s value accordingly.
Product Page Product Addons Appearance:
Set the layout for the Title, addon types, and the addon section by entering the details in this section.

You will be able to see the list of accepted variables per input field on its top.

Enter the template appearance details in the HTML format.

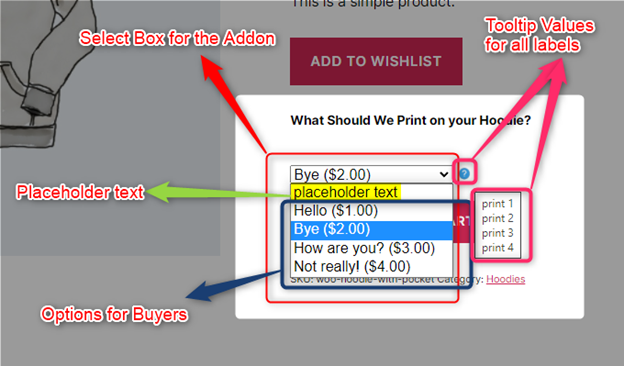
Frontend Preview: Product Addons on the Product Details Page
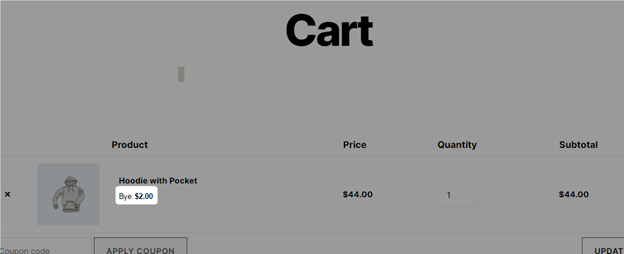
Cart Template #
Just as the template settings for the product pages, you can set the appearance of addon details to be displayed on your cart page using the options provided in this section.
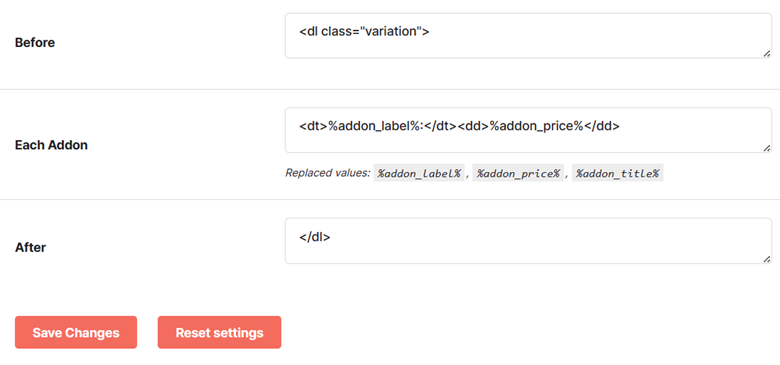
Frontend Preview: Product Addons on the Cart Page
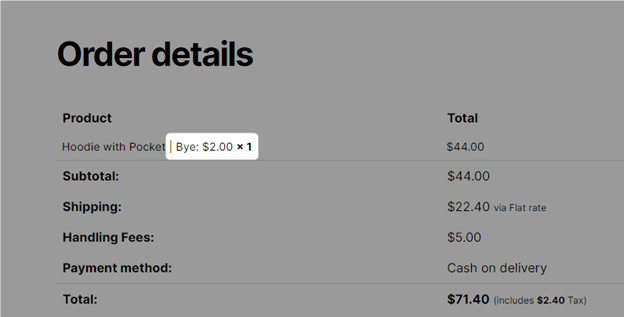
Order Details Tab Template #
Create the HTML-formatted template for your product addons to be displayed on the Order Details page.
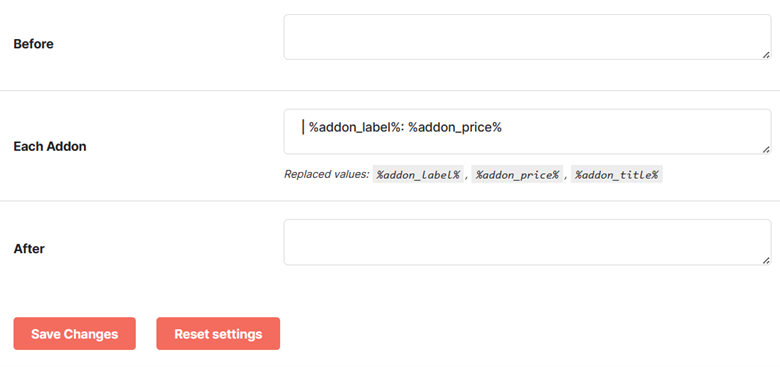
Frontend Preview: Product Addons on the Order Details Page
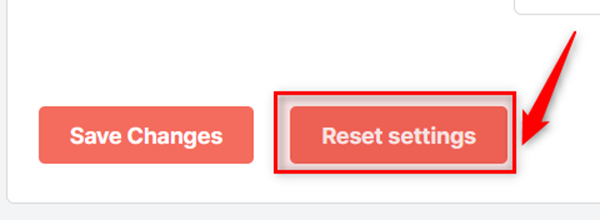
Restore Default Settings for the Product Addons Plugin #
Click on the Reset Settings button to start using the plugin’s default configuration.
This feature is also helpful when you wish to edit product addons settings from the beginning or want to delete all old product addons in one click.