
Description
The Checkout Custom field is a Booster plugin module for WooCommerce that adds custom fields to your WooCommerce checkout page.
When enabled, the WooCommerce custom checkout fields plugin allows you to add custom fields such as text field, number, text area, date picker, radio button, checkboxes, password, etc., to your checkout page.
And you can add them wherever you please: Billing, Shipping, Account, and Order Notes sections.
By adding custom fields to your checkout page, you increase your chances of making more sales for your store.
Also, by adding the right fields to your checkout page, you will significantly reduce your online store’s bounce rate.
In this post, you will learn how to add fields to WooCommerce checkout fields to your store easily.
Key Features of WooCommerce Checkout Custom Fields module
Here are some WooCommerce Checkout Custom Fields that make it the plugin of choice for online retailers.
- Allows you to display custom fields in admin email
- Allows you to add all fields to customers’ email
- You can enable the emails field template: before, each, and after the fields
- Allows you to add custom fields to your “Thank you” and “View order” pages
- Comes with “Order received” fields template: before, each, and after the fields
- Allows you to set options for select and radio type fields
- You can also set options for the checkbox type field
- Has week-picker and time-picker field type options
- It has a visibility option that lets you show or hide custom checkout field based on the content of a customer’s cart
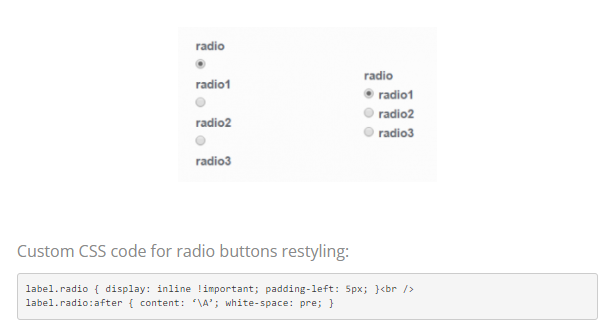
- You can customize the view of your website’s checkout radio buttons via CSS
Adding and removing WooCommerce Checkout Custom Fields
How to add fields to WooCommerce checkout
Here are the steps to adding custom fields to WooCommerce checkout
Step 1: From your WordPress dashboard, navigate to WooCommerce > Settings > Booster > Cart & Checkout > Checkout Custom Fields.
Step 2: Enable the Checkout Custom Fields option.
Step 3: Customize the checkout custom fields however you please. For example, you can choose to remove them from specific products and product categories. Alternatively, you can make them hide or show based on a customer’s cart amount.
And of course, you can choose a format for your date-picker or week-picker.
To remove the custom fields, disable the Checkout Custom Fields option from the Booster Dashboard.
Settings of WooCommerce Checkout Custom Fields
The Booster Checkout Custom Fields comes with lots of setting options. For example, it allows you to set your Customs Field Number. Also, you can set the default value of your custom checkbox field without any hassles.
You can even add a checkout file upload option if you want.
Email Options
This section allows you to set if you want custom fields to be displayed in emails. Also here you can define how fields should be outputted.
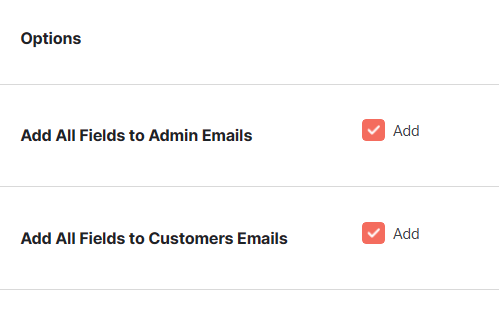
- Add All Fields to Admin Emails
- Enable this if you want all fields to be added to all emails to administrators.
- Default:
yes
- Default:
- Add All Fields to Customers Emails
- Enable this if you want all fields to be added to all emails to customers.
- Default:
yes
- Default:
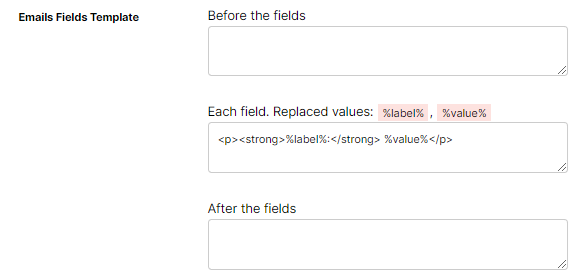
- Emails Fields Template: Before the fields
- This option sets what should be outputted before the custom fields. For example try:
<table>.- Default: None
- Emails Fields Template: Each field
- This option sets how each field should be outputted. Replaced values:
%label%,%value%. For example try:<tr><th>%label%</th><td>%value%</td></tr>- Default:
<p><strong>%label%:</strong> %value%</p>
- Default:
- Emails Fields Template: After the fields
- This option sets what should be outputted after the custom fields. For example try:
</table>.- Default: None
Order Received Options
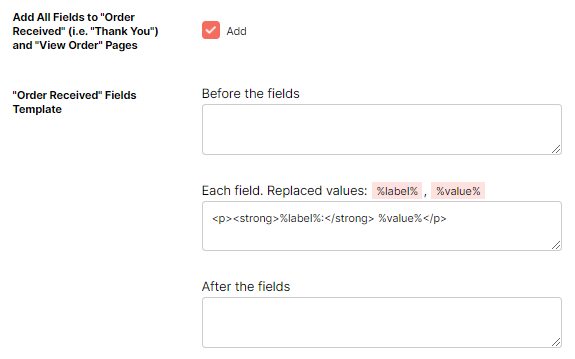
-
- Default:
yes
- Default:
-
- Default: None
- Replaced values:
%label%,%value%.- Default:
<p><strong>%label%:</strong> %value%</p>
- Default:
-
- Default: None
Custom Fields Number Option
- Custom Fields Number
-
- Default:
1
- Default:
Field’s Options
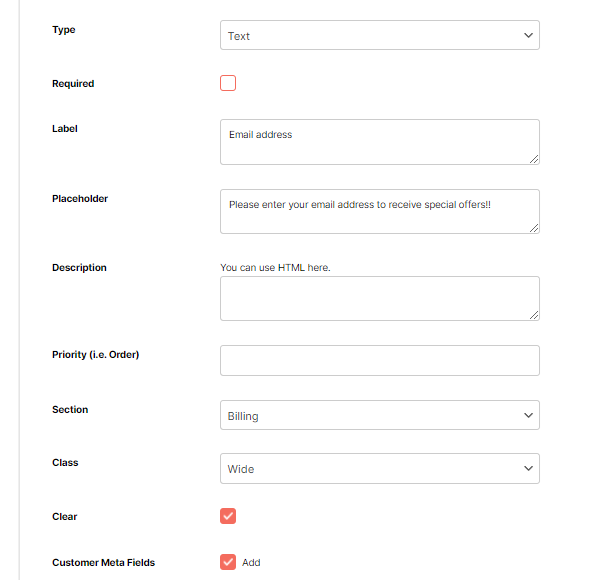
- Enable/Disable
- Enables the custom field.
- Default:
no
- Default:
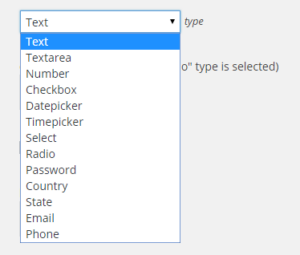
- Type
- Possible values: Text; Textarea; Number; Checkbox; Datepicker; Weekpicker; Timepicker; Select; Radio; Password; Country; State; Email; Phone.
- Default:
Text
- Default:
- Required
- Sets if the field is required to fill on checkout on not.
- Default:
no
- Default:
- Label
- Sets label for the field.
- Default: None
Key Features of WooCommerce Checkout Custom Fields module
- Placeholder
- Sets placeholder for the field.
- Default: None
- Priority (i.e. Order)
- Here you can set the field’s position inside the section. Lower number will move the field higher in the section.
- Default: None
- Section
- Possible values: Billing; Shipping; Order Notes; Account.
- Default:
Billing
- Default:
- Class
- HTML class. Possible values: Wide; First; Last.
- Default:
Wide
- Default:
- Clear
- CSS clear option.
- Default:
yes
- Default:
- Customer Meta Fields
- Check this if you want the field to be added to the customer meta fields.
- Default:
yes
- Default:
Select and Radio Field Type Options
This subsection allows you to set options for select and radio type fields.

- Select/Radio: Options
- Set options for the field here. One option per line.
- Default: None
- Select: Use select2 Library
- Enable this if you want to use select2 library instead of standard HTML select input field.
- Default:
no
- Default:
- select2: min input length
- select2: Number of characters necessary to start a search. Ignored if set to zero.
- Default:
0
- Default:
- select2: max input length
- select2: Maximum number of characters that can be entered for an input. Ignored if set to zero.
- Default:
0
- Default:
Checkbox Field Type Options
This subsection allows you to set options for checkbox type fields.
- Checkbox: Value for ON
-
- Default:
Yes
- Default:
- Checkbox: Value for OFF
-
- Default:
No
- Default:
- Checkbox: Default Value
- Possible values: Not Checked; Checked.
- Default:
Not Checked
- Default:
Datepicker, Weekpicker and Timepicker Field Type Options
This subsection allows you to set options for datepicker, weekpicker and timepicker type fields.
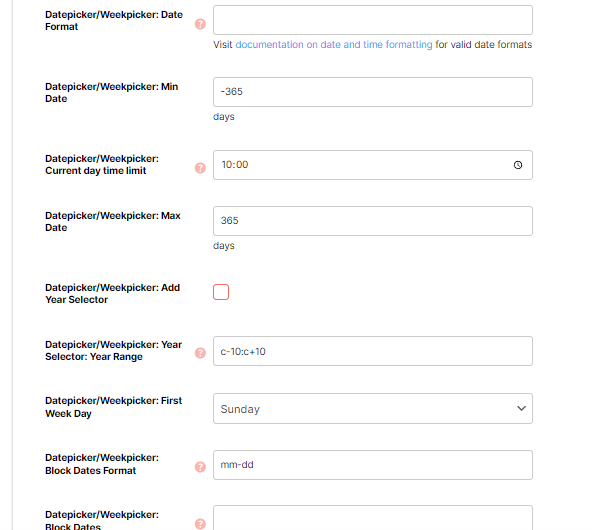
- Datepicker/Weekpicker: Date Format
-
- Default: None
- Datepicker/Weekpicker: Min Date
- Min date in days.
- Default:
-365
- Default:
- Datepicker/Weekpicker: Max Date
- Max date in days.
- Default:
365
- Default:
- Datepicker/Weekpicker: Add Year Selector
-
- Default:
no
- Default:
- Datepicker/Weekpicker: Year Selector: Year Range
- The range of years displayed in the year drop-down.
- Default:
c-10:c+10
- Default:
- Datepicker/Weekpicker: First Week Day
- Possible values: Sunday; Monday; Tuesday; Wednesday; Thursday; Friday; Saturday.
- Default:
Sunday
- Default:
- Timepicker: Time Format
-
- Default:
hh:mm p
- Default:
- Timepicker: Interval
- Interval in minutes.
- Default:
15
- Default:
Field Visibility Options
This subsection allows you to show or hide custom checkout field, depending on what’s in cart.
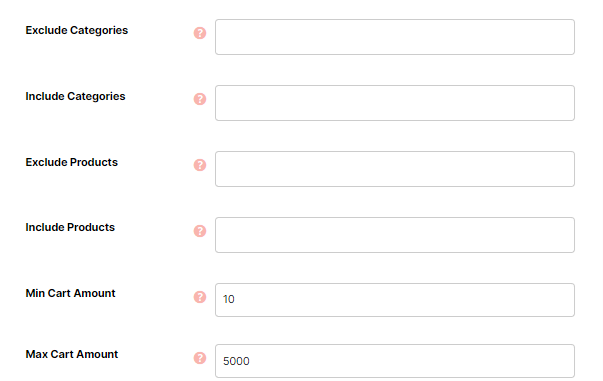
- Exclude Categories
- Hide this field if there is a product of selected category in cart.
- Default: None
- Include Categories
- Show this field only if there is a product of selected category in cart.
- Default: None
- Exclude Products
- Hide this field if there is a selected product in cart.
- Default: None
- Include Products
- Show this field only if there is a selected product in cart.
- Default: None
- Min Cart Amount
- Show this field only if cart total is at least this amount. Set zero to disable.
- Default:
0
- Default:
- Max Cart Amount
- Show this field only if cart total is not more than this amount. Set zero to disable.
- Default:
0
- Default:
Tips & Tricks
- WooCommerce > Settings > Booster > Cart & Checkout > Checkout Custom Fields for WooCommerce