Overview #
The WooCommerce Mini Cart Custom Info plugin allows you to add custom info to the WooCommerce mini cart widget. It allows you to use Booster shortcodes to define the information and the position of the info in the mini cart.
You can add as many blocks to your mini cart, while using the Booster – WooCommerce mini cart custom info plugin.
How to Enable the Custom Mini Cart Info Plugin for WooCommerce? #
Download and install Booster for WooCommerce to enable and use the WooCommerce Custom Mini Cart plugin with your eCommerce store. Follow these steps:
- Navigate to WordPress Dashboard > Booster > Plugins > Cart & Checkout and look for the Mini Cart Custom Info plugin.
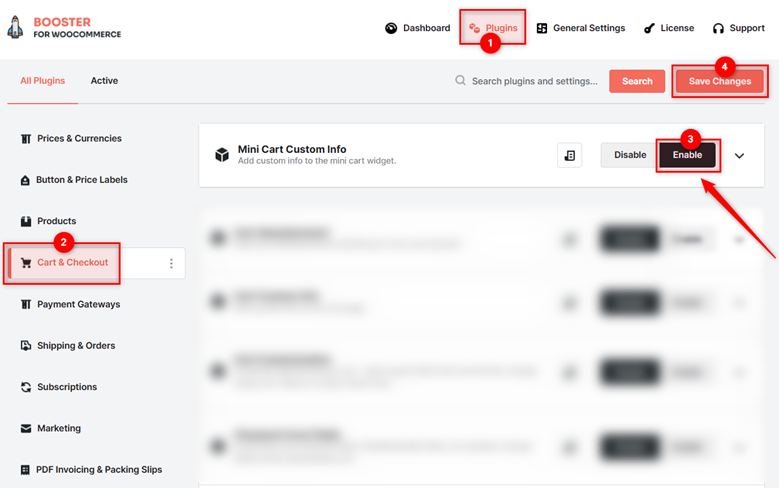
2. Select Enable for the Mini Cart Custom Info plugin and click Save changes.
The WooCommerce Custom Mini Cart Info plugin will be enabled for your site.
Configuring Custom Info for Mini Cart in WooCommerce #
You can add custom info to the WooCommerce mini cart widget by adding various custom blocks to your store’s mini cart using this plugin.
For each custom block, you can define the text that you want to display and the position of the info text in the mini cart.
Creating Custom Info Blocks for Your Mini Cart #
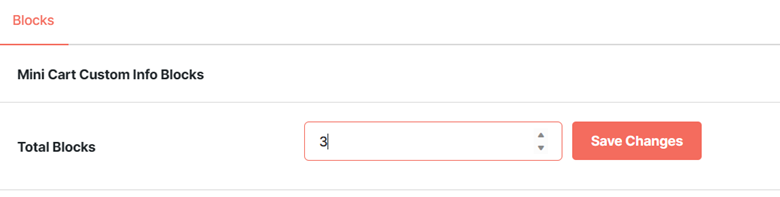
- Go to the Blocks section on the Mini Custom Cart Info plugin’s settings page.
- Enter the number of information blocks you want to add to the mini cart in the Total Blocks field and click the Save Changes button next to it.
Configuring a Custom Info Block for Your Mini Cart #
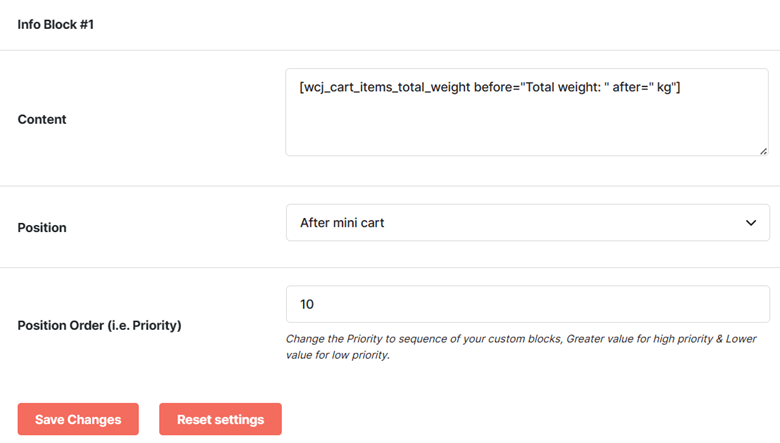
- Enter/select the required values for the fields. Refer to the table below for field descriptions:
| Field | Description |
| Content | Custom text that should be displayed in the mini cart. You can use shortcodes to define the content |
| Position | Position of the custom info field in the mini cart |
| Position Order (i.e. Priority) | Position of the custom info field in the sequence |
- Click Save Changes.
This process has to be repeated for all the custom info blocks you want to configure for your store’s mini cart.
Once done, the custom info field in the mini cart will be configured.
Suggestion: Use inline CSS in the Content field to beautify the mini cart custom info block and make it look like an inherent part of your mini cart.
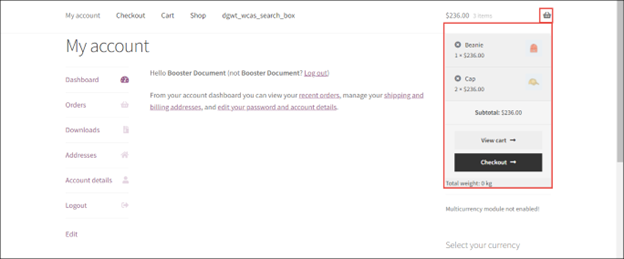
Output #
A sample mini cart on the WooCommerce site, along with the total weight of the items in the cart.