Overview #
The WooCommerce Offer Your Price plugin in the Booster for WooCommerce plugin bundle allows store users to send price suggestions to the store administrators. Store admins can add the link to the Offer your Price form as a button in the single product pages, archive pages, and custom locations (using hooks).
To receive realistic and useful price suggestions, store administrators can set minimal, maximal, and default product prices using the WooCommerce Offer Your Product Price plugin. One can also define the email template and offer price history meta box fields to customize the information sharing and receiving process.
When to Use the ‘WooCommerce Offer your Product Price’ Plugin? #
Let us give you a few examples where this ‘Offer your Price’ plugin by Booster Plugin’s developers can improve your eCommerce sales and revenue.
- When you have retailers in your B2B store, and they buy products in bulk
- When you sell your creative pieces through auction
- When you want to clear stock faster
- When your store has multiple vendors who offer the same products at different prices
- When you have a product from different sellers with different costs
Frontend Views #
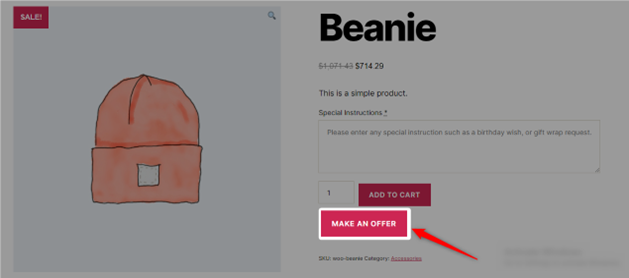
1) Make an Offer Button on a Product Page #
2) Form for Customers to Let them Send the Offer #

How to Install the ‘Offer your Price’ Feature on your WooCommerce? #
- Go to your WordPress administration dashboard using relevant login credentials.
- Click on the Booster menu to enter Booster settings.
- Search for the plugin ‘Offer your Price’ in the Prices & Currencies

- Select Enable for this plugin.
- Save changes.
Plugin Settings #
General Options #
The Offer Your Product Price plugin allows eCommerce store owners to enable or disable it for several conditions, such as:
- For all products
- For all products with no pricing mentioned
- Per Product (for selective products – individually)
- Per Product Category (for selective categories – individually)
- For several categories AND several products of these categories (Suggestion: Select it when you want to exclude a few products from the selected categories)
You may select the relevant option to get started.
Note: To prevent buyers from making suggestions on out-of-stock products, click the checkbox for the Exclude option.

Button Options #
The Button Options section allows administrators to enable global settings related to the MAKE AN OFFER button. This button is added to product pages as per the defined button position (for example – near/below the ‘Add to Cart’ button).

- Label: This text will appear on the button as button text. Here is an example:

- CSS Class: This class will define the appearance of your button.
- CSS Style: You can enter inline CSS to format your button in a different way than its default appearance.
- Position On Single Product Page: This option decides the position where this make-an-offer button will appear in your shop. Alongside the priority count, you can select one of the following positions for your button:
- No position (Hidden)
- Before the single product
- Before the single product summary
- Inside the single product summary
- Before the add-to-cart form
- After the add-to-cart form
- After the single product
- After the single product summary
- Position on Archive Pages: On archive pages, you may add the make-an-offer button before or after the product. Or, you can skip adding this button to archive pages too.
- Advanced: Custom Position(s): This option lets you select a custom position for the button and its order on the page. If your store has custom hooks (or you can create one), use the desired value here. If you want to add multiple hooks, separate them using ‘|’ (separators).
Form and Notice Options #
This section accepts inputs related to the form that will open up when someone clicks the MAKE AN OFFER (or equivalent) button.
- Set the price input details that include:
- Label: Add the text to be displayed for the input field that asks for price suggestions from your store users. This field accepts %currency_symbol% variable.
- Price Step: Decimal precision
- Minimal Price: The lowest bid allowed
- Maximal Price: The highest bid allowed
- Default Price: A default price to be sent with form (as a suggestion for the buyer)

- Add labels for Customer Email, Customer Name, and Customer Message input fields. Make sure these labels define the purpose of your input fields properly.
- Set a label for Send a Copy to Customer This option accepts %product_title% variable in input.

- Next, you need to provide the Form Header, Form button Label, Form Footer, and Required HTML. Here, the Form Header accepts the %product_title% variable in the input string. The fields form header, form footer, and requited HTML can interpret and display HTML-formatted data.

- Set a display message that will be shown to the customer when the Customer Notice is sent successfully.

Styling Options #
The WooCommerce Offer your Product Price plugin opens the Make-an-offer form for your customer as a pop-up when the button-click event happens. You can set form width, background colors for the header & footer, and text colors for the header & footer using the options given in the Styling Options section.

Email Options #
The Email Options section lets you decide upon the contents and eligible recipients for the email being sent on make-an-offer form submission.
- Email Recipient:
By default, the store administrator is the only recipient of this email. The customer can receive it by selecting the Send a Copy to Customer checkbox in the form. To change this setting, replace ‘%admin_email%’ in this field with ‘%admin_email%, %product_author_email%’. After saving changes, the form author, as well as the store administrator, will receive these emails.
- Email Subject: Add the email title i.e. subject line here.
- Email Template: Specify the contents of your email here. While doing so, you may use %product_title%, %offered_price%, %customer_name%, %customer_email%, and %customer_message% variables in this field.

Admin Options #
Here, you can add the fields’ names that the Offer Your Price plugin must collect and send to the store administrator upon (make-an-offer) form submission. The information that this Booster plugin can send to admins are – Date, Price, Message, Name, Email, Customer ID, User IP, User’s agent name, and Sent-to details.

Reset Settings #
You can always reset the Offer Your Price plugin’s settings to the default settings. Just click the Reset Settings button present at the bottom of the plugin configuration dashboard.

Booster: Offer your Price Settings for Individual Products #
Note: This setting will only work when you’ve either opted for ‘Enable per product’ or ‘Enable per product and per product category’ while enabling this feature (in the General Section).
If you have enabled Offer your Price for your products and/or for per-product per-category, you will see this section in your product description pages on opening them in the Edit mode.
From the Booster: Offer your Price section below the product description field, you can:
- Enable or disable the price-offering capability for store customers. Select Yes to enable/show and No to disable/hide it.
- Set the Price Step – Decimal precision acceptable for the input offered price.
- Set the acceptable Minimal and Maximal Price: These details will help the buyer understand whether or not his offer will succeed.
- Declare a Default Price for the product for immediate purchase.


