Overview #
The My Account Plugin is your one-stop option to customize Shop > My Account settings, sections, pages, menu item names, and capabilities. Using this Booster plugin, you can –
- Add option(s) for Buyers to Set Order Status on their own;
- Set a Default user role;
- Add an option to let the User choose a role while registering to the online store;
- Rename your My Account menu items;
- Add custom menu items to My Account page;
- Reorder menu items;
- Add custom pages and their endpoints;
- Customize dashboard content;
- Add custom information blocks.
How to Install the “My Account” Plugin for a WooCommerce Store? #
- Download Booster for WooCommerce.
- Go to Booster > EMAILS & MISC. > My Account
- Select Enable for the My Account
- Click on the Save Changes

General Options #
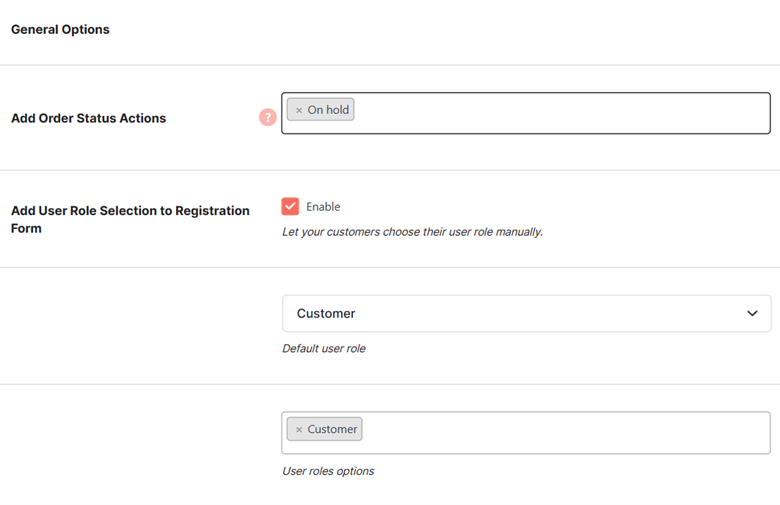
In the General Options section, store administrators will find the options to enable their customers or other user roles with extra capabilities. For example, you can let the customers set the order status or allow any user role to set their new user role through the registration form.
Add Order Status Options #
You may select one or multiple order statuses in this field from the available options (Pending payment, On hold, Cancelled, Refunded, Completed, Processing, and Failed).
Through the front end of the store, your customers will be able to set order status among the values entered in the above field.
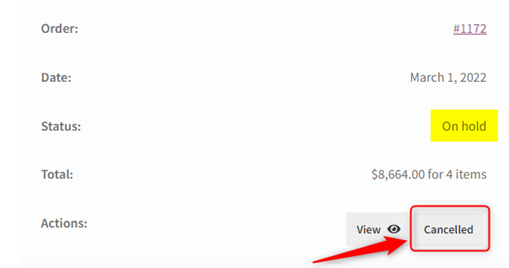
For example, on enabling the Add Order Status Options for the status “On hold”, your customers will see an additional button with the label “On hold” on the Home > Orders page in your shop.
Shop Preview: Orders Page with an order that has “On Hold” Button
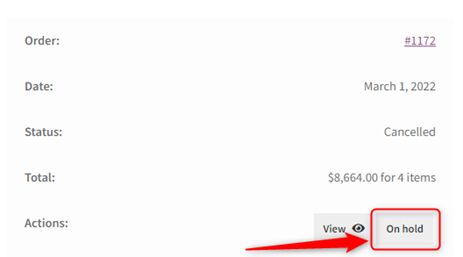
On clicking the On hold button, the status of the order will change to On hold.
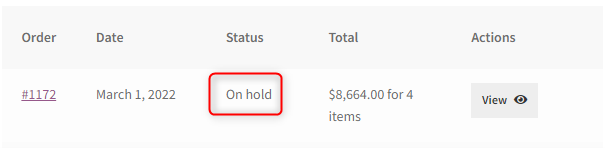
Similarly, if you will enable the Add Order Status Options for the status “Cancelled”, your buyers will see an option Cancelled on the Orders page.
Add User Role Selection to the Registration Form #
Select Enable for the Add User Role Selection to Registration Form option if you want to change the default user role for your shop, or wish to make a list of user roles available for end-users at the time of registration.
- Select a role from the dropdown list to make it the Default User Role
- In the User Role Options field, select the user roles that a person, while registering to your shop through the frontend could select as its user role.
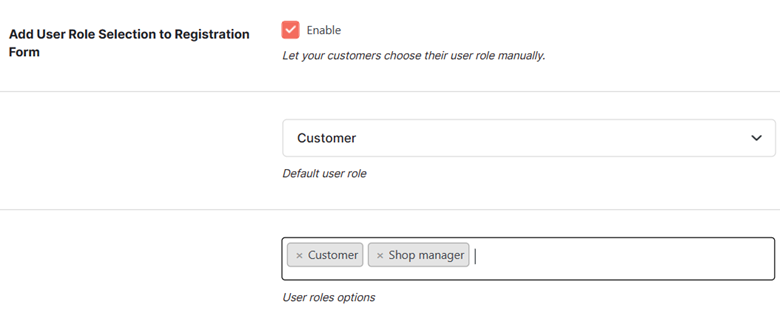
For example, if you want to let people register on your eCommerce shop as Customer or Shop Manager, select both options in the User Role options field and select the Default user role as “guest”.
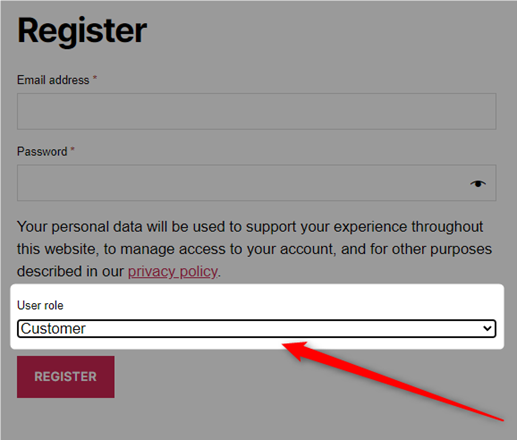
Frontend Preview: Registration Form for the Guest User with an Option to Select User Role
Menu & Endpoints Options #
If you want to be creative and impress your visitors or customers, it is easy when the My Account Plugin is installed on your store. Go to the Menu & Endpoint Options section and it will let store owners rename all the menus in their WooCommerce store for the My Account Page. Besides this, you can also change the order of menu items and add custom menu items from this section.
Note: Visit WooCommerce > Settings > Advanced > Page setup > Account endpoints to disable menu items.
How to Rename Menu items in your WooCommerce Store > My Account? #
- Select Enable Section for the Customize Menu & Endpoints
- Enter the desired new label for the menu items as you prefer. To retain the existing menu item label, leave the respective field blank.
- Dashboard
- Orders
- Downloads
- Addresses
- Payment Methods
- Edit Account / Account Details
- Logout
- View Order
- Lost Password

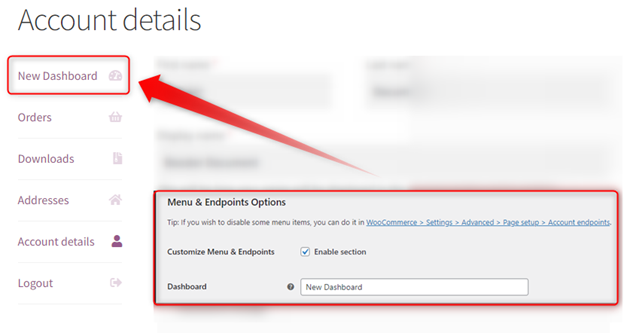
Store Preview: Renamed the “Dashboard” tab as “New Dashboard”
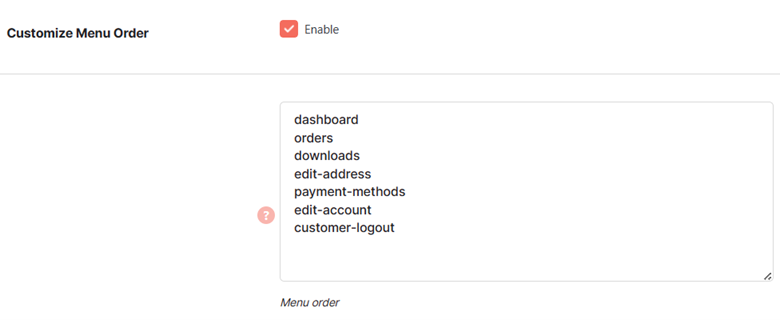
How to Change the Menu Order in your Online Store > My Account Page? #
To change the order of menu items or tabs for the “My Account” page in your eCommerce store, do the following:
- In the Menu & Endpoints Options section, select Enable for the Customize Menu Order
- In the Menu order text area, rearrange the menu items, keeping one item per row.
How to add Custom Menu Items on the My Accounts Page? #
- Select Enable for the Add Custom Menu Items
- Enter the custom menu details, one per line. The format is: shop|Shop|/shop/
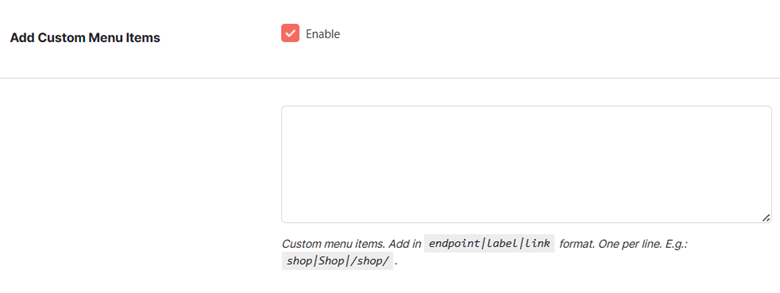
Input: shop|Shop|/shop/
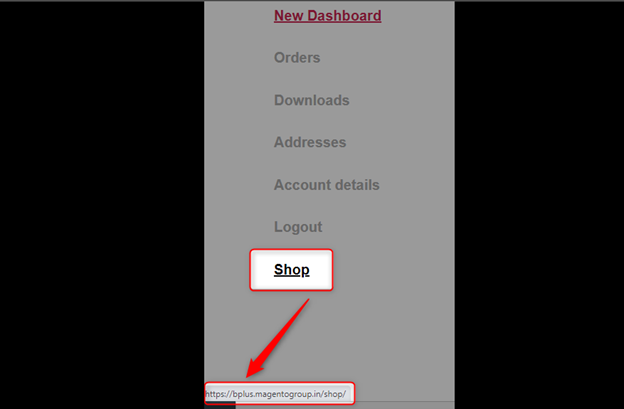
Store Preview: A Custom Menu Item “Shop” Added to the My Account Page for Buyers
Custom Pages #
While using the My Account Plugin – Booster for WooCommerce, you can create custom WooCommerce pages and add them as tab/menu items on your My Account page. For this:
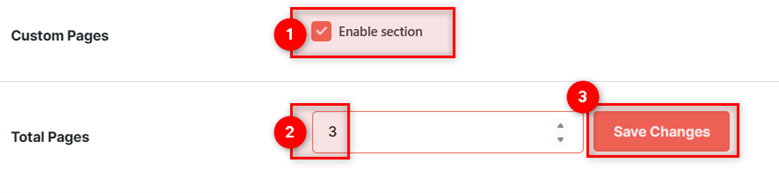
- In the Custom Pages section, click Enable Section for the Custom Pages
- Enter the number of custom pages to be created in the Total Pages input field.
- Click on the Save Changes button, placed next to the input field.
- Click on the Save Changes button, placed at the bottom of the page.
For each of the custom pages you are creating, do the following:
- Set a page Title.
- Add an Endpoint, e.g. the page’s local address or slug.
- Enter the content (HTML is accepted) in the Content text area.
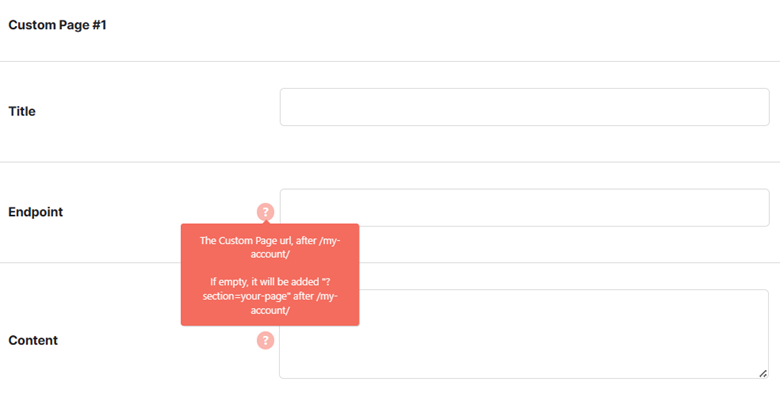
Repeat the same for all the pages to be created, and click on the Save Changes button.
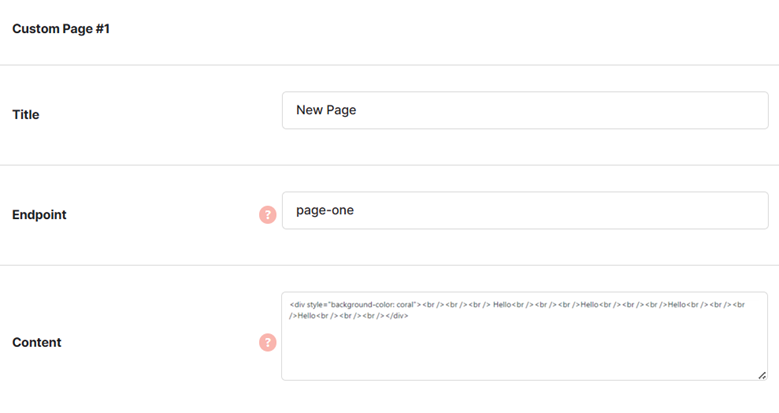
Input:
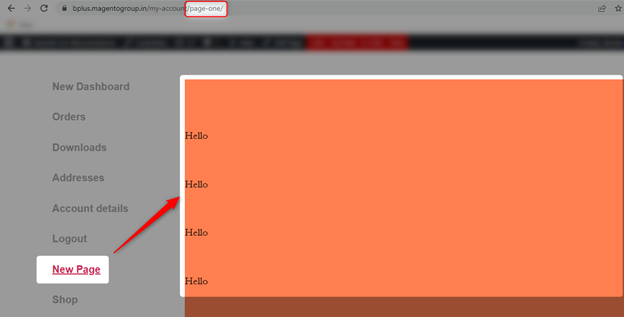
Store Preview: A custom page with title “New Page” and Endpoint “Page One” Loaded
Dashbaord Customization #
If you want to customize My Account > Dashboard page in the WooCommerce shop on the frontend, use the options in the Dashbaord Customization section.
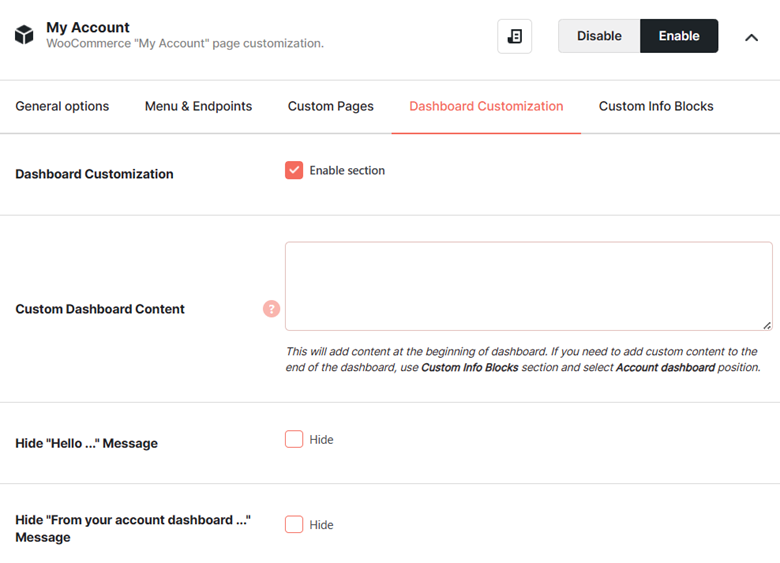
- Select Enable for the Dashboard Customization option checkbox.
- To add custom content on the top of the Shop Dashboard in the My Account section, enter your content (HTML-formatted) in the Custom Dashboard Content input field.
- Select Hide “Hello …” Message option checkbox to make the “Hello, <username>” text invisible for your store.
- Select Hide “From your account dashboard …” Message option checkbox to hide this message from the My Account > Dashboard
Input:

Store Preview: A Dashboard Page with Custom Content
Custom Info Blocks #
The Custom Info Blocks section lets you add extra information sections in various locations within the Shop’s Home > My Account sections and pages. You can add multiple info blocks using the options present in this section, enabled through the My Account Page.
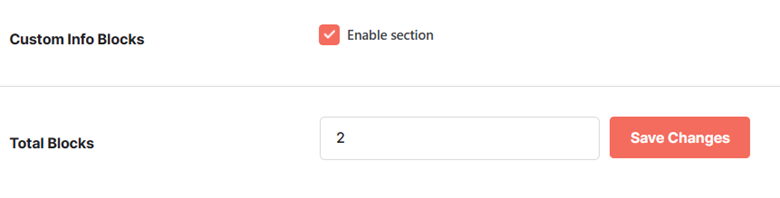
- Select Enable for the Custom Info Blocks.
- Enter the Total Blocks count to specify the number of blocks you want to add to the My Account section page(s).
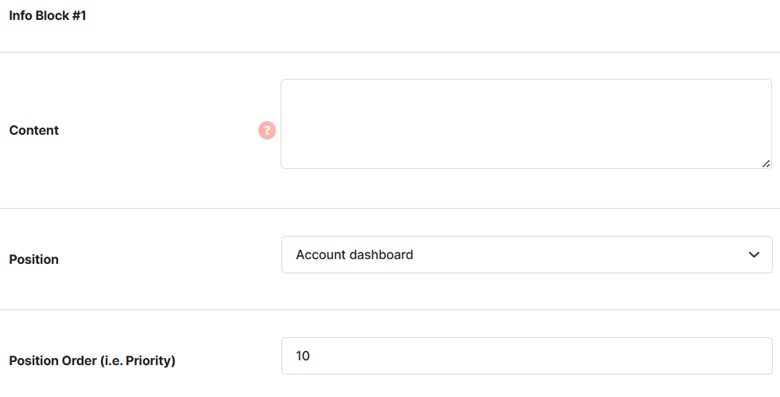
- For each of the Info Block:
- Enter the content to be displayed in the Content input field.
- Select the Position of the Info block. Your options are:
|
Account content Account dashboard Account navigation After account downloads After account navigation After account orders After account payment methods After available downloads After customer login form After edit account address form After edit account form After my account
|
Available download end Available download start Available downloads Before account downloads Before account navigation Before account orders Before account orders pagination Before account payment methods Before Available downloads Before customer login form Before edit account address form Before edit account form Before my account
|
Edit account form Edit account form end Edit account form start Login form Login form end Login form start Lost password form Register form Register form end Register form start Reset password form View order |
- Set the Position Order (i.e. Priority) if you want to change the order of Info Block on its position, in case multiple sections are being added to the same position.
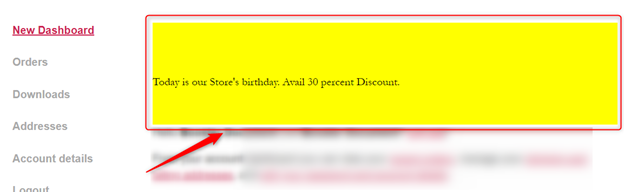
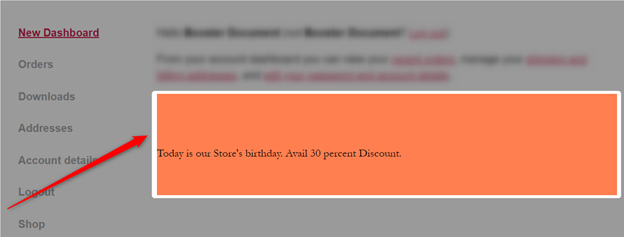
Store Preview: A Custom Info Block on the Dashboard Page
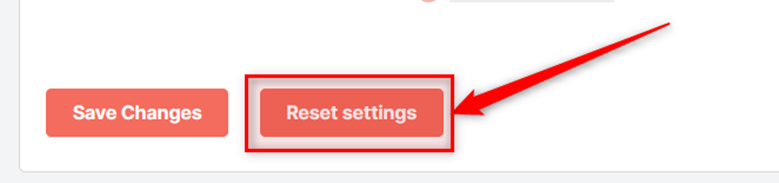
Reset Settings #
To restore My Account Plugin’s default settings, click on the Reset Settings button.