
Description
As the name suggests, the WooCommerce Mini is a Booster plugin module that allows you to add custom information to your website’s mini widget.
What’s more, with this plugin, you can add custom information wherever you want on your mini-cart widget.
For example, you can choose to place it after the cart, right within the cart, or before the cart – the choice is entirely yours to make.
Why do you need the Booster WooCommerce Mini cart plugin?
Well, firstly, you need it to greatly improve your visitors’ shopping experience. By displaying relevant information, such as shipping charges, discount availability, etc., you would help them make better buying decisions.
By improving your visitors’ shopping experience, you would improve your conversion rates too. And this means more sales for your store.
Key features of WooCommerce mini cart plugin
Here are some of the interesting features the mini cart plugin for WooCommerce comes with:
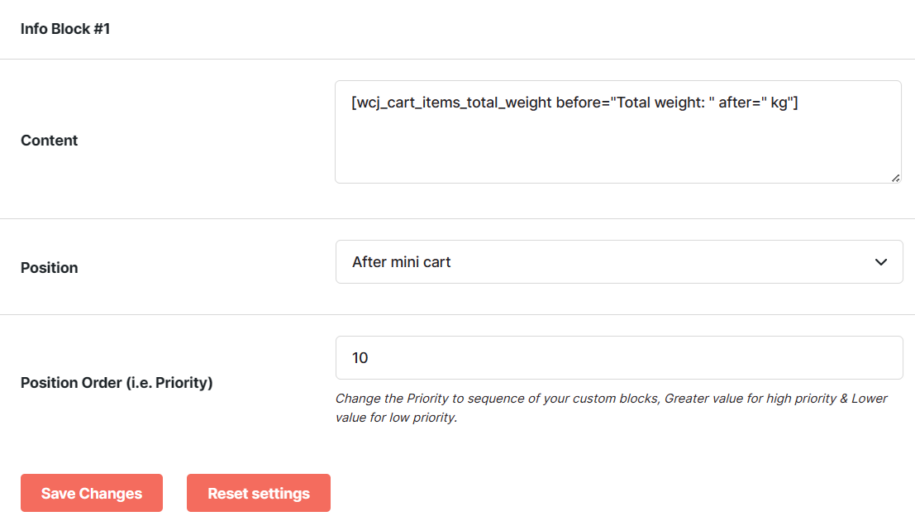
- Allows you to priority order for your custom information;
- Custom info position: before the mini cart, after mini cart, before the button;
- You can add your custom info content. You can use shortcodes for content if you wish;
- Allows you to set your preferred number of blocks.
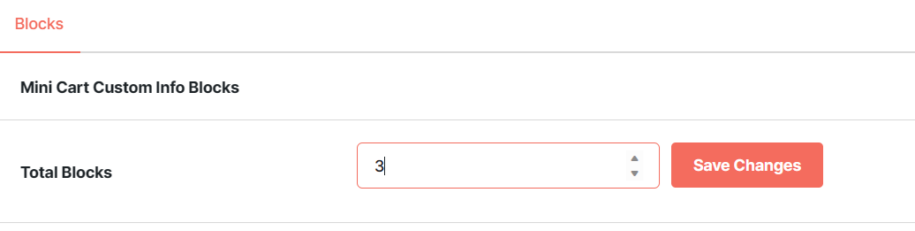
After changing number of blocks, you must click Save changes button.
Position will specify where to output the content, and priority can help you move the content inside that position. If you are not sure, leave the default value for priority option.
You can use shortcodes in content.
Installation of WooCommerce mini cart plugin
To install the Mini cart plugin module in WooCommerce, you first need to install and activate the WooCommerce plugin on your WordPress website.
If you have done that already, the next step is to download the Booster for WooCommerce plugin to your machine. After downloading the plugin, upload, install and activate it the same way you would with other plugins.
Once the plugin has been installed and activated successfully, the Booster for WooCommerce dashboard page would pop up.
Click the Launch Booster Settings button.
If you have the plugin up and running on your website already, navigate to WooCommerce >> Booster Settings.
How to create a WooCommerce mini cart
To create a WooCommerce Mini cart page, click the Carts & Checkout tab on the settings page.
On the Carts and Checkout page, scroll down a little until you find the Mini Cart Custom info section. Click the Settings tab beneath.
To create a WooCommerce mini cart, simply enable the Enable Module checkbox.
FAQs
How to set up a WooCommerce Mini Cart using WooFunnel Funnel Builder?
To set up WooCommerce mini cart using WooFunnel Funnel builder, you first have to install and activate the plugin.
When you are done, the next thing you will have to do is to create an optimized checkout page. Lucky for you, WooFunnel comes with lots of pre-made templates that save you the trouble of building one from scratch.
After that, preview and publish the checkout page with WooCommerce Mini cart.
Conclusion
Displaying all custom information that your visitors will need to make an informed buying decision will help to improve their buying experience.
The Booster WooCommerce Mini cart plugin module makes doing so easy.
- WooCommerce > Settings > Booster > Cart & Checkout > Mini Cart for WooCommerce