
WooCommerce out of the box doesn’t give you the option to customize the payment experience on your online store aside from choosing which payment options to offer. Ideally, you need to be able to cater to all types of customers and each customer may have their own payment gateway preferences.
A great way to do this is by using Booster Elite to enhance the WooCommerce payment experience, improve user experience, and boost sales.
In this article, we’ll show you different ways to enhance the payment experience for customers in WooCommerce using the Booster Elite for WooCommerce plugin.
8 Ways to Enhance the WooCommerce Payment Experience
There are many ways you can enhance the WooCommerce payment experience using the Booster Elite for WooCommerce plugin.
We’ll assume you already have the WooCommerce plugin installed on your WordPress site. We’ll also assume you have installed and activated Booster Elite on your WooCommerce store.
#1: Add multiple payment gateways
Adding multiple payment gateways to your WooCommerce store can help you enhance the user experience. You can add local payment gateways or a custom payment gateway on your online store.
Offering custom payment solutions to customers can help attract new visitors to your WooCommerce store. Additionally, it can incentivize local customers to buy from your store if you’re offering a local payment gateway that’s convenient for them to use.
For instance, if you want local customers to pay you through a local online vendor app, you can set it as a custom payment gateway. This makes it easier to receive local payments and encourages local customers to shop from your WooCommerce store.
Here’s how you can do that using Booster Elite’s WooCommerce Custom Payment Gateways module:

Enable the Custom Gateways module under the Payment Gateways section.

Next, navigate to Booster → Payment Gateways → Custom Gateways to configure the module’s settings.
You can set the number of custom payment gateways you want to create in the text field next to the Number of Gateways. Now this custom payment gateway will appear in the default WooCommerce settings.
To further customize your custom payment gateway, navigate to WooCommerce → Settings → Payments.
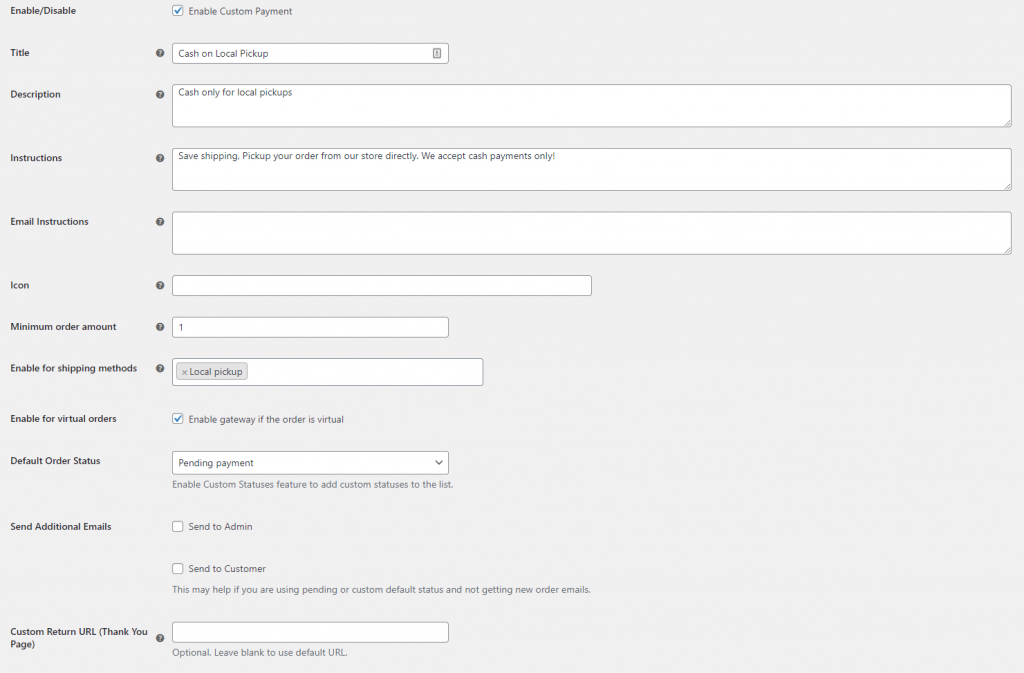
You can set the title of the gateway, the description, and instructions on how to pay using the custom gateways, email instructions, add an icon for the gateway, set the availability for certain shipping methods only, and enable the gateway for virtual orders.
You can also enhance the payment experience on your WooCommerce store by setting up extra fees or discounts for preferred payment gateways.
The WooCommerce Payment Gateways Fees and Discounts module lets you add payment gateways fees or discounts for specific payment methods available on your online store.
You can use it to add extra fees and discounts to either the default WooCommerce gateways or for custom payments gateways, similar to the one we added earlier.
#2: Offer region-specific payment gateways
Offering region-specific payment gateways can be beneficial for WooCommerce stores that sell globally. This means that if your store operates in the EU, you can offer EU- specific payment gateways while also offering the default payment gateways to international customers.
For instance, if you offer a local payment gateway that is restricted to your country or state only, local customers might find it convenient to shop from your WooCommerce store. It not only helps boost sales but also can increase revenue for your business.
Here’s how you can do that using Booster Elite’s WooCommerce Payment Gateways by Country or State module:

Enable the Gateways by Country, State, or Postcode module under the Payment Gateways section.

Next, navigate to Booster → Payment Gateways → Gateways by Country, State, or Postcode to configure the module’s settings.
Here you can set up which countries, states, or postcodes will be included for specific payment gateways. You can use address autofill for woocommerce pro. You can set up all the default payment gateways, including all the custom ones you might have created.
For instance, you can exclude the United States (US) from direct bank transfers and only make it available for customers in Canada. Once you’re done click the Save changes button to continue.
Here’s how it looks on the front-end of your WooCommerce store if you enable Check Payments and Cash on Delivery for the United States:
#3: Offer different payment gateways for different currencies
You can offer different payment gateways for different currencies as a way to accept only your preferred currency for each payment method. For instance, you can only accept US Dollars when a customer selects cash on delivery as their payment gateway.
This can also help you prevent any extra costs for your business in currency exchanges. Additionally, this is a great way to restrict certain customers from using certain payment gateways. This means that EU customers won’t select the cash on delivery payment gateway as it forces them to pay with US dollars. This configuration restricts the payment gateway to US customers only.
Here’s how you can do that using Booster Elite’s WooCommerce Payment Gateways by Currency module:

Enable the Gateways by Currency module under the Payment Gateways section.

Next, navigate to Booster → Payment Gateways → Gateways by Currency to configure the module’s settings.
You can set the preferred currency for each payment gateway on your WooCommerce store. In the Allowed Currencies text field, enter the currency that you accept with the payment gateway. You can enter the currency that you don’t accept in the text field below Denied Currencies and click the Save changes button to continue.
Here’s how it looks on the front-end of your WooCommerce store:

You can also add a currency converter for available payment gateways on your WooCommerce store using the WooCommerce Payment Gateways Currency Converter module.
You can quickly and easily set different currencies for every single WooCommerce payment gateway you might have set up, even the custom payment gateways. It also lets you set the currency exchange rates manually or they can be updated automatically. The currency will change dynamically on the front end.
#4: Offer discounts on payment gateways
A great way to incentivize customers to buy more from you is by offering them discounts. You can offer customers discounts on selected payment gateways. This way, you encourage customers to use your preferred payment gateway.
It also motivates your customers to quickly order from you so that they can avail a discount. Not only does this help boost sales but also helps attract new visitors to your WooCommerce store.
Here’s how you can do that using Booster Elite’s WooCommerce Payment Gateways Fees and Discounts module:

Enable the Gateways Fees and Discounts module under the Payment Gateways section.
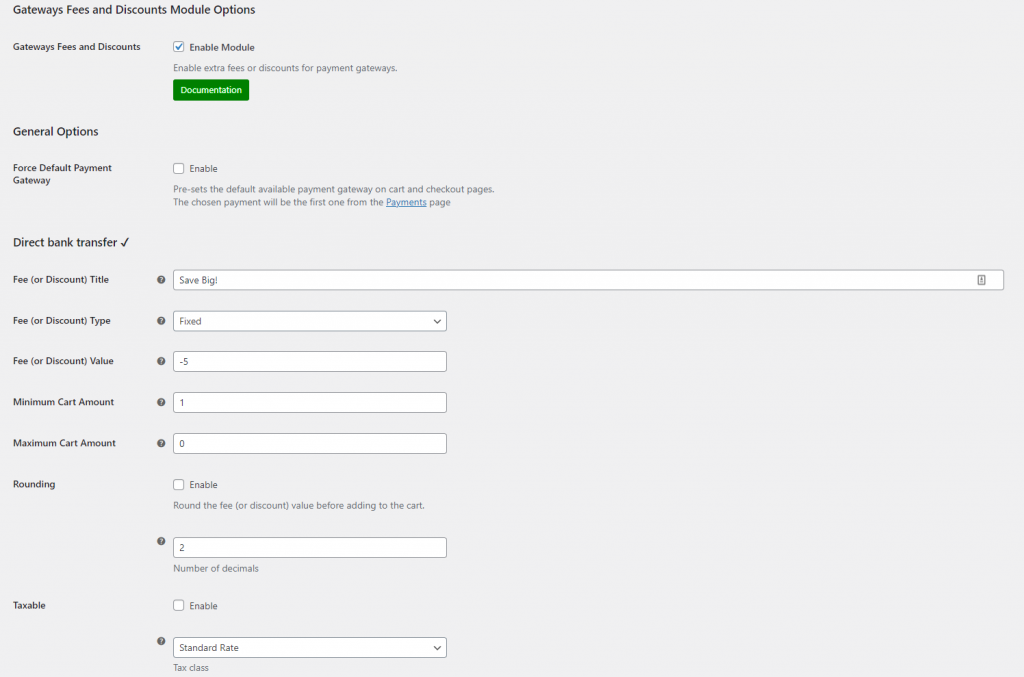
Next, navigate to Booster → Payment Gateways → Gateways Fees and Discounts to configure the module’s settings.
Here, you can set the discount or fee for each of the available payment options on your WooCommerce store. You can set the title for the discount or fee in the Fee (or Discount) title text field. Select the type of discount or fee you want to offer for the selected payment gateway by using the drop-down menu next to Fee (or Discount) Type.
Enter the value of the fee or discount in the text field next to Fee (or Discount) Value. You can enter a negative value for offering a discount and a fee for values above zero. Once you’re ready, click the Save changes button to continue.
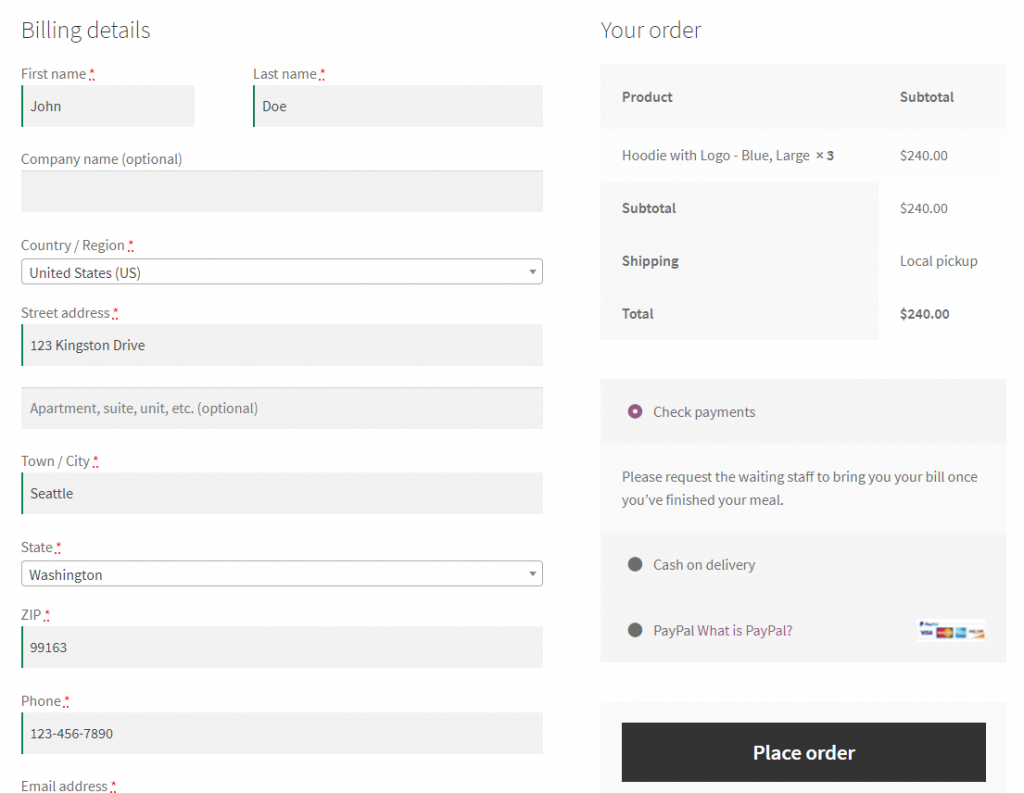
Here’s how that looks on the front-end of your WooCommerce store:

You can also enable shipping methods if certain payment gateways are used. The WooCommerce Payment Gateways by Shipping module lets you set “enable for shipping methods” for WooCommerce payment gateways.
Shipping options will be enabled or disabled based on the customer’s selection.
#5: Change icons for payment gateways
You can change the icons for payment gateways on the checkout page to give your WooCommerce store a modern, unique look. This not only helps your online store stand out from the competition but also helps customers identify the payment gateways at a glance and place their orders faster.
Here’s how you can do that using Booster Elite’s WooCommerce Payment Gateways Icons module:
![]()
Enable the Gateways Icons module under the Payment Gateways section.
![]()
Next, navigate to Booster → Payment Gateways → Gateways Icons to configure the module’s settings.
Here, you can enter a URL to add an image to each payment gateway on your WooCommerce store. Additionally, you can also choose to remove the icon. This is great if you don’t want to offer one of the default WooCommerce payment gateways. Once you’re done, click the Save changes button to continue.
Here’s what it will look like on the front-end of your WooCommerce store:
![]()
#6: Show different payment gateways to different users
If your WooCommerce store sells to multiple types of customers, including wholesale and retail customers, you might want to show different payment gateways for each user role.
This can help enhance the user experience for different types of customers. For instance, retail customers can just pay through cash on delivery. Wholesale customers can instead use a different payment gateway such as PayPal or direct bank transfer to buy from your online store.
By displaying different payment gateways for different users, you can give members more payment options that are exclusive to them.
Here’s how you can do that using Booster Elite’s WooCommerce Payment Gateways by User Role module:

Enable the Gateways by User Role module under the Payment Gateways section.

Next, navigate to Booster → Payment Gateways → Gateways by User Role to configure the module’s settings.
Here you can edit and set multiple payment gateways and the user roles that will have access to them. You can set the user role that will have access in the Include User Roles meta box. Once you’re done adding and removing user roles from different payment gateways available on your WooCommerce store, click the Save changes button to continue.
#7: Set min/max amounts for payment gateways
Setting minimum and maximum amounts for payment gateways can be beneficial to some online stores. This can be a way to avoid paying higher sums of fees for larger orders.
For instance, the fees for a large order will be significantly higher with payment processors such as PayPal or Stripe. So, setting a maximum limit for using this payment gateway can be beneficial. Additionally, it can also open up more payment options for customers on your WooCommerce store.
Here’s how you can do that using Booster Elite’s WooCommerce Payment Gateways Min/Max Amounts module:

Enable the Gateways Min/Max Amounts module under the Payment Gateways section.

Next, navigate to Booster → Payment Gateways → Gateways Min/Max Amounts to configure the module’s settings.
You can set the minimum amount for each payment gateway in the Min text field right next to each payment option. Similarly, you can set the maximum amount in the Max text field below. Once you’re done, click the Save changes button to continue.
Here’s how it looks on the front-end of your WooCommerce store:

#8: Enable different payment gateways for different types of products
If you sell a lot of different types of products on your online store, enabling different payment methods for each might be a good idea. As an example, products such as jewelry or furniture usually aren’t sold with payment options like cash on delivery.
By limiting payment options by the type of WooCommerce product, you can sell different types of products on your WooCommerce store without running into payment issues.
Here’s how you can do that using Booster Elite’s WooCommerce Payment Gateways per Product or Category module:

Enable the Gateways per Product or Category module under the Payment Gateways section.
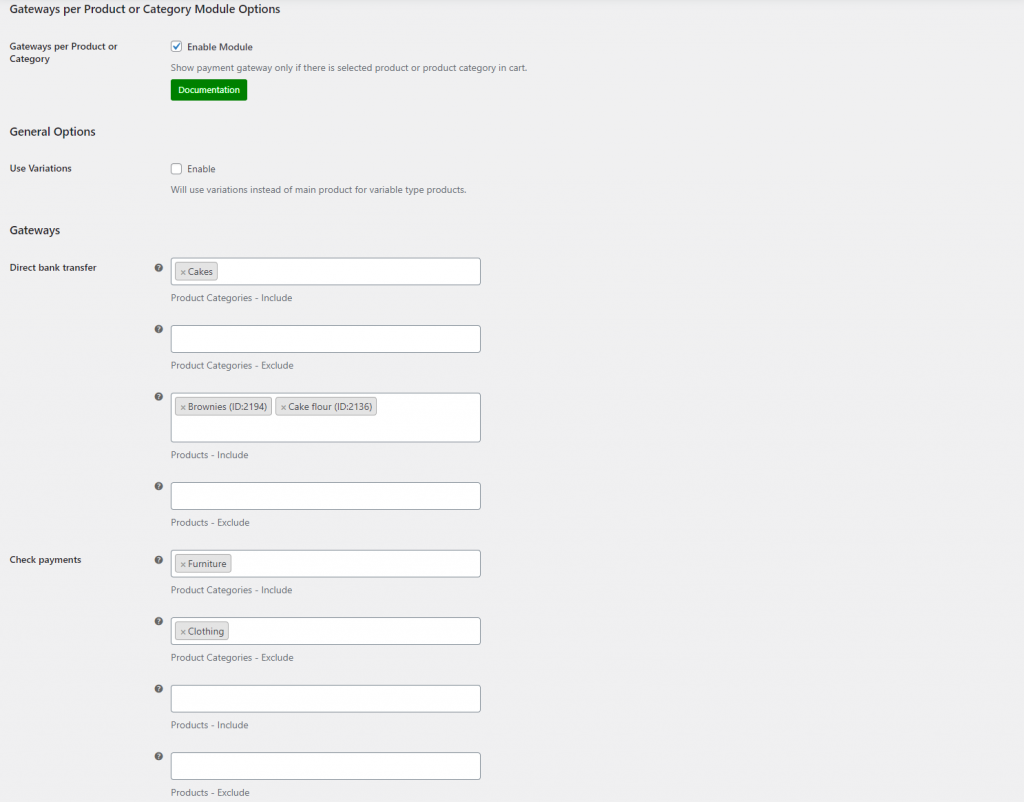
Next, navigate to Booster → Payment Gateways → Gateways per Product or Category to configure the module’s settings.
You can set which products or product categories will be used for which payment gateway. If a customer has the same product in their cart, they can be either restricted from a payment option or have access to it.
You can set which categories you’d want to allow for the payment gateway in the Product Categories – Include text field. Similarly, you can also allow or restrict products for the payment gateway. Once you’re done, click the Save changes button to continue.
Here’s how that looks on the front-end of your WooCommerce store for a furniture product:

Conclusion
Enhancing the payment experience on your WooCommerce store can help boost sales and improve user flows on the checkout page of your online store. The Booster Elite for WooCommerce plugin packs tons of modules that can help you enhance the WooCommerce payment experience in a variety of different ways.
Ready to start improving and enhancing the WooCommerce payment experience? Get Booster Elite today!