As an online store owner, you might want to add fees such as shipping and handling fees or sales tax (GST) to the WooCommerce checkout page. This allows you to add additional charges to the customer’s order total.
The only problem is that WooCommerce, out of the box, doesn’t let you add different types of fees to the WooCommerce checkout page.
One easy way of doing this is with the Booster Plus for WooCommerce plugin that lets you add fees to the checkout page of your online store. In this article, we’ll show you how you can add fees to the WooCommerce checkout page using Booster Plus.
Why add fees to your WooCommerce store?
One way to charge customers additional fees and taxes when they place their order is by displaying the additional fees on your WooCommerce store’s checkout page. This lets customers know what additional charges they have to pay with their order so you don’t have to cut your profits short.
You may also want to add fees to the checkout page so that your store can sell to EU-specific customers. Since EU-specific customers are bound to pay EU VAT tax, adding an option to pay it at the time of purchase can help improve the user experience and attract new customers to your store.
You can also add fees to your WooCommerce store as a means to cover the extra costs involved in shipping out your order to customers. Additionally, if you work with third-party logistics services, you can pass charges on to customers who order from your WooCommerce store.
Types of fees you might need to charge
Let’s take a look at different types of fees store owners might need to charge on the WooCommerce checkout page:
Handling fees
Handling fees can be charged to the customer to cover storing and packaging costs.
For example, if your store sells fishing equipment, you can charge handling fees for shipping out fresh fish bait orders or fishing rod orders. Since you need to store and package fresh fish bait carefully, charging extra fees will make it possible to offer the best service.
Customers will be informed at checkout about the additional handling costs included in their order’s total.
Processing fees
Store owners may need to add processing fees to the WooCommerce checkout page as most online payment services charge a commission for every transaction. This helps in making sure the customer pays for the additional processing fees so you remain profitable. You can also charge processing fees based on the payment methods you accept.
EU VAT
If your store sells to EU-specific customers, you need to add EU VAT fees to the WooCommerce checkout page. This can help you cater to EU-specific customers and help maintain their tax laws and regulations when buying from your WooCommerce store.
This also saves customers a lot of time when buying from your store. Customers now don’t have to pay the EU VAT tax themselves. Instead, they just pay when they’re checking out at your online store. This not only encourages customers to buy again from you but also attracts new customers who are looking for a simpler shopping experience.
Charging customers extra fees is essential for businesses that want to provide top-notch service while remaining profitable.
How to add fees to the WooCommerce checkout page
Here, we’ll show you how to add fees to the WooCommerce checkout page using Booster Plus’s WooCommerce Checkout Fees module.
Step #1: Enable the WooCommerce Checkout Fees module
Start by getting the Booster Plus for WooCommerce plugin and installing it on your WordPress website. Next, navigate to WooCommerce → Settings → Booster from the admin panel to access the different modules.
You’ll see a list of different modules. Select the Checkout Fees module under the Cart & Checkout section. You can select the checkbox next to the module to enable it. Once you’re done, click the Save changes button at the bottom of your screen to continue.
Step #2: Configure plugin settings
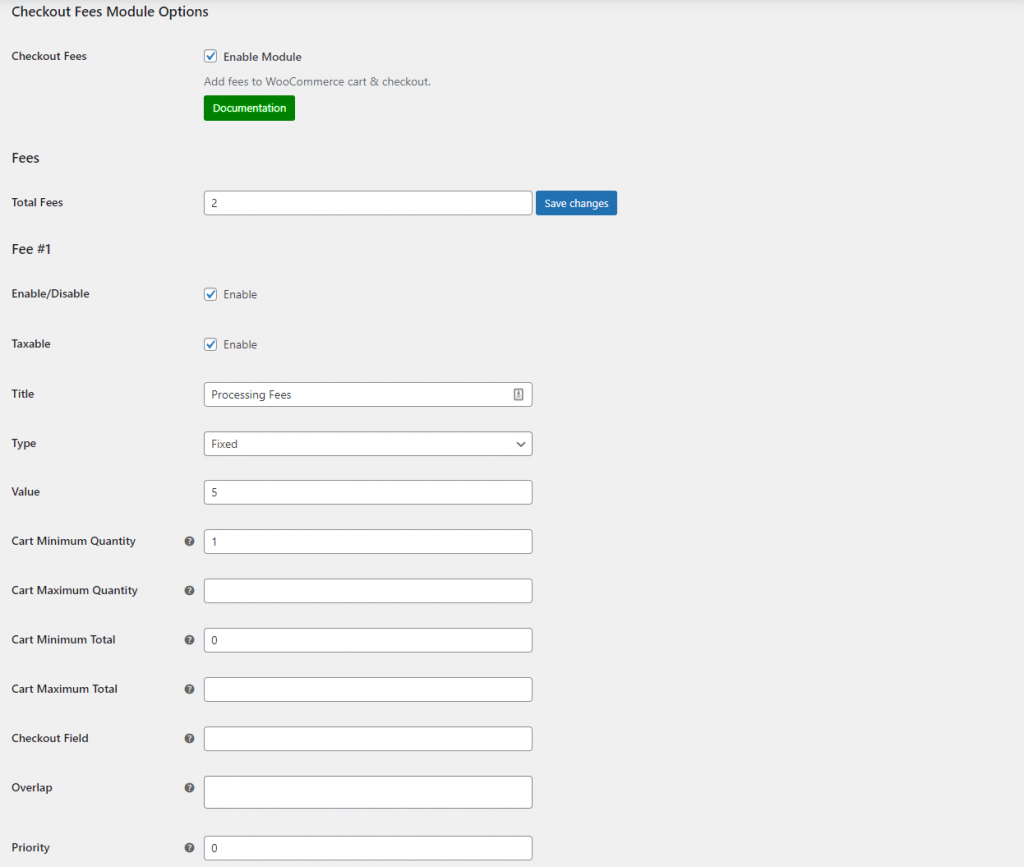
Navigate to Booster → Products → Checkout Fees to configure the module’s settings.
You can select the number of fees you want to add to the checkout page of your WooCommerce store. Set the total number of fees in the text field next to Total Fees and click the Save changes button next to it.
Now let’s move on to setting each fee’s values. You can set the name of the fees you’d want to charge in the text field next to Title and choose the type either Fixed or Percent. Now, you can enter the value of the discount in the text field next to Value.
Similarly, we can create multiple fees and add them to the WooCommerce checkout page. We’ve added Handling Fees as Fee#2. In the Type, you can set it to Percent and enter the amount of the fees you want to charge in the Value text field. Once you’re done with the settings, click the Save changes button to continue.
In addition to this, you can also use Booster Plus’s WooCommerce EU VAT Number module to collect and validate EU VAT numbers at checkout. It also lets you exempt VAT for valid numbers automatically. The module supports 28 EU countries’ standard VAT rates to your online store.
Step #3: Preview
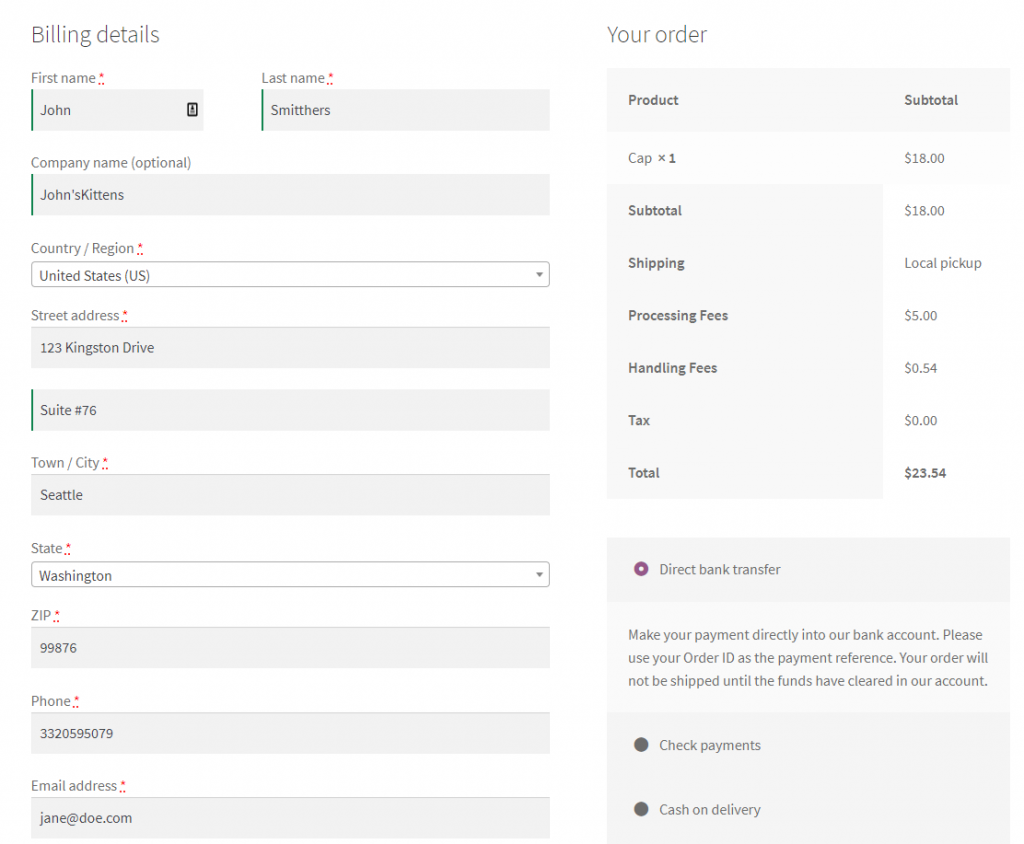
Now that we have added two additional charges to the WooCommerce checkout page, they will automatically be added to the customer’s order. It’ll look something like this on the front-end:
Conclusion
Adding fees to the WooCommerce checkout page makes it easy for store owners to charge different types of fees such as handling fees, processing fees, or EU VAT to your customer. This ensures that you’re not losing out on profits.
You may also add fees directly to your shop’s products using Booster Plus’s WooCommerce Product Extra Fees module. This lets you set extra fees globally or for selected products only. Additionally, you can also set fees for products in specific categories on your WooCommerce store.
Booster Plus gives users the ability to select and customize from over 100 modules that help make your WooCommerce store stand out from the competition.
Be sure to check out our article on How to Customize the WooCommerce Cart and Checkout Page for more information.
Ready to start adding fees to the WooCommerce checkout page? Get Booster Plus today!


