As an online store owner, you’re always looking for ways to improve the user experience of your store. This helps attract new customers while ensuring existing customers stay happy. You can customize WooCommerce cart page and checkout page by adding or removing information and functionality.
In this article, we’ll show you some different ways of WooCommerce checkout page customization. And also, you will learn about Booster Plus modules that will help you make a custom WooCommerce cart page.
#1: Remove the ‘Order Again’ Button
Removing the “Order Again” button from your checkout page might be beneficial for some businesses. You might consider doing this if you sell one-time, exclusive products such as memberships and subscriptions on your WooCommerce store.
Not allowing customers to order again is also useful if you want to allow customers to avail discounts only once. For instance, if you’re allowing a one-time 10% discount on all sports watches, you don’t want the same customer to avail the discount twice. Instead, customers who have already gotten the discount won’t be able to see the “Order Again” button.
This also gives everyone a chance to buy your products if you have limited stock or if you want to organize limited-time drops. In other words, if your products are limited in stock and sell out quickly, limiting customers from ordering again ensures everyone will be able to place an order.
Additionally, if you sell services, you’d want to remove the order again button.
How to Remove the ‘Order Again’ Button
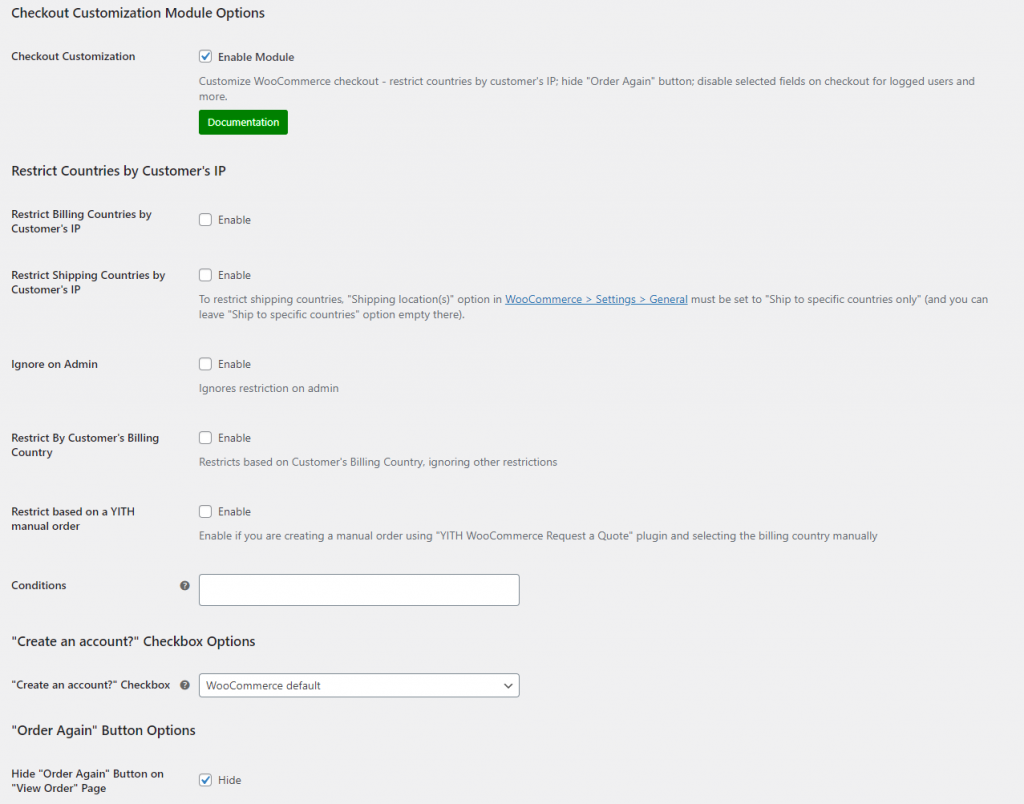
You can remove the “Order Again” button from your online store using Booster Plus’s WooCommerce Checkout Customization module.
After you install and activate the Booster Plus for WooCommerce plugin, navigate to WooCommerce → Settings → Booster to access the different modules.
From the list of modules, select the checkbox next to WooCommerce Checkout Customization and click the Save changes button to continue. Now go to Booster → Cart & Checkout → Checkout Customization to hide the “Order Again” button. Tick the checkbox next to Hide ‘Order Again’ Button on ‘View Order’ Page. Click the Save changes button to continue.
#2: Display Additional Fees
Once a customer adds everything to their cart and is ready to checkout, the last thing you’d want is to show additional fees. They’ll be more likely to rethink their purchase decision and may even bounce off your store.
Showing additional fees early on in the purchase process ensures customers know about any hidden or extra charges. This way, they won’t get demotivated seeing additional fees after they’ve decided to buy from you.
Charging additional fees is necessary for businesses that need to break even and cover all their costs. For instance, if you’ve hired labor to package products, you could charge customers additional processing fees which directly go towards the labor that does all the packaging.
How to Display Additional Fees
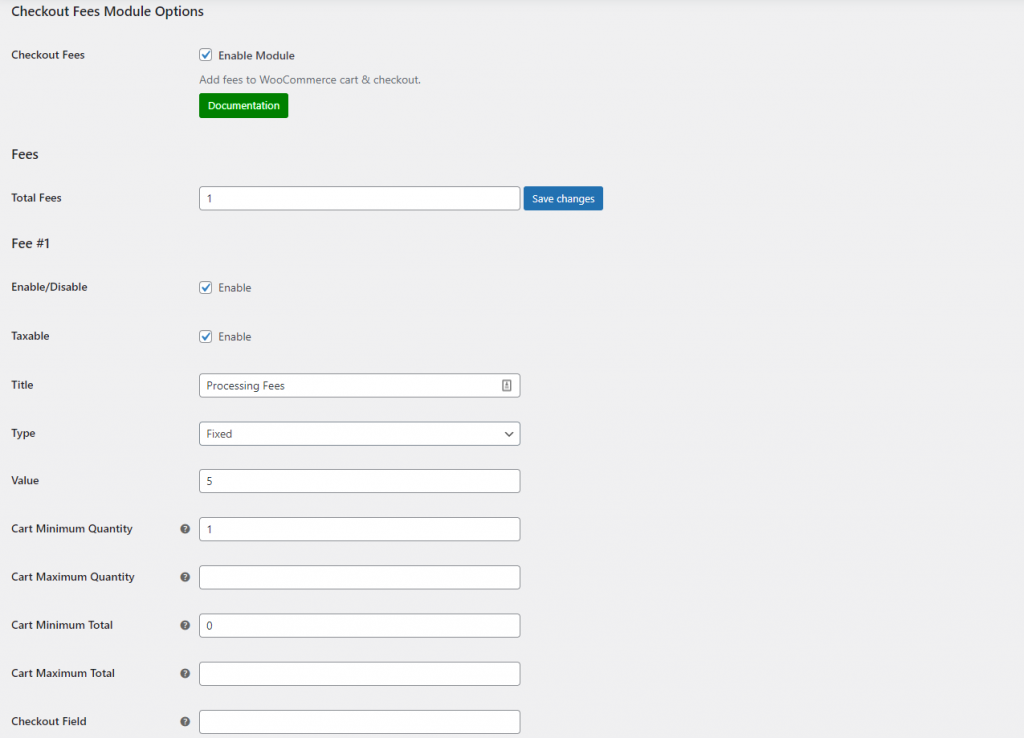
You can display additional fees on the checkout page of your online store using Booster Plus’s WooCommerce Checkout Fees module.
With the Booster Plus for WooCommerce plugin installed on your store, navigate to WooCommerce → Settings → Booster to access the different modules.
From the list of modules, select the checkbox next to WooCommerce Checkout Fees and click the Save changes button to continue.
Now go to Booster → Cart & Checkout → Checkout Fees to display additional fees on the cart and checkout pages. You can select the number of additional fees you want to add to your cart and the checkout page. Once you add the title, you can select the type of fees, either fixed or by percentage, and then add the amount in the Value text field below. Once you’re done, click the Save changes button to continue.
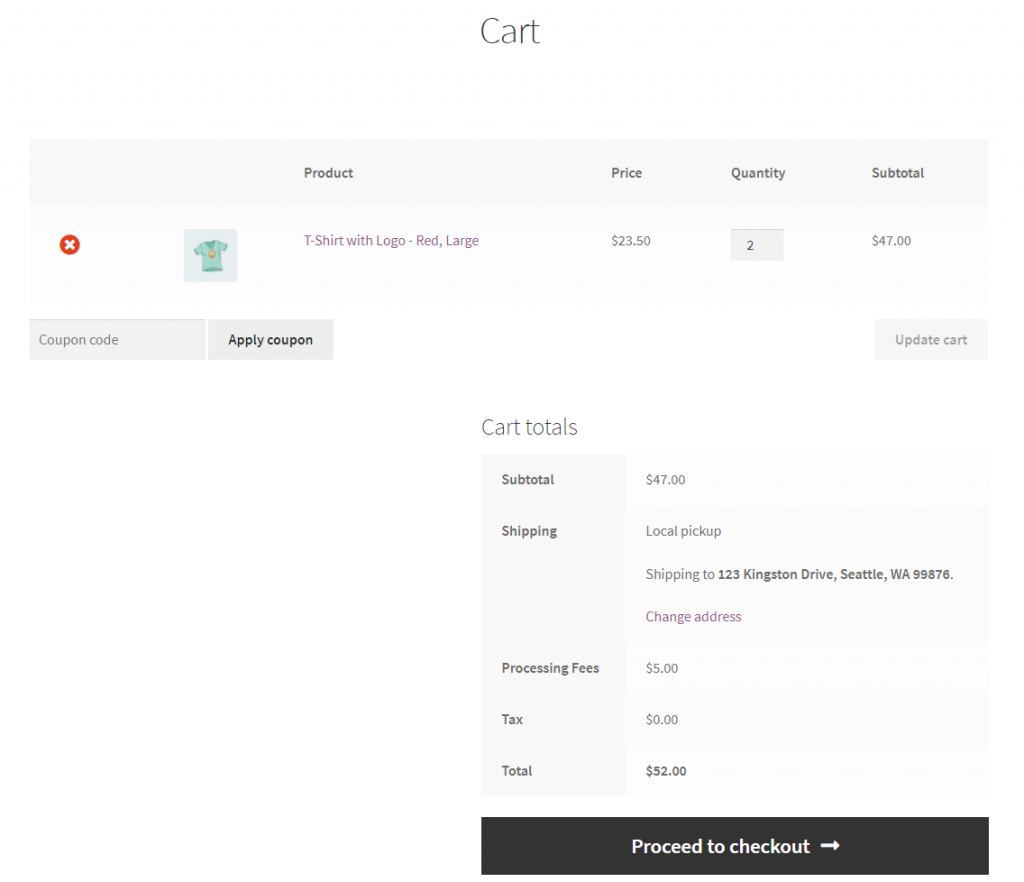
Here’s what it looks like for your customers on the front-end:
Be sure to check out our tutorial on How to Add Fees to the WooCommerce Checkout Page for more ideas.
#3: Add Custom Fields and Information on The Checkout Page
If you want to collect information from your customers when they checkout, you can use input fields. By adding custom input fields such as date picker fields, checkboxes, or text fields, you can collect information from customers during checkout.
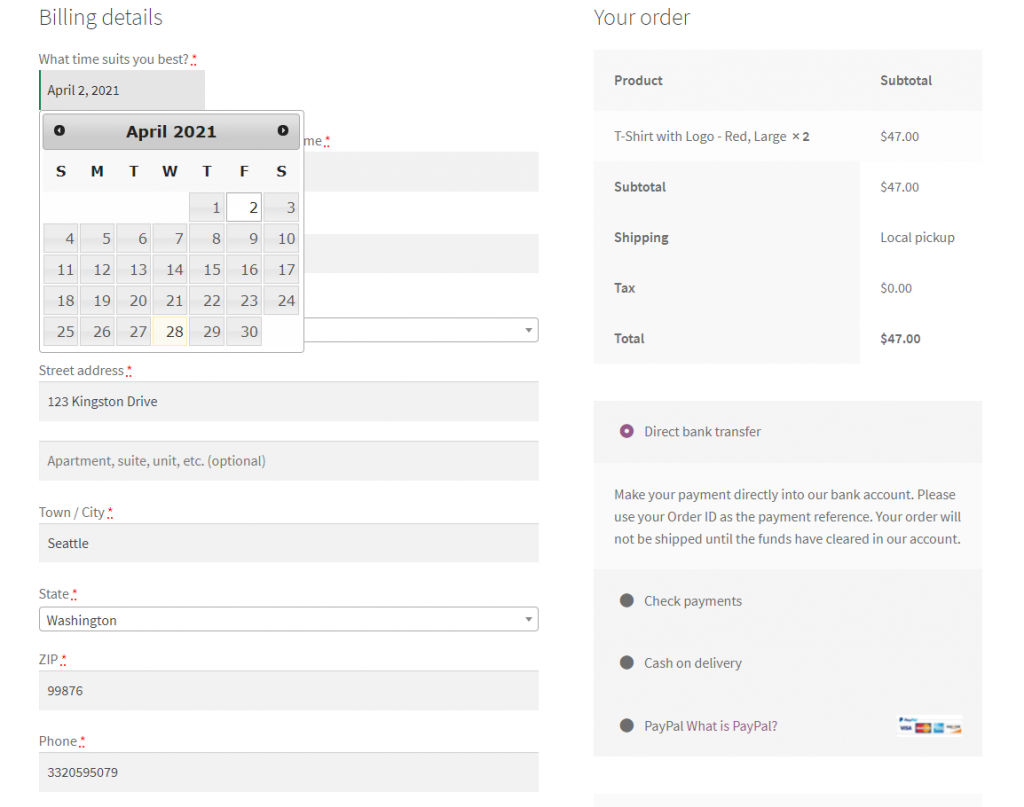
For instance, if you sell flower bouquets on your WooCommerce store, adding a date picker and a text field will allow customers to let you know when they want the flowers delivered. They can enter a message they’d like to have printed on the gift card attached to the flower bouquet by using a text field. This helps you gather information from your customers on the checkout page.
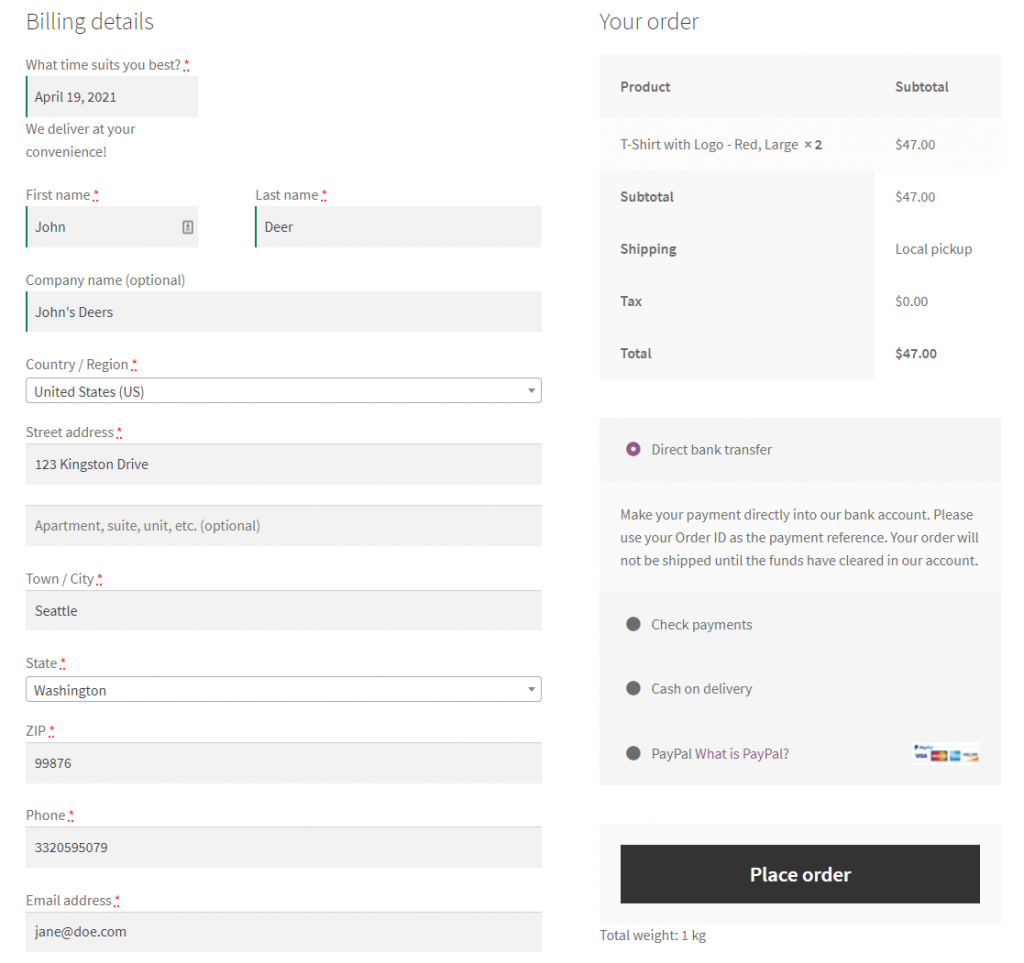
Additionally, adding custom fields on the checkout page can also be useful if you want to display information on the checkout page. For example, you can display instructions, shipping and handling information, or the total weight package. This lets customers know about their orders before they’re dispatched.
How to Add Custom Fields and Information on The Checkout Page
You can add custom fields and information on the checkout page of your online store using Booster Plus’s WooCommerce Checkout Custom Fields and WooCommerce Checkout Custom Info modules.
Navigate to WooCommerce → Settings → Booster from the admin panel to access the different modules.
From the list of modules, select the checkbox next to Checkout Custom Fields and Checkout Custom Info and click the Save changes button to continue.
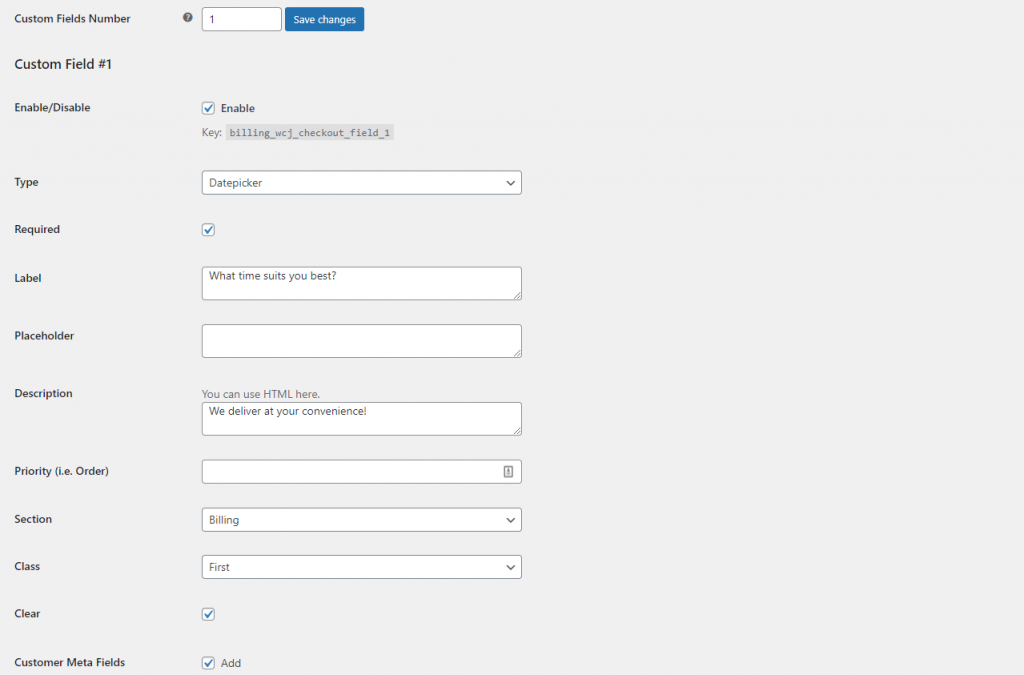
Now go to Booster → Cart & Checkout → Checkout Custom Fields to display custom fields on the checkout page. You can enter the number of fields you want in the text field next to Custom Fields Number. You can edit your custom field by selecting the Type from a list of options including Text, Textarea, Checkbox, Datepicker, Weekpicker, Timepicker, Select, Radio, Password, Country, State, Email, and Phone.
After entering the label and description, click on the Save changes button to continue. Here’s how your customer will see custom fields on the checkout page:
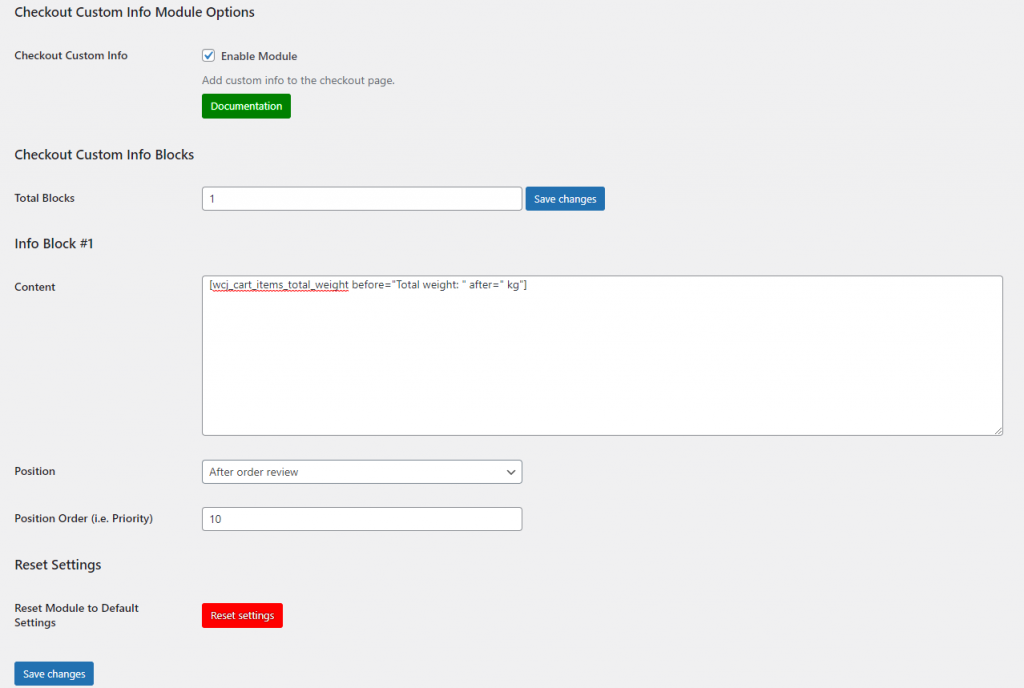
Next, we need to add custom information to the checkout page. Navigate to Booster → Cart & Checkout → Checkout Custom Info to configure the module’s settings.
Once you’re done entering additional custom information in the text field, click the Save changes button to continue.
Here’s what customers will see when they check out:
Additionally, you can also customize the core WooCommerce checkout fields using the WooCommerce Checkout Core Fields module.
#4: Set up a Coupon Field
Setting up a coupon field on your WooCommerce store can help you offer discounts on products using coupons. For instance, you can provide coupon codes to customers that they can use to avail discounts at checkout. For example, you can provide “Free shipping above $50”. Once the customer reaches the minimum amount, they will be able to enter the coupon code and claim the discount at checkout.
Coupons encourage customers to buy more from you. Following our example from above, customers would want their cart value over $50 so that they can avail free shipping. This means that your customers might end up buying more from you than they had originally planned. This is a great way to boost your store’s average order value.
How to Set up a Coupon Field
You can set up a coupon field on your online store using Booster Plus’s WooCommerce Coupon Code Generator and WooCommerce URL Coupons and WooCommerce Coupon by User Role modules.
After installing the Booster Plus for WooCommerce plugin, navigate to WooCommerce → Settings → Booster to access the different modules.
From the list of modules, select the checkbox next to Coupon Code Generator, Coupon by User Role, and URL Coupons and click the Save changes button to continue.
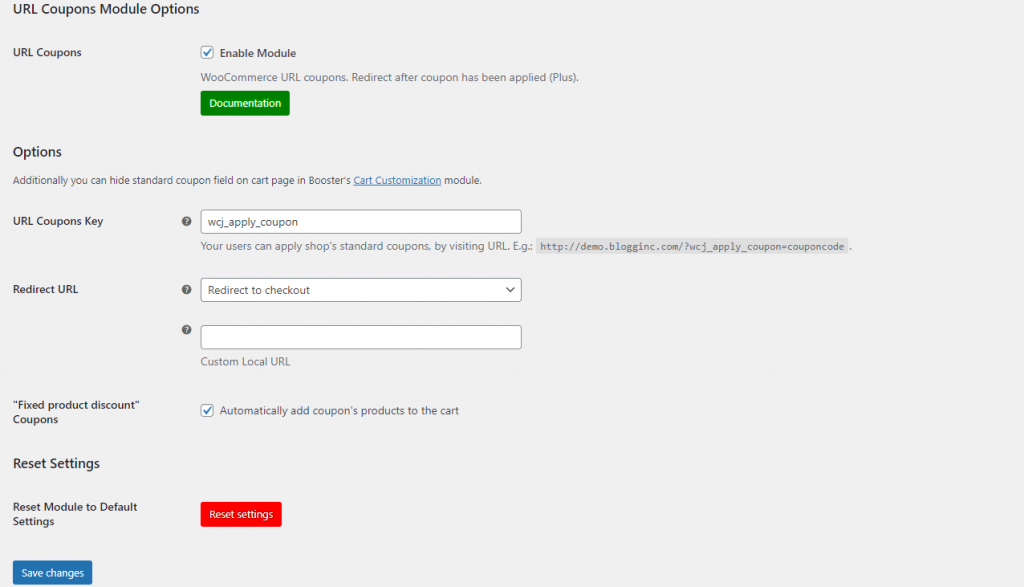
Now go to Booster → Cart & Checkout → URL Coupons to enable URL coupons on your WooCommerce Store.
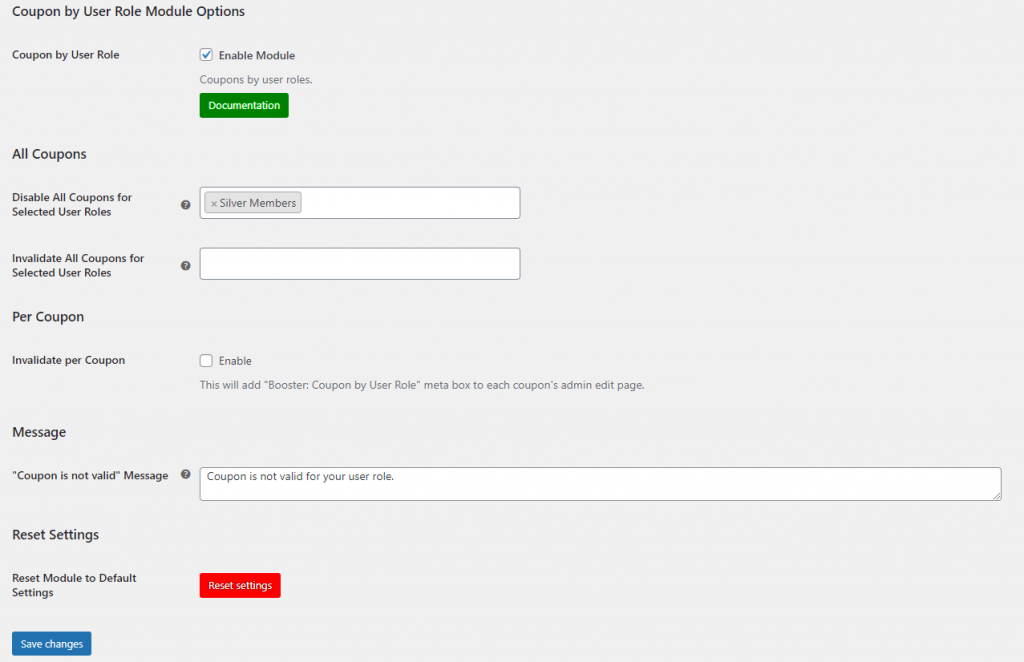
Next, navigate to Booster → Cart & Checkout → Coupons by User Role to enable or disable coupons based on the user role.
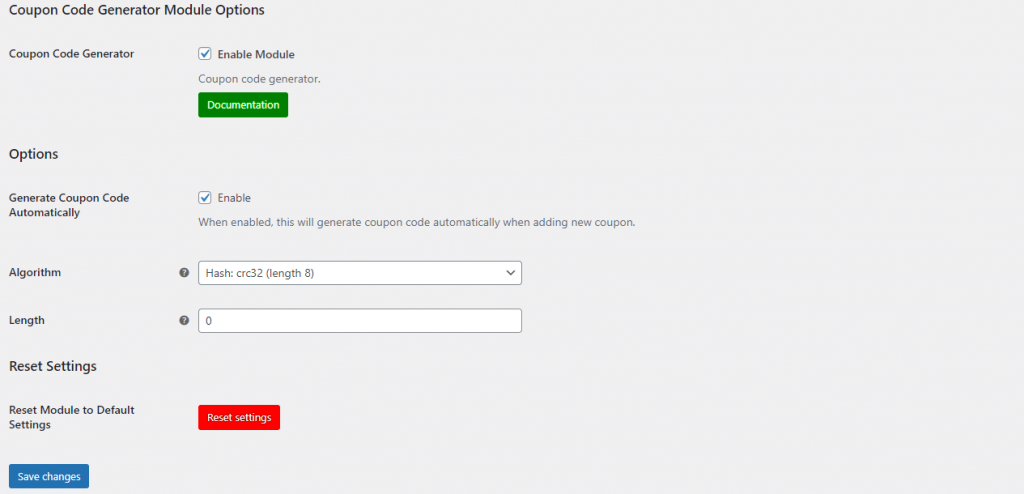
Finally, go to Booster → Cart & Checkout → Coupon Code Generator and generate secure coupon codes to share with customers.
Once you’re done, click the Save changes button at the bottom of the screen to save each module’s settings.
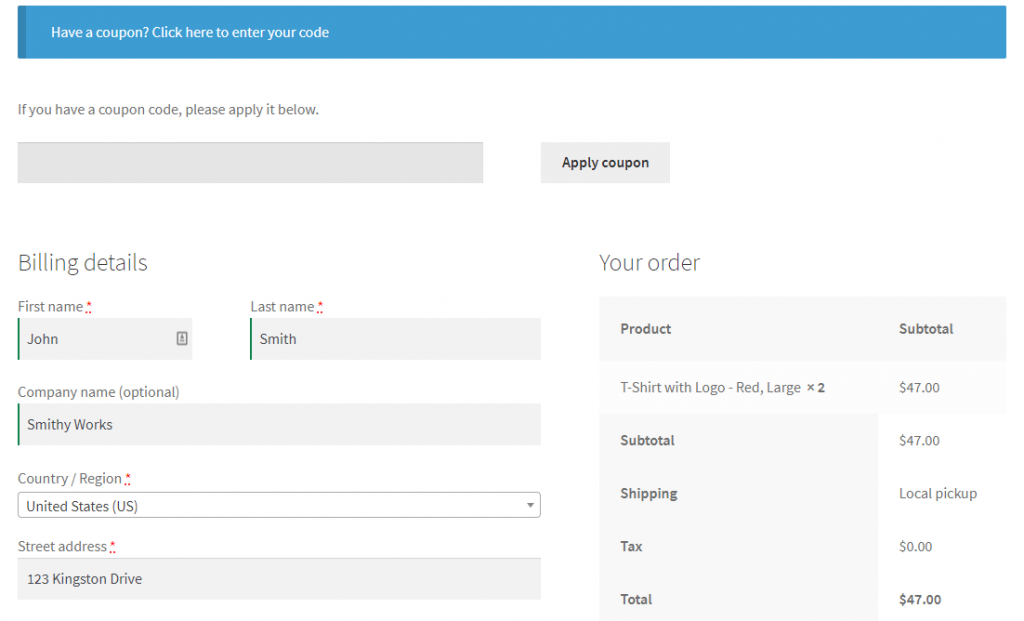
Your customers can enter the coupon code and get a discount:
Additionally, you can hide the coupon field using Booster Plus’ WooCommerce Cart Customization module.
#5: Validate the Customer’s EU VAT
Setting up a way to validate the customer’s EU VAT number is necessary if your business operates in the EU or you sell to customers based in the EU. Ideally, you’d want to validate it right before they checkout so that your customers don’t have to pay more.
Additionally, this is also a great way to check how much tax the customer will have to pay if any. It also lets customers know exactly how much tax they have to pay before they checkout from your WooCommerce store.
How to Validate the Customer’s EU VAT
You can validate your customer’s EU VAT on the checkout page using Booster Plus’s WooCommerce EU VAT Number module.
Install and activate the Booster Plus for WooCommerce plugin. Next, navigate to WooCommerce → Settings → Booster to access the different modules.
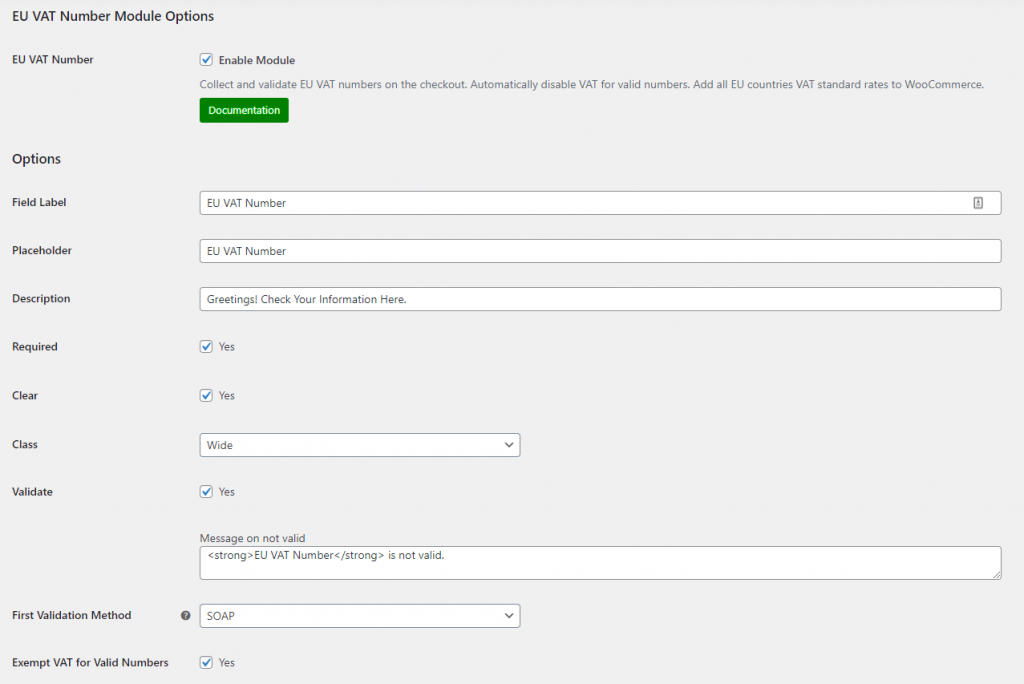
From the list of modules, select the checkbox next to EU VAT Number and click the Save changes button to continue. Now go to Booster → Cart & Checkout → EU VAT Number to let customers validate their details at checkout.
You can set this as a required field by selecting the checkbox next to Required. Additionally, you may add a description and customize the field label. Once you’re done customizing the different options, click the Save changes button to continue.
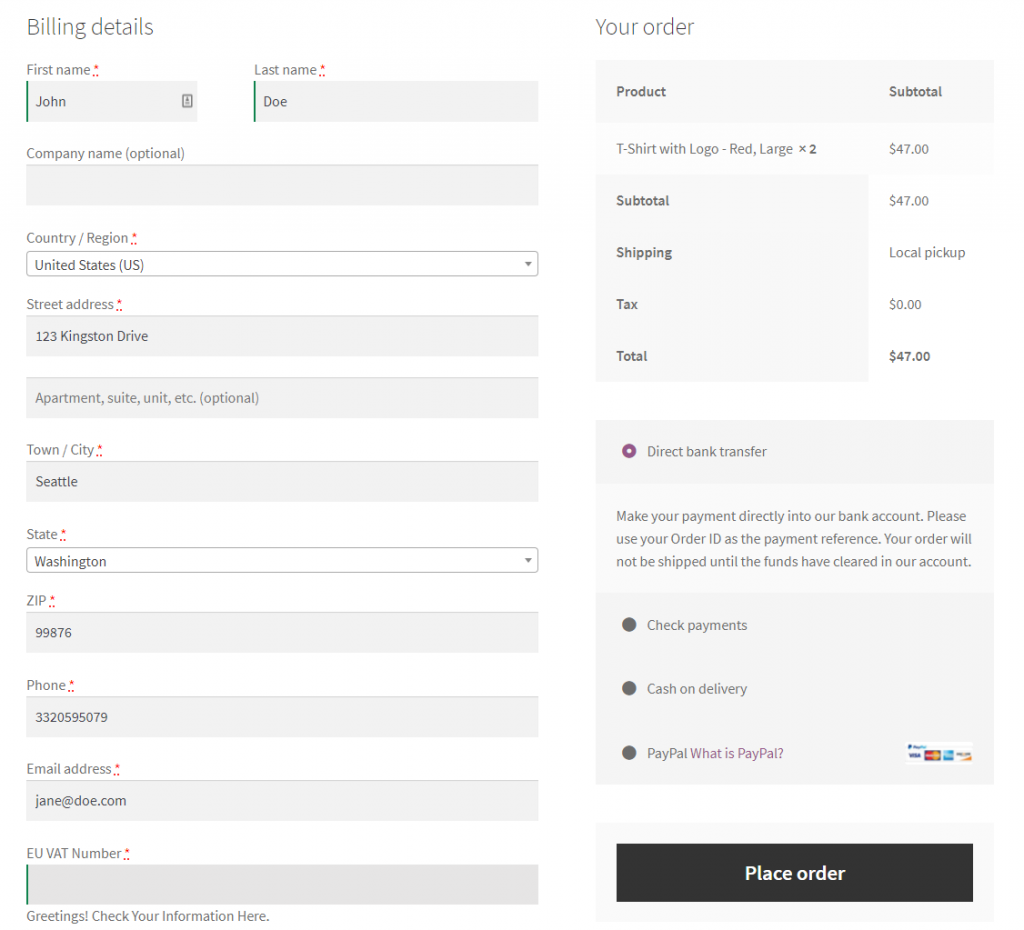
Here’s how customers will have to validate their EU VAT number at checkout:
#6: Let Customers Upload Files on The Checkout Page
If you sell customized products, you’ll need a way to let customers upload files on the checkout page. For instance, if you sell custom jewelry, you’ll need to be able to get the customer’s input on how they want to personalize it. Customers can upload an image of a monogram they want to be engraved on a necklace, for example.
Letting customers upload files on the checkout page is also great if you sell services and need to collect documents from customers such as a copy of their utility bill. Additionally, this is also useful if you offer technical analytics such as financial consultancy, business accountancy, or auditing services.
How to Let Customers Upload Files on The Checkout Page
You can let customers upload files on the checkout page using Booster Plus’s WooCommerce Checkout Files Upload module.
After installing and activating the Booster Plus for WooCommerce plugin, navigate to WooCommerce → Settings → Booster to access the different modules.
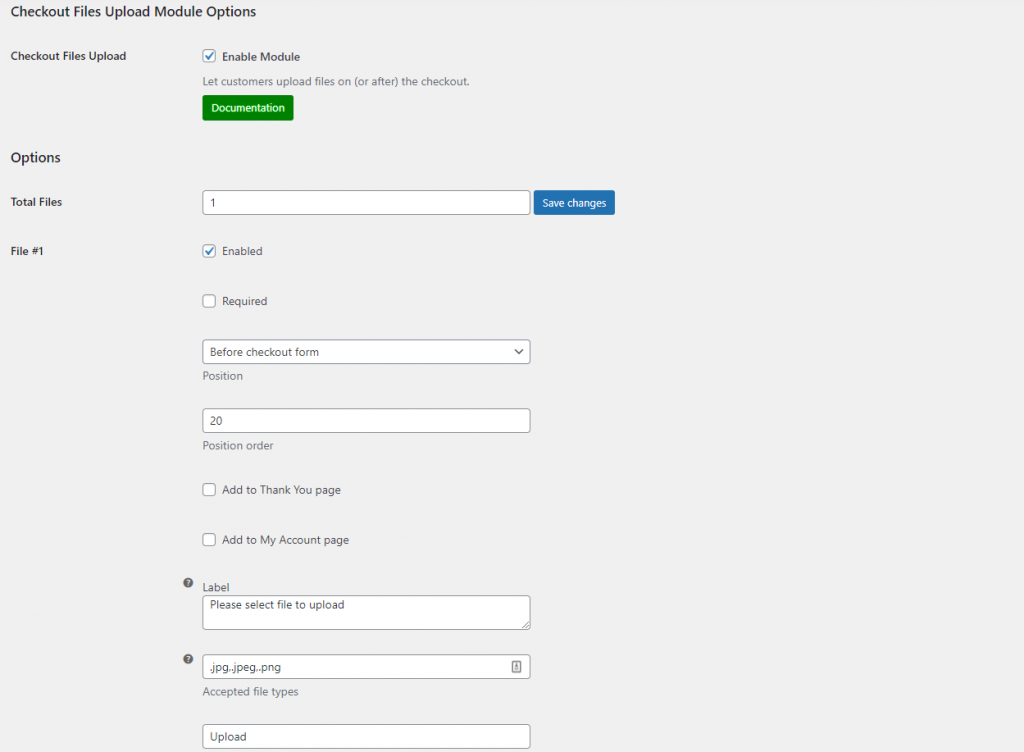
From the list of modules, select the checkbox next to Checkout Files Upload and click the Save changes button to continue. Now go to Booster → Cart & Checkout → Checkout Files Upload to configure the modules settings customize WooCommerce checkout.
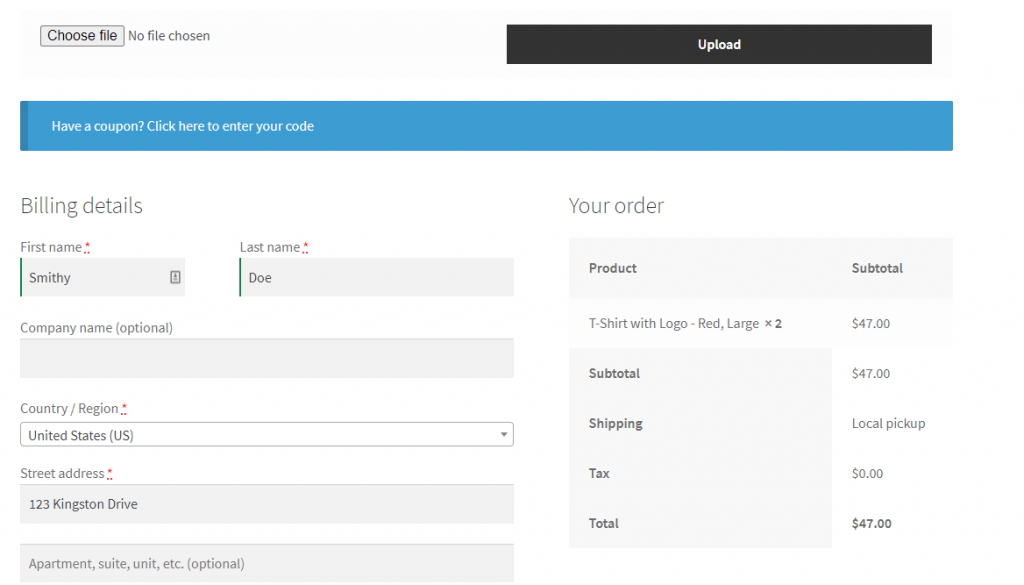
Here’s how your customers will be able to upload files on the checkout page:
#7: Customize The Mini Cart Widget
The mini cart widget can be used to provide customers with important bits of information before the cart, in a specific place within the cart, or after the cart. By customizing the mini cart widget, you can add information to your mini cart. You can also use this space to share information.
How to Customize The Mini Cart Widget
The easiest way to customize the mini cart widget on your online store is by using Booster Plus’s WooCommerce Mini Cart and WooCommerce Cart Custom Info modules.
Navigate to WooCommerce → Settings → Booster to access the different modules.
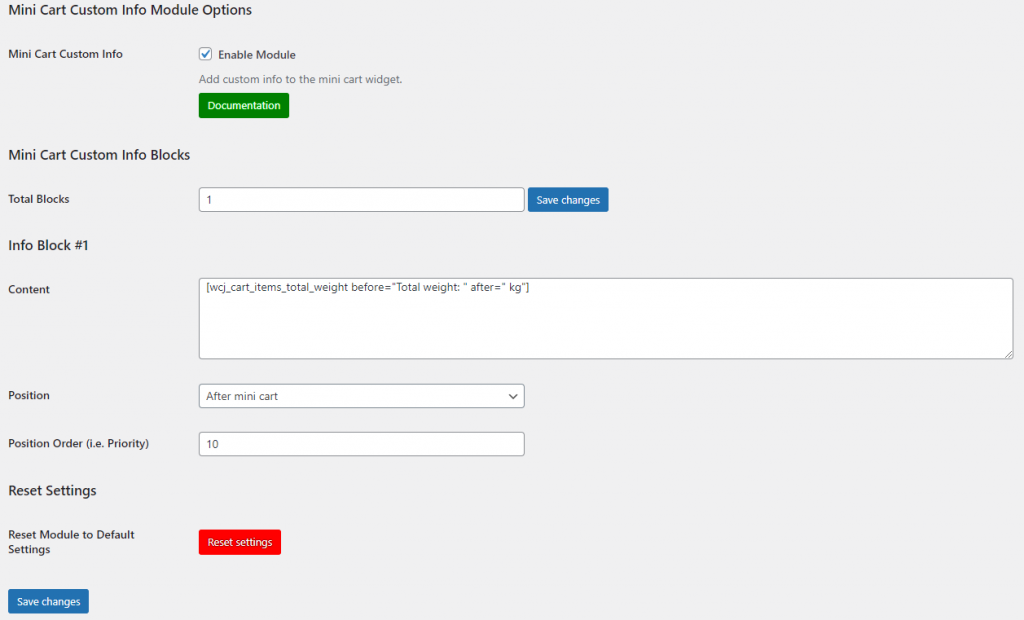
From the list of modules, select the checkbox next to Mini Cart Custom Info click the Save changes button to continue. Now go to Booster → Cart & Checkout → Mini Cart Custom Info to configure the module’s settings.
You can edit what you want to display as custom information in the mini cart widget, once you’re done, click the Save changes button to continue.
Check out our tutorial on How to Customize the WooCommerce Mini Cart Widget for even more ways to customize the mini cart widget.
#8: Add and Customize the “Empty Cart” Button
Adding an empty cart button can help you speed up user flows on your WooCommerce store. Customers won’t have to manually remove multiple products from the cart. Instead, they’ll be able to do that with one click. This way, customers will have an easier time if they make a mistake adding products to their cart or if they want to order different products.
How to Add and Customize the “Empty Cart” Button
You can add and customize an “Empty Cart” button on your online store using Booster Plus’s WooCommerce Empty Cart Button module.
After installing and activating the Booster Plus for WooCommerce plugin, navigate to WooCommerce → Settings → Booster to access the different modules.
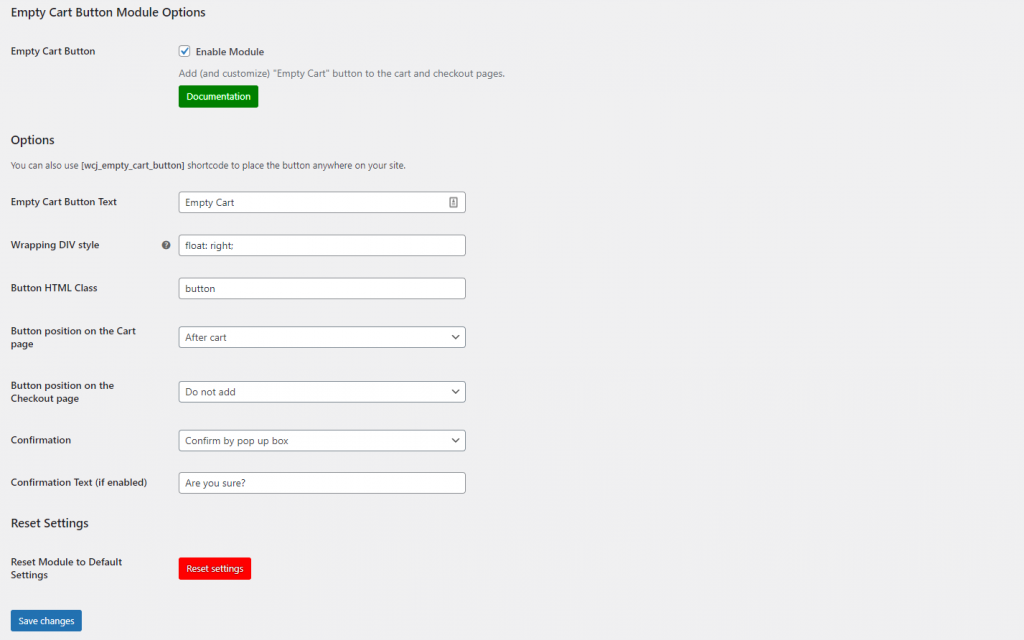
From the list of modules, select the checkbox next to WooCommerce Checkout Fees and click the Save changes button to continue. Now go to Booster → Cart & Checkout → Empty Cart Button to customize the “Empty Cart” button.
Once you’re done with the changes, click the Save changes button to continue.
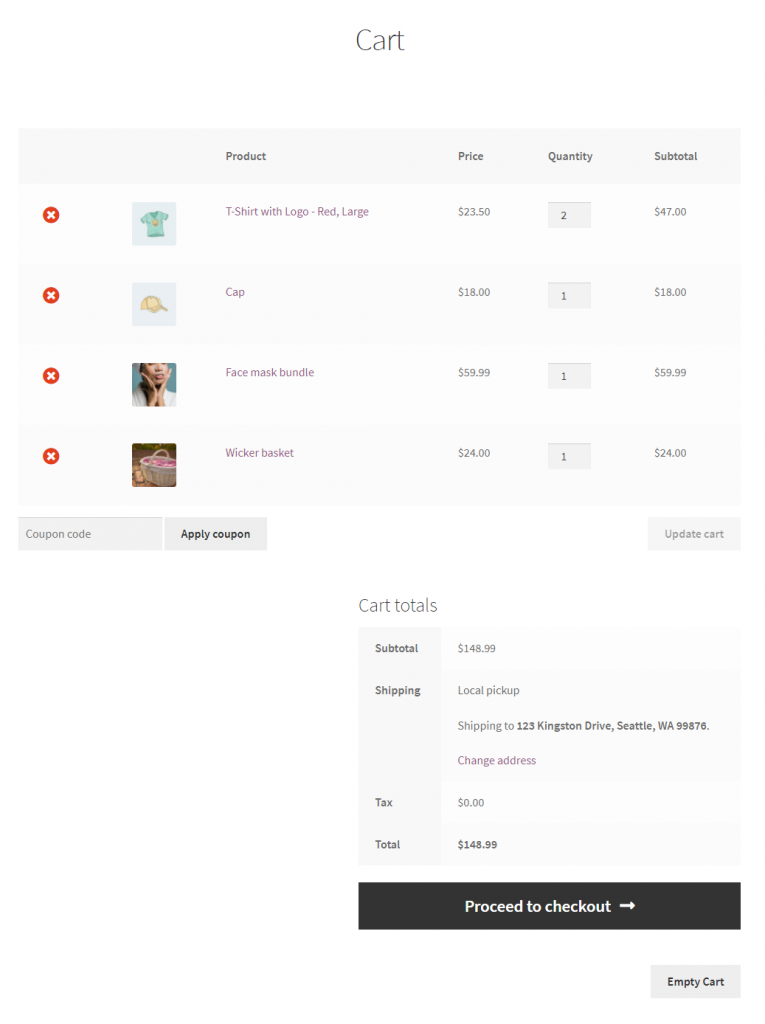
This will display an “Empty Cart” button for your customers:
Customize the WooCommerce Cart and Checkout page today
You can customize WooCommerce checkout page, and cart page using the Booster Plus for WooCommerce plugin. With different customization options, you can improve the user experience on your WooCommerce store, while also encouraging customers to buy more from you.
The best part is that all of this can be done with one plugin!
Booster Plus packs over 110+ modules that help with the customization of your online store in new ways. You can use it to optimize the checkout experience on your WooCommerce store.
Ready to customize the WooCommerce cart and checkout page? Get Booster Plus today!


