Overview #
The WooCommerce Order Custom Statuses plugin allows you to add custom order statuses to your WooCommerce store. Additionally, it lets you customize the statuses based on your requirements. So now, add more detailed information to your order statuses without hassles.
Enabling Order Custom Statuses Plugin for WooCommerce #
To enable and use the Order Custom Statuses plugin, you should first download and install Booster for WooCommerce.
- Navigate to WordPress Dashboard > Booster > Plugins > Shipping & Orders
- Click Enable for the plugin Order Custom Statuses.
- Save changes.

The WooCommerce Order Custom Statuses plugin will be enabled for your site.
Configuring Custom Statuses for Orders #
From this section (e.g., Custom Statuses tab), you can:
- Add custom order statuses and customize the statuses based on your requirements using this option.
- Add custom order statuses to the admin report.
- Make the custom order statuses editable.
- Enable/disable the plugin to add custom statuses to the list.
- Add statuses to admin bulk order actions, and so on.
Enter/select the required values for the field. Refer to the table below for field descriptions:
| Field | Description |
| Default Order Status | Default status of all orders on your WooCommerce site. Note: Payment gateways can change this status immediately on order creation. E.g. BACS gateway will change status to On-hold. |
| Set Default Order Status Forcefully | Specifies if the default order status is forcefully set. Note: Forcing the status can result in unpredictable consequences. |
| Add All Statuses to Admin Order Bulk Actions | Specifies if all the statuses are added to the bulk actions list on the admin Order page |
| Add Custom Statuses to Admin Reports | Specifies if custom statuses are added to admin reports |
| Make Custom Status Orders Editable | Specifies if custom statuses are editable. By default orders with custom statuses are not editable, similar to the standard WooCommerce Completed status. |
| Remove Status Prefix | Specifies if the wc- prefix will be removed from custom statuses. Enable this option if you cannot see the orders or the statuses. |
| “Processing” and “Complete” Action Buttons | Specifies if Processing and/or Complete buttons are hidden/displayed. |
| Add Custom Statuses to Admin Order List Action Buttons – Add | Specifies if custom statuses are added to the Actions column on the admin Order page. |
| Add Custom Statuses to Admin Order List Action Buttons – Enable Colors | Specifies if the custom statuses, under the Actions column on the admin Order page are color-coded |
| Enable Colors in Status Column | Specifies if the custom statuses under the Status column are color-coded. |
| Add Custom Statuses Buttons to Admin Order Preview Actions | Specifies if custom status buttons are added to the admin orders preview page |
- Click Save Changes.
Please note that when you configure the Default Order Status option, some standard WooCommerce emails may be stopped from being triggered. For example, triggers for the new order email to admin are when order status changes:
- From pending to processing
- From pending to completed
- From pending to on-hold
- From failed to processing
- From failed to completed
- From failed to on-hold
and for customer’s on-hold order email:
- from pending to on-hold
- from failed to on-hold
By default, the order status is set to “pending” in WooCommerce. If you change that, some order emails may never be triggered. For example, to continue sending two emails described above, you need to set the “Default Order Status” option to either “pending” or to “no changes.”
To remove custom order statuses from your shop, disable the Order Custom Statuses plugin.
The custom order statuses will be configured.
Managing Custom Order Statuses (Booster Tools > Custom Statuses) #
You can create, delete, and edit custom order statuses using this option. The Tools section allows you to manage the custom order statuses and also lists the default WooCommerce order statuses. However, editing the default WooCommerce order statuses is not allowed.
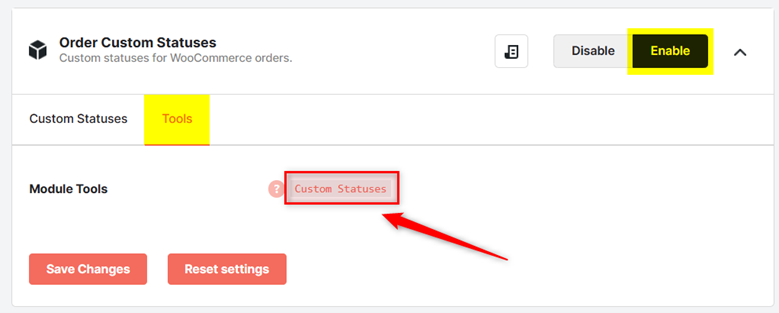
- Make sure that the Custom Order Statuses plugin is enabled.
- Navigate to the Tools tab.
- Click the Custom Statuses Module Tools link. Alternatively, go to Booster > Booster Tools > Custom Statuses page.
Now, you can add, edit, and delete custom statuses for your eCommerce shop as you wish.
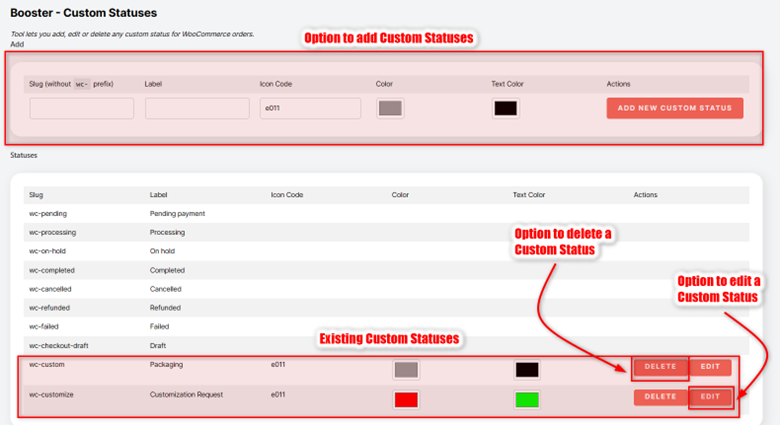
Adding a Custom Status #
- To add a custom order status, enter the slug of the custom status, without the prefix -wc, in the Slug field.
- Enter the name of the custom status in the Label field.
- Enter the code of the icon that you want to set for the custom status in the Icon Code field. To view the full list of icons and their codes, click here.
- Select the color of the custom status from the Color dropdown palette.
- Select the text color of the custom status from the Text Color dropdown palette.
- Click Add new custom status.
The custom order status will be added.
Editing a Custom Status for WooCommerce #
To edit a custom status, click the Edit button in the row of the status, edit the values of the required fields, and click Edit Custom Status.
Deleting Custom Statuses #
To delete a custom status, click the Delete button in the row of the status.
To delete all the custom statuses, click the Delete All Custom Statuses button at the bottom of the page.
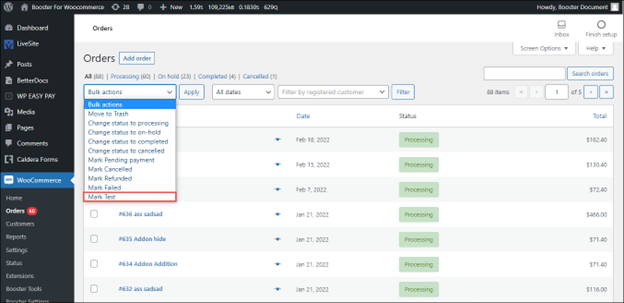
Output Example #
The Bulk actions list of the Admin Orders page with the custom order status Test added is shown in the screenshot below: